User Guide
Welcome to the User Guide for Eva!
If you are viewing this on the pdf version, use Adobe Acrobat Reader and zoom in to 200% for the best viewing experience!
This document is created by CS2101 G05 Team 1
- Ben-Hanan Choong See Kaay
- Hou Rui
- Royce Ho Shou Yee
- Tin Kah Ong Isaac
- Udayagiri Nikhila Sai
You may refer to our work distribution at the bottom of this document.
- 1. Introduction
- 2. Getting Started
-
3. Features
- 3.1. Eva GUI
- 3.2. System Commands
- 3.3. Staff commands
-
3.4. Applicant commands
- 3.4.1. List all applicants :
list a- - 3.4.2 Add an applicant:
adda - 3.4.3. Find an applicant :
find a- - 3.4.4. View :
view - 3.4.5. Delete an applicant:
dela - 3.4.6. Edit an applicant:
edita - 3.4.7. Add an application:
addapp - 3.4.8. Delete an application:
delapp - 3.4.9. Set application status:
setas - 3.4.10 Clear applicant database:
clear a-
- 3.4.1. List all applicants :
- 3.5. Comment Commands
- 3.6. Script Engine (Experimental)
- 4. FAQ
- 5. Command summary
- Appendix: Distribution of Contribution
1. Introduction

Welcome and thanks for downloading Eva!
What is Eva?
Eva is a simple and lightweight desktop application that handles HR related administrative tasks,
like managing your company staffs and recording details related to recruitment.
Eva comes with a Command Line Interface (CLI) which is faster than a typical mouse/GUI driven app after you or your staffs get used to it.
We hope that through our app, you and your company will be empowered and able to solve your basic HR needs.
This user guide will take you through the basics of Eva and help you get moving straightaway.
There are 3 types of messages you can look out for that will further enhance your experience in using Eva with this user guide.
![]() Note:
These notes are meant for additional information that will help you understand the segment better.
Do take note of these messages as you read the user guide
Note:
These notes are meant for additional information that will help you understand the segment better.
Do take note of these messages as you read the user guide
![]() Tip:
These tips will enable you to use Eva in a more efficient manner. So it will be beneficial for you to pay attention to these tips!
Tip:
These tips will enable you to use Eva in a more efficient manner. So it will be beneficial for you to pay attention to these tips!
![]() Important!
Important!
These messages are meant to alert you of certain consequences involved in the feature that might be important to you.
2. Getting Started
Before you begin, here’s a quick start guide on how to get Eva up and running on your computer!
-
Ensure you have Java
11or above installed in your Computer. -
Download the latest
Eva.jarfrom here. -
Copy the downloaded jar file to the folder you want to use as the home folder for Eva.
-
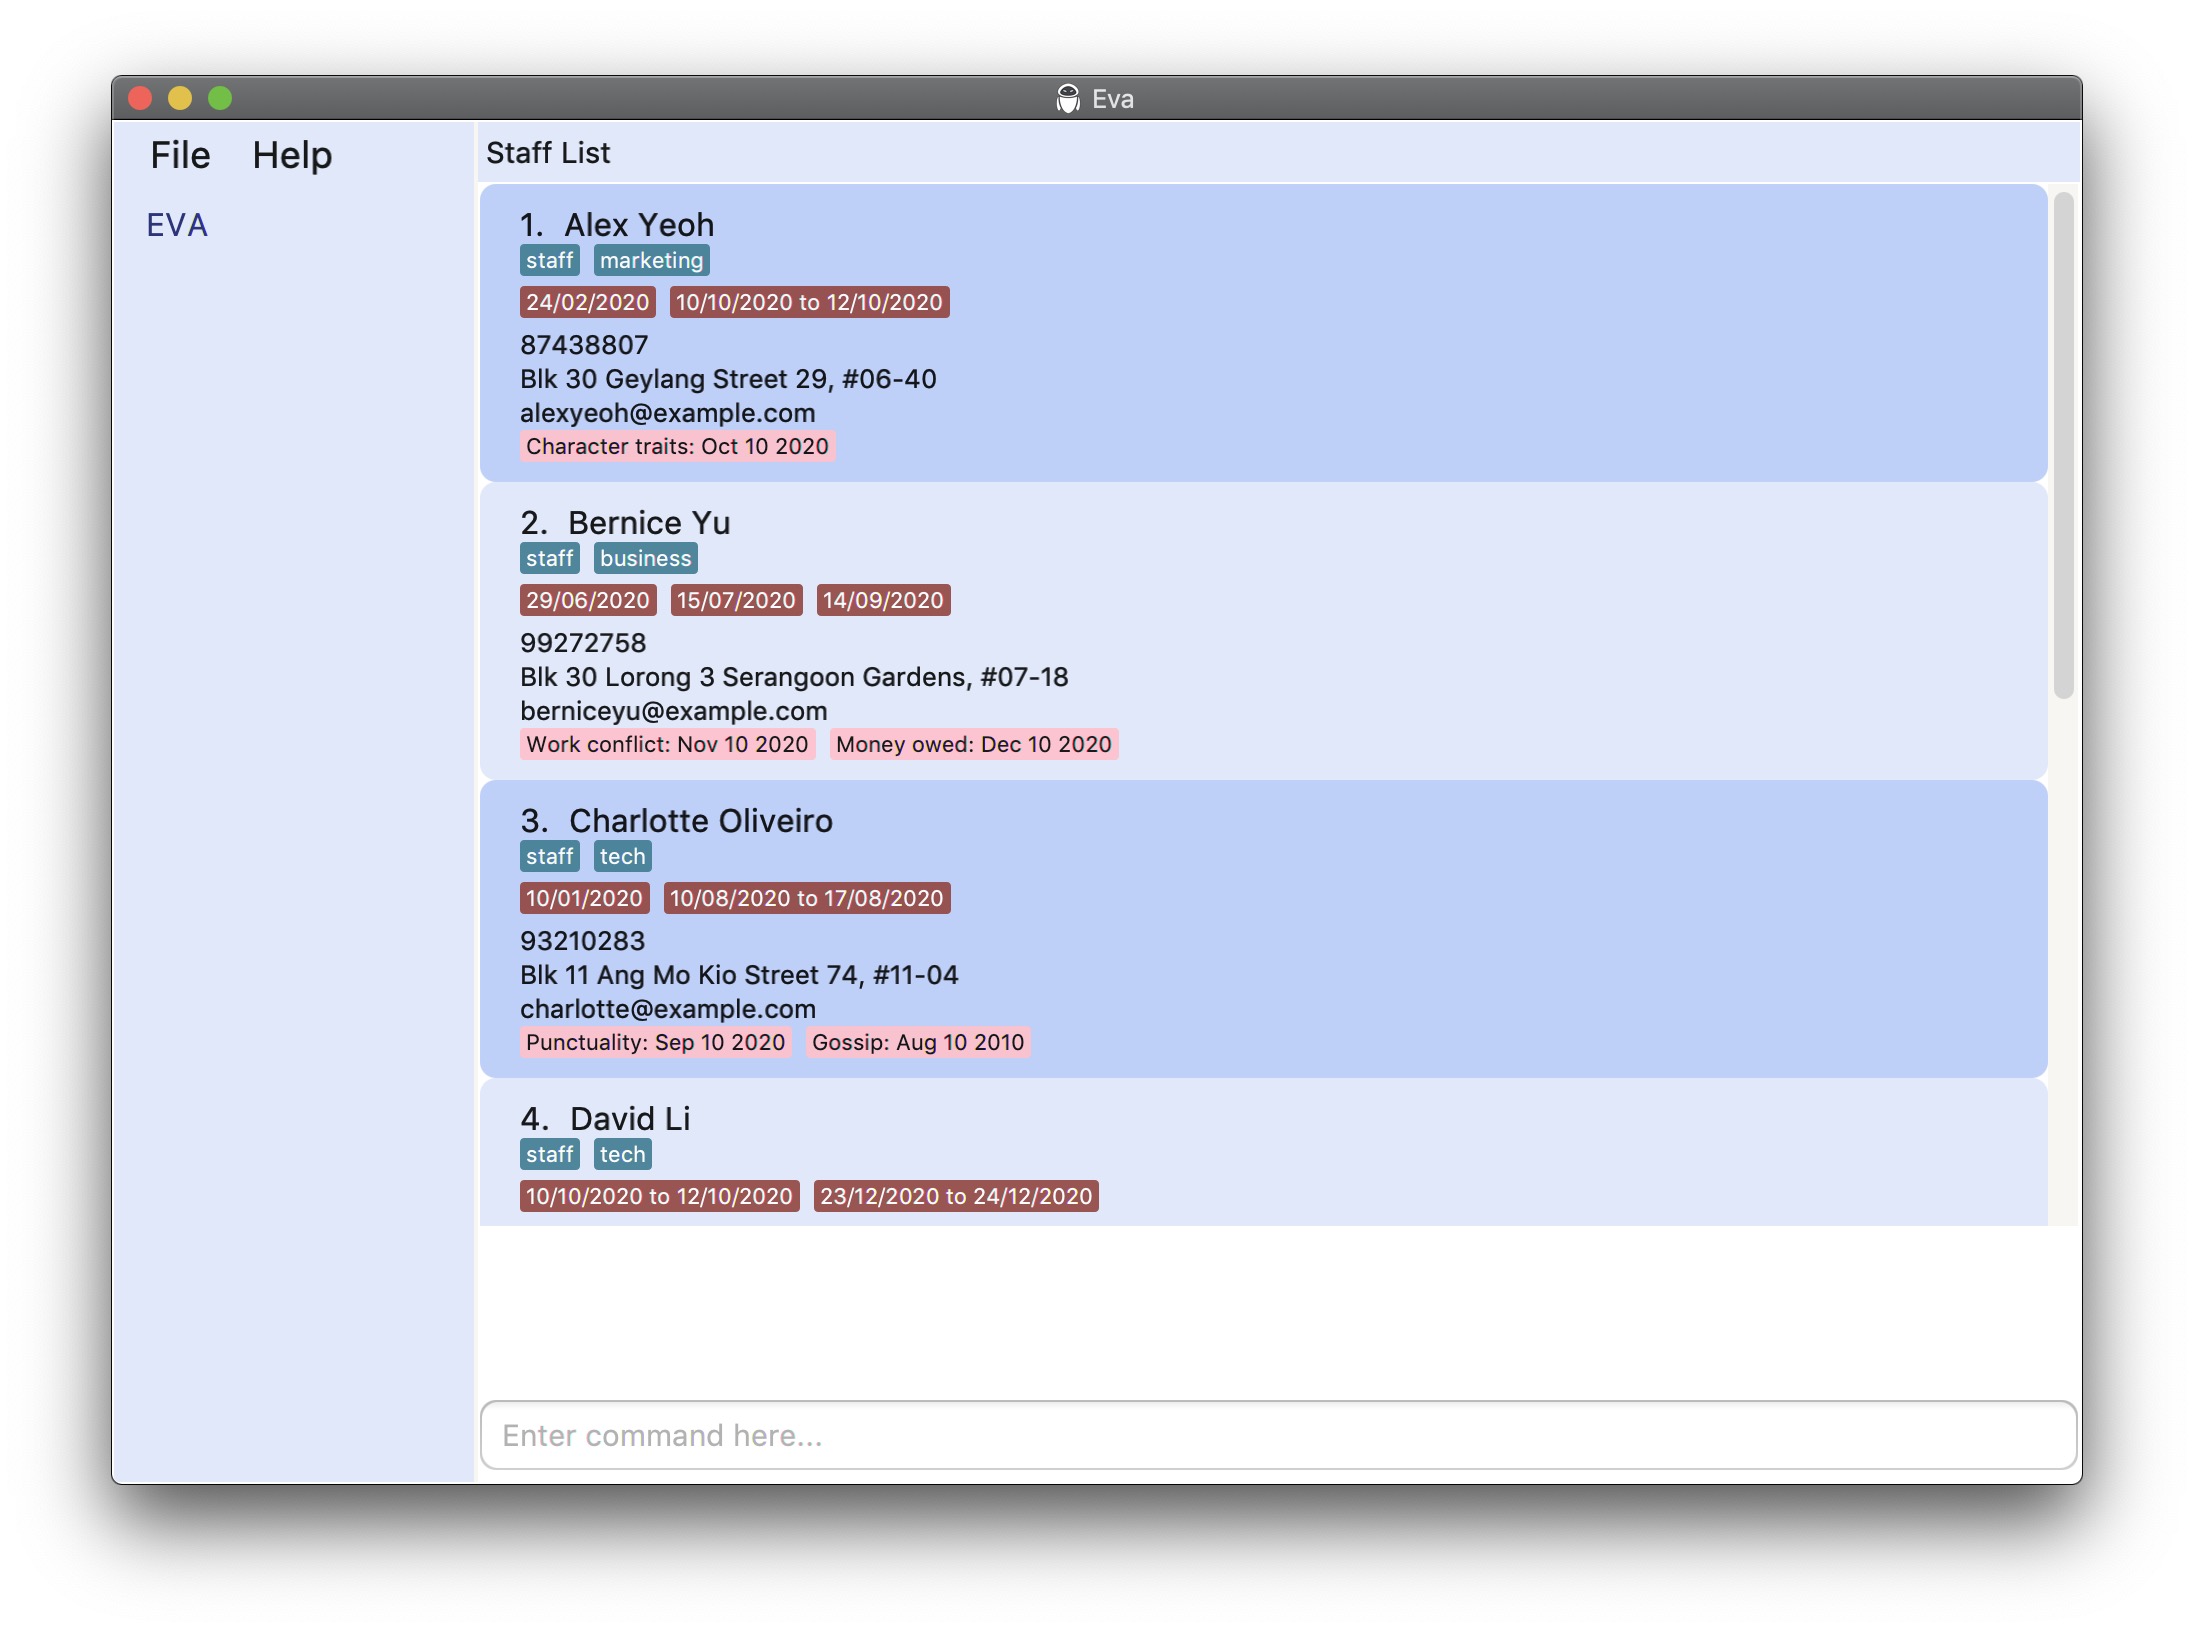
Double-click the file to start the app. If you face any issues, refer to our Frequently Asked Questions (FAQ) Section below. A GUI similar to the one below should appear in a few seconds. Note how the app generate some sample data when you first launch it!
-
Type a command in the command box and press Enter to execute it. e.g. typing
helpand pressing Enter will open the help window.Here are some example commands you can try:
-
list a-: Lists all applicants, changes the panel to display the applicant list. -
addan/John Doe p/98765432 e/johnd@example.com a/John street, block 123, #01-01: Adds a staff namedJohn Doeto the application. -
list s-: Lists all staffs, changes the panel to display the staff list. -
addsn/John Doe p/98765432 e/johnd@example.com a/John street, block 123, #01-01: Adds a staff namedJohn Doeto the application. -
dels3: Deletes the 3rd staff shown in the staff list. -
addl1 l/d/08/10/2020 d/10/10/2020 l/d/20/10/2020: Adds two leave records with dates08/10/2020 to 10/10/2020and20/10/2020to the 1st staff shown in the current list. -
dell1 10/10/2020: Deletes the leave record containing the date10/10/2020from the 1st person in the current list. -
find s-Doe: Finds the staff whose name contains “Doe”. -
clear s-: Clears the staff database. -
exit: Exits the app.
-
-
That’s it! Now, you can refer to the Features below for details of each command.
3. Features
![]() Notes about the command format:
Notes about the command format:
Here are some general information you would need to know about our commands as you read through the user guide.
-
Words in
UPPER_CASEare the parameters to be supplied by the user.
e.g. inadd n/NAME,NAMEis a parameter which can be used asadd n/John Doe. -
Items in square brackets are optional.
e.gn/NAME [t/TAG]can be used asn/John Doe t/friendor asn/John Doe. -
Items with
… after them can be used multiple times including zero times.
e.g.[t/TAG]…can be used ast/friend,t/friend t/familyetc. -
Parameters can be in any order.
e.g. if the command specifiesn/NAME p/PHONE_NUMBER,p/PHONE_NUMBER n/NAMEis also acceptable. -
Upon the accidental inclusion of fields that are not meant to be repeated, Eva only takes the last parameter entered.
e.g. The commandadds n/John Doe n/Alex Yeoh p/98765432 e/email@email.com a/123 test st p/23456789, will be recognised asadds n/Alex Yeoh e/email@email.com a/123 test st p/23456789
In Eva, using our commands, you can store and access information about staff and applicants. Information includes details like name, phone number and more. As such, in order to store and access these details in a neat and tidy manner, be sure to follow these guidelines on storing and accessing these details as shown in the table below.
| Field | Constraints | Example |
|---|---|---|
NAME |
can contain only alphanumeric characters, cannot be blank, and has a character limit of 70 characters. | John Doe |
EMAIL |
should be of the format local-part@domain where the local-part should contain alphanumeric characters or special characters which includes the characters !#$%&'*+/=?`{|}~^.-_ The domain name should have at least 2 characters and contain only alphanumeric with a period or a hyphen for the characters in between if needed. |
john_Doe12345@example123.com |
PHONE |
can only contain numbers, and must be between 8 and 20 digits long. |
6590018978 |
TAG |
can only contain alphanumeric characters, cannot be blank, and has a character limit of 25 characters. | hardworking |
INDEX |
The index of the staff or applicant It must be a valid index number. |
2 Note: This index will represent the staff/applicant with index-2 in the displayed list. |
DATE |
must be in the format DD/MM/YYYY
|
06/07/2020 represents the 6th of July 2020Note: Eva automatically corrects wrong dates like 30/02/2020 and 31/11/2020 to 29/02/2020 and 30/11/2020 respectively. |
![]() Tip:
Tip:
Eva automatically saves any changes made to the records in your hard disk when using the commands below!
There is no need to save manually!
You can also find the records in the data folder where the eva.jar file is located.
Here is a brief overview on how this section is arranged.
The first section brings you through the different panels you will see in our application. After getting familiar with that, we will share some general system commands you can use at any point in time.
In the third section, we will bring you through the features we have implemented for staff.
Following which, you will be introduced to the features for managing applicant records.
Finally, you will learn about how to add and delete comments to applicants and staff and our very own unique script engine (experimental feature). By then, you will definitely become a master in using Eva! So let’s get started!
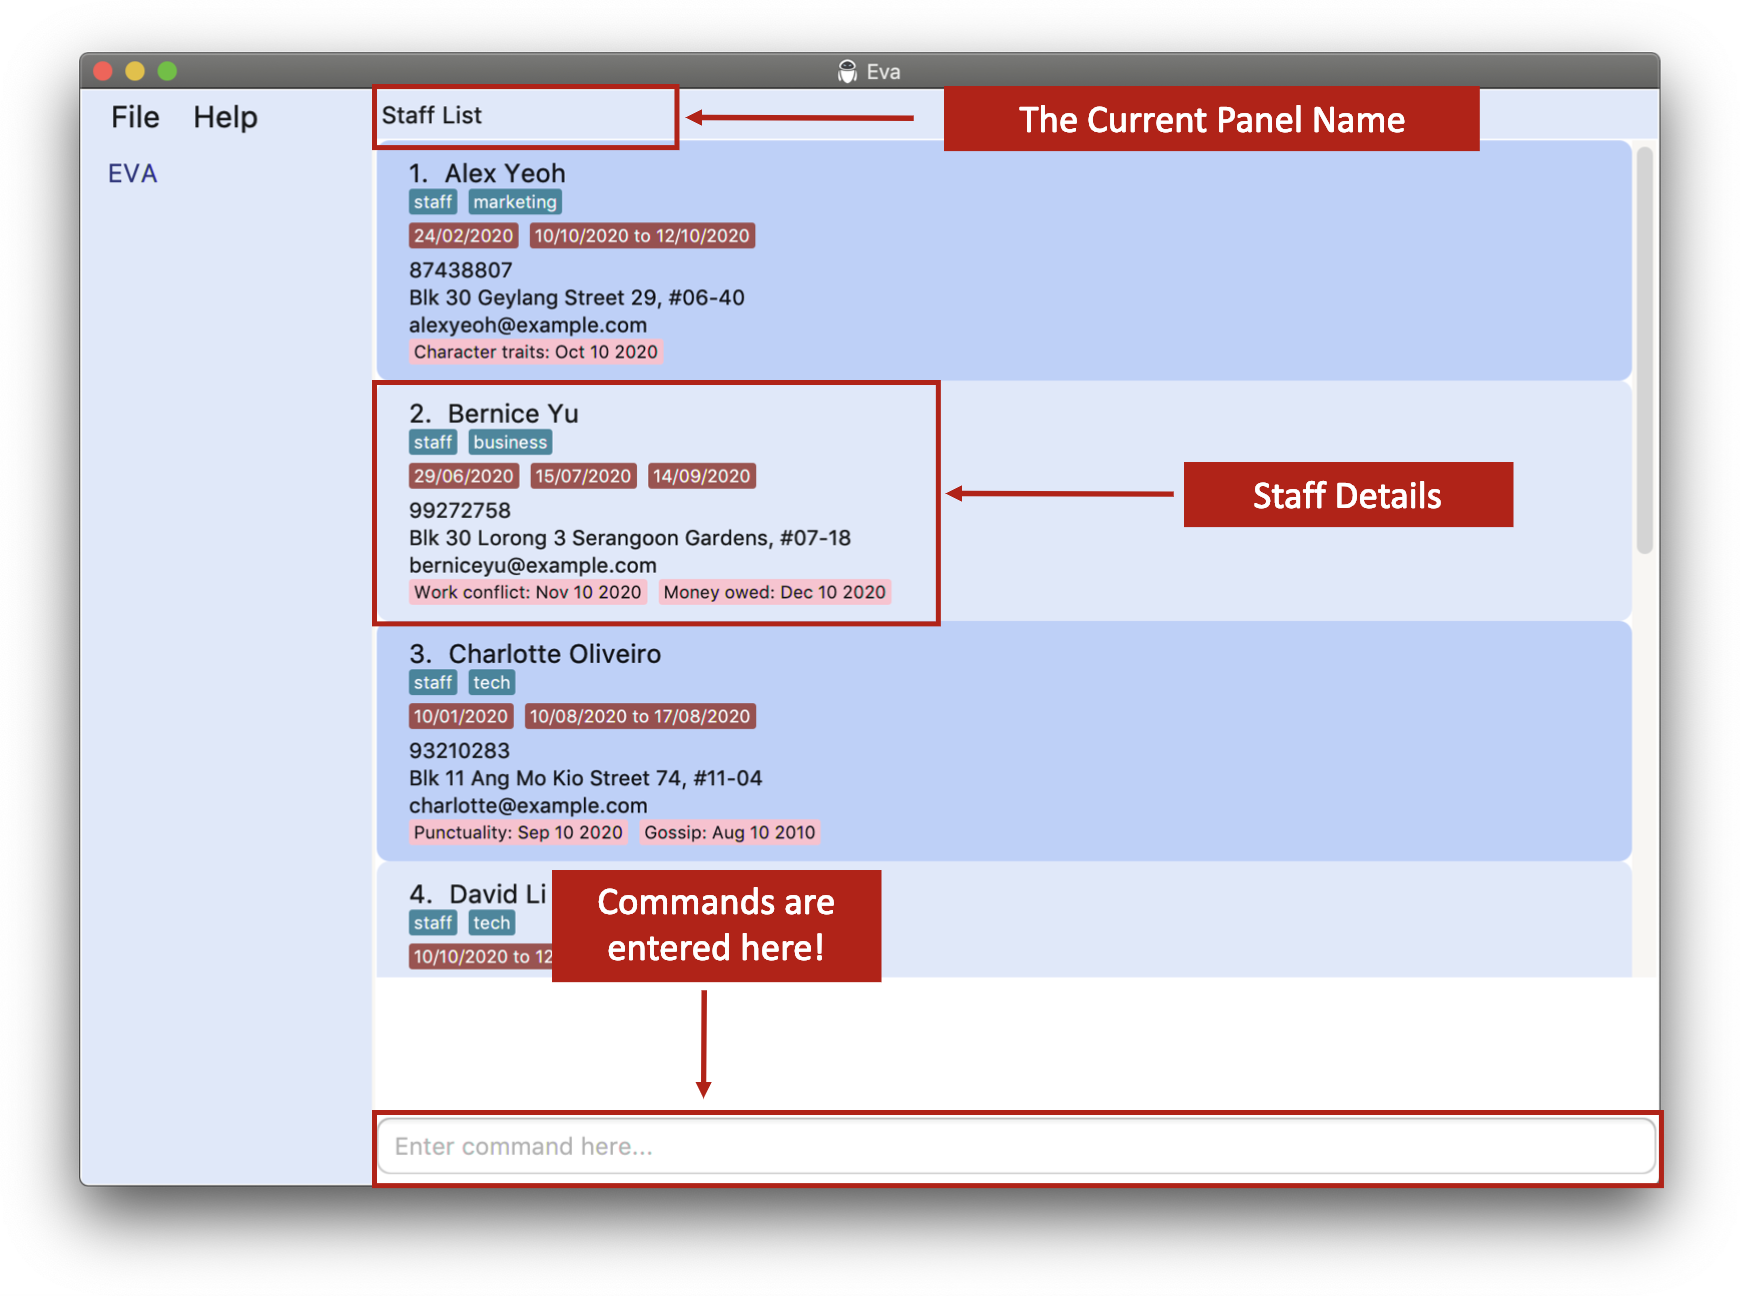
3.1. Eva GUI
Before we dive into the features, let us help you familiarize yourself with our GUI!
As of v1.4, Eva currently has four different panels it can switch between:
3.1.1. Staff List : Staff List Panel
This panel is where you can see all your staffs in a condensed list view.
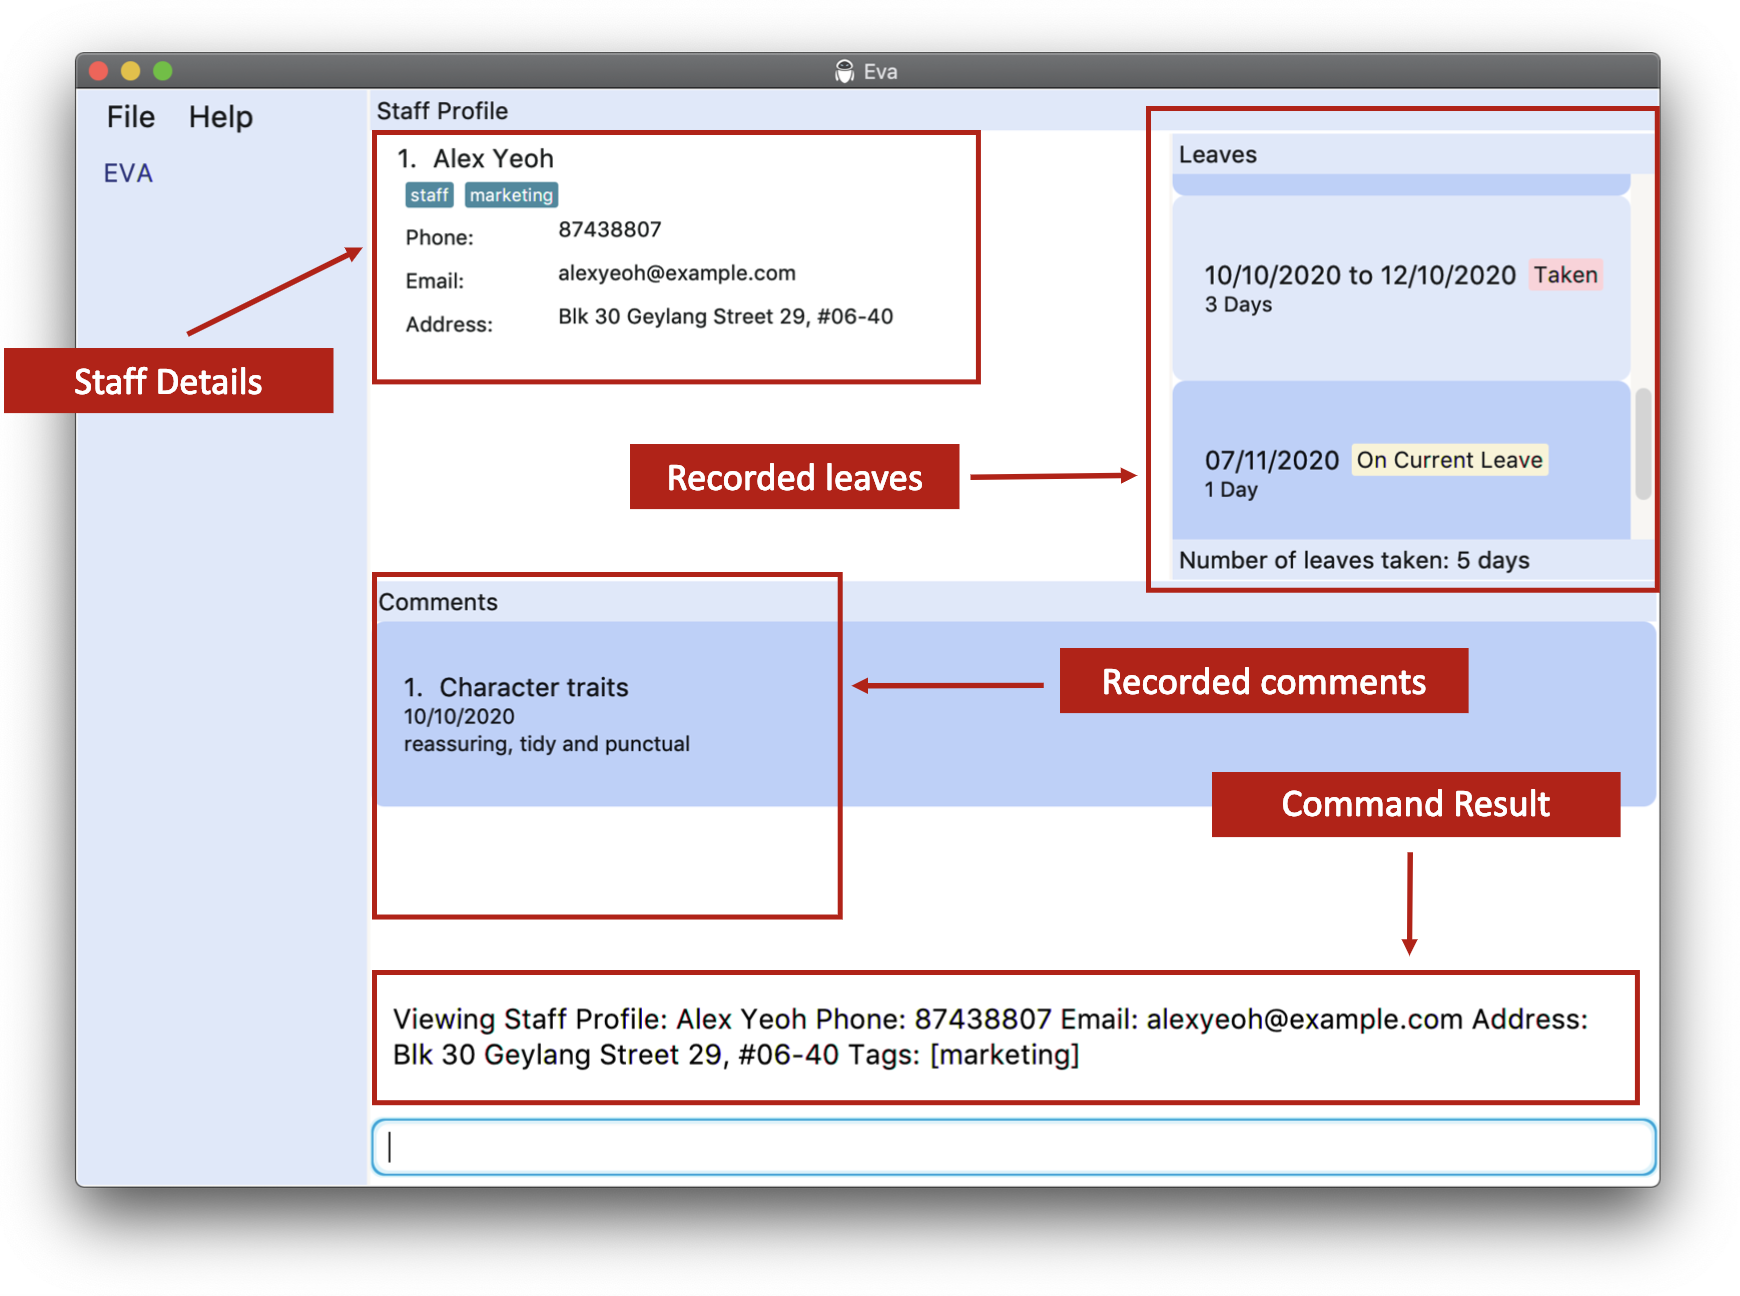
3.1.2. Staff Profile : Staff Profile Panel
This is where you can zoom in on an individual staff and view more information about their leaves and comments.
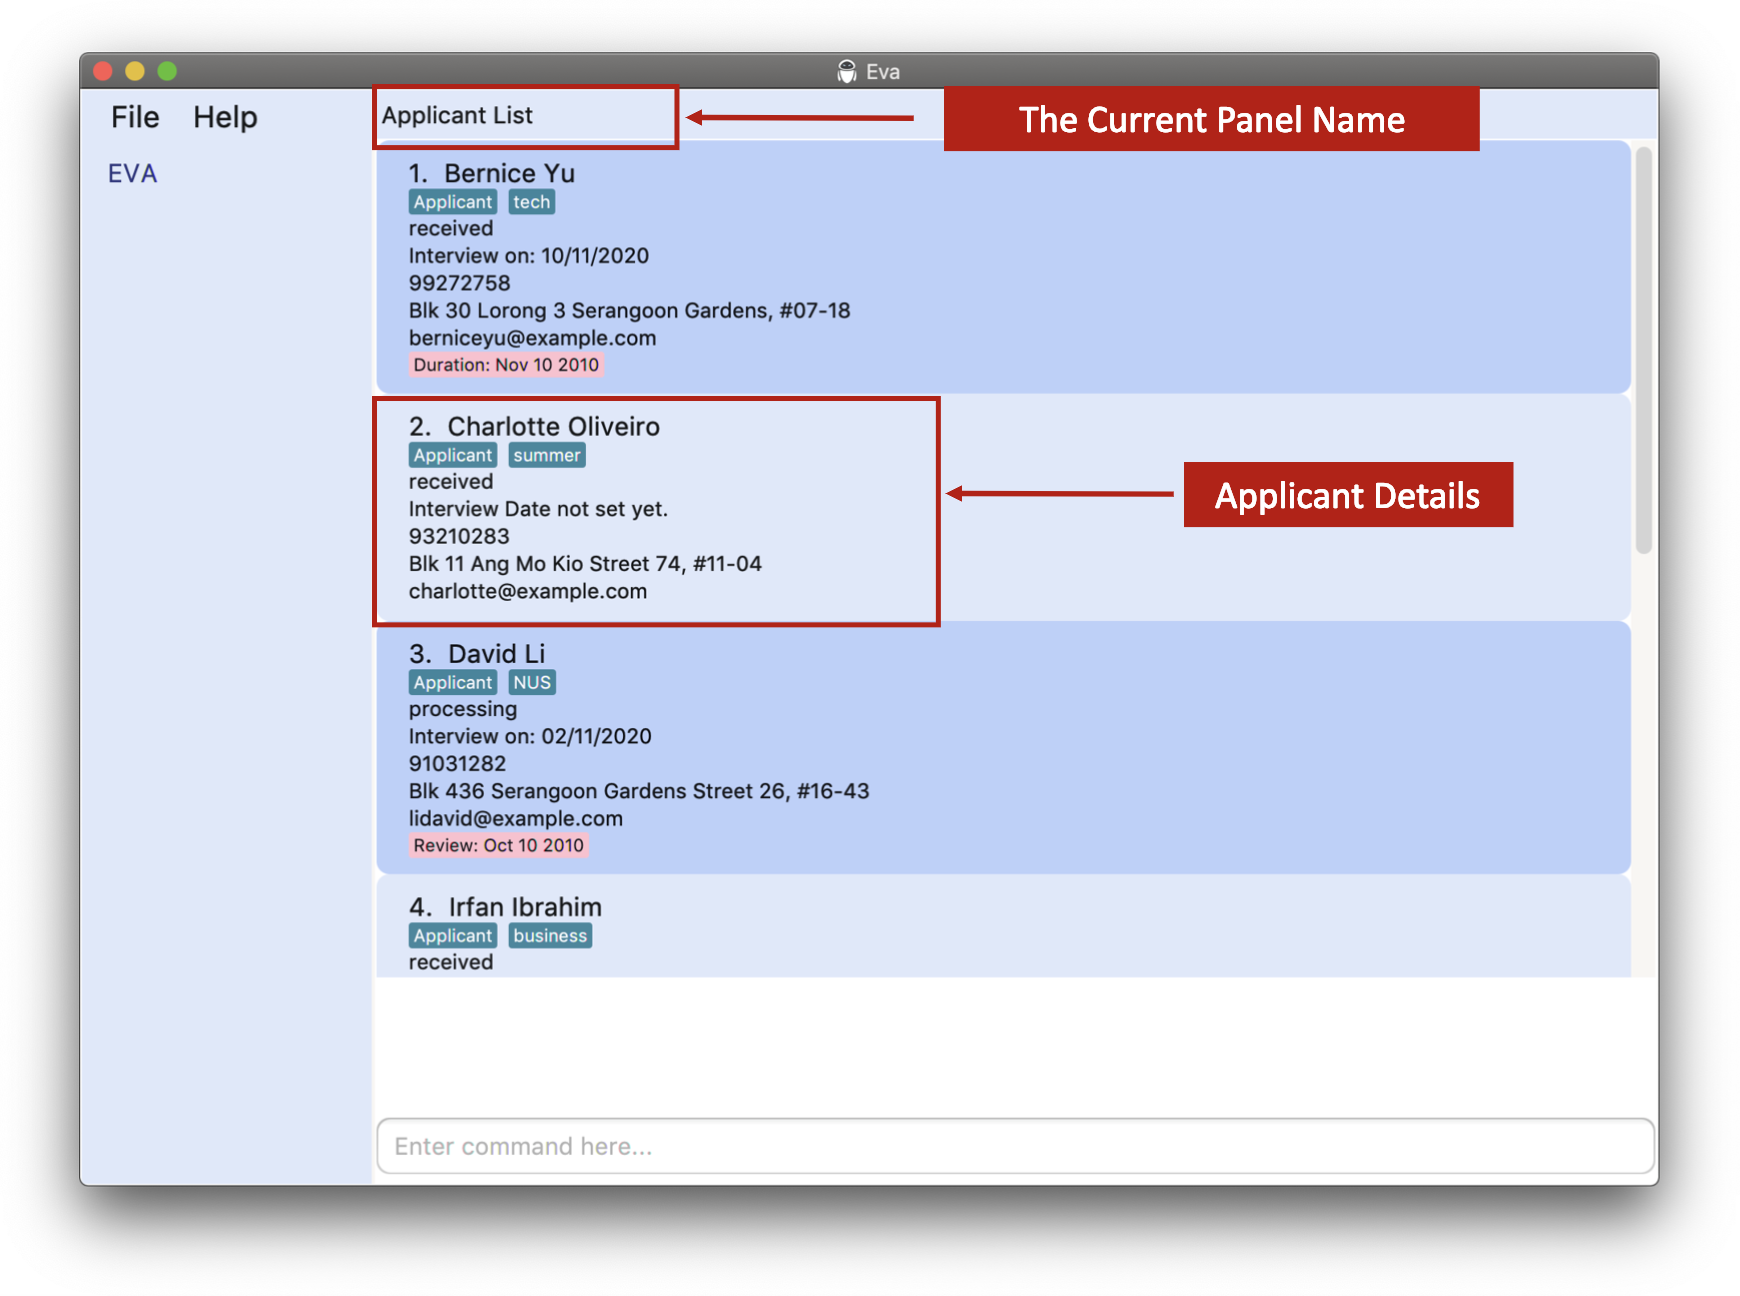
3.1.3. Applicant List : Applicant List Panel
Similar to the Staff List, this is where you can see all your applicants in a condensed list view.
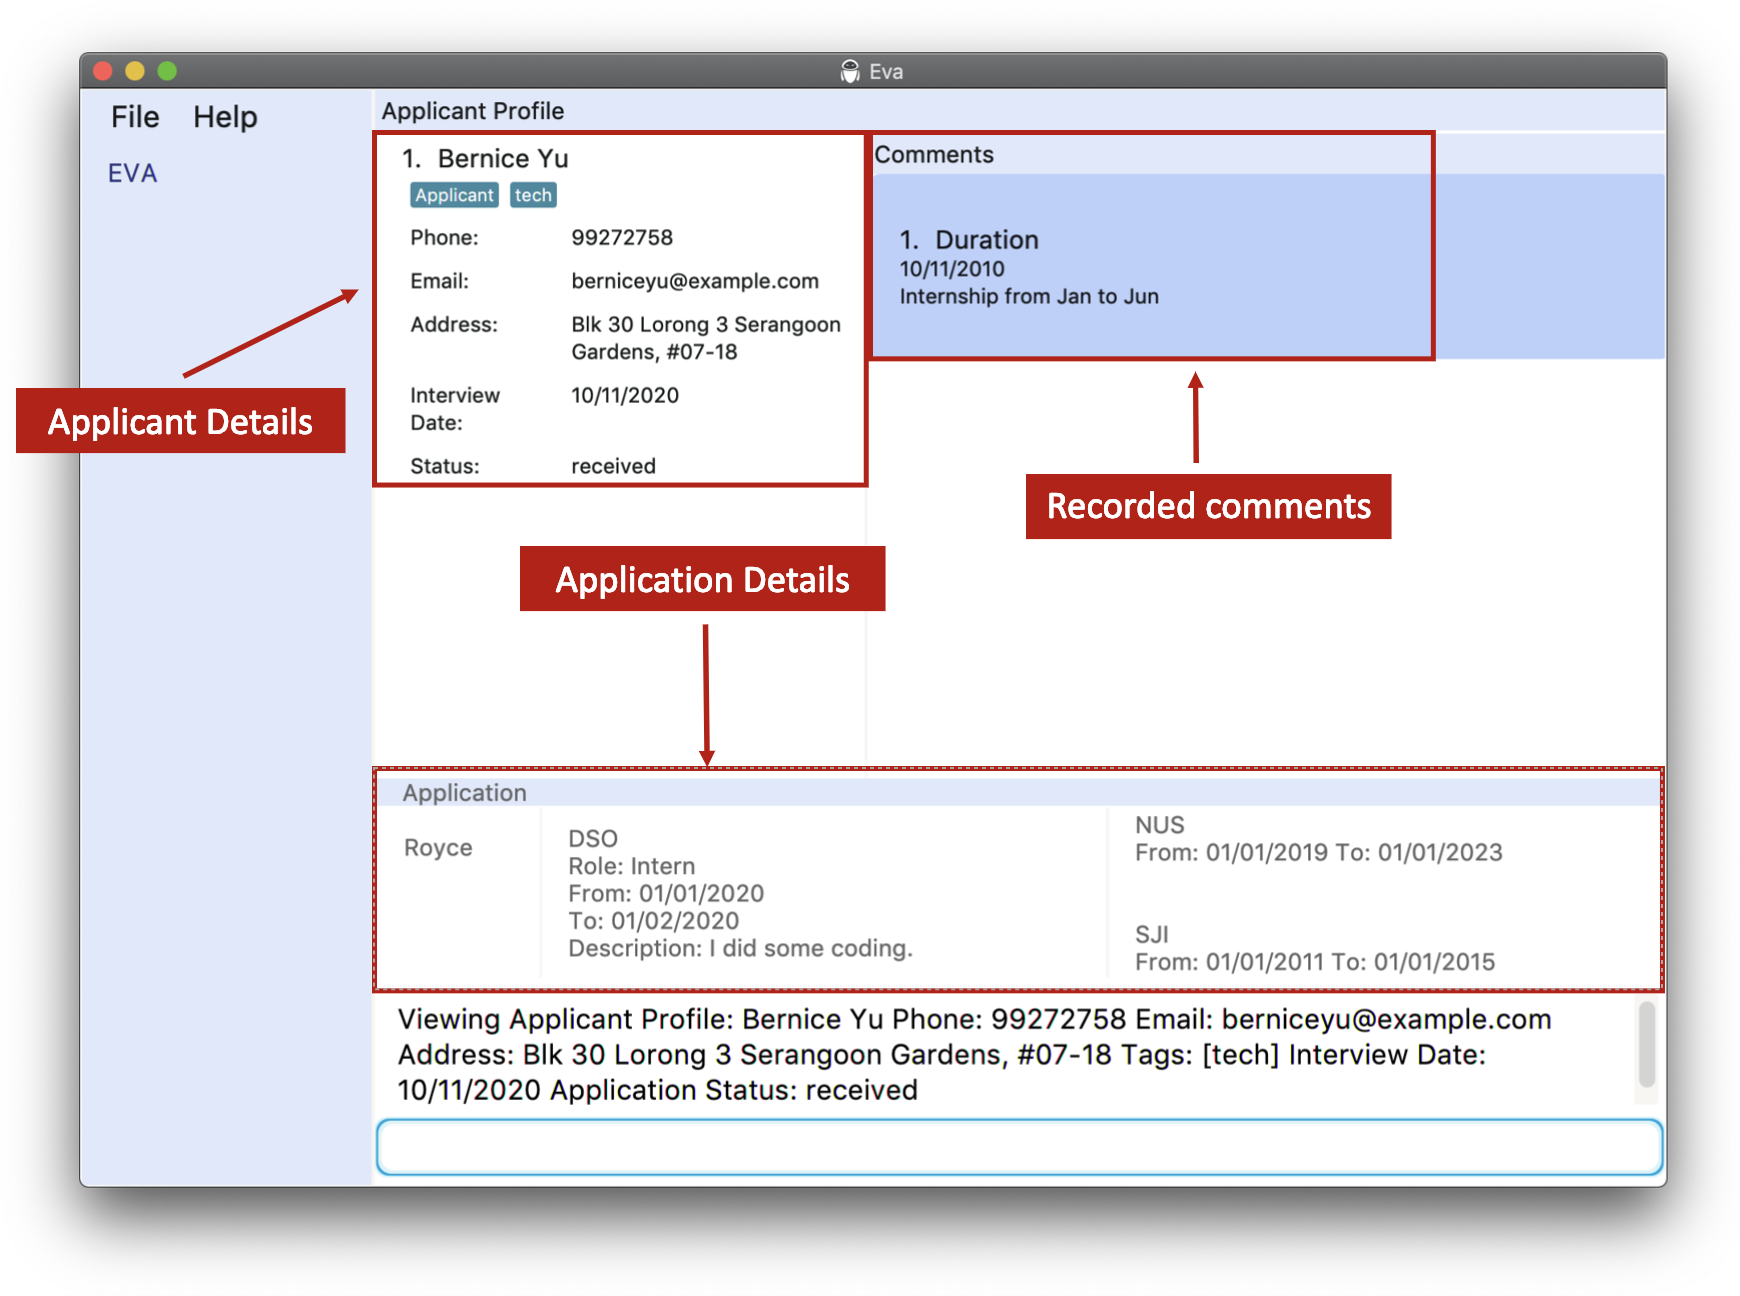
3.1.4. Applicant Profile : Applicant Profile Panel
This is also similar to the Staff Profile where you can zoom in on an individual applicant and view more information about them.
However, notice how the placement of the comments section differs from the Staff List.
These four panels form the core of Eva to be sure to familiarize yourself with them! Once ready, move on to the Commands!
![]() Note:
Eva launches into the
Note:
Eva launches into the Staff List Panel by default.
However, Eva remembers which list you last looked at and will open at Applicant List Panel if you exited the app from there!
3.2. System Commands
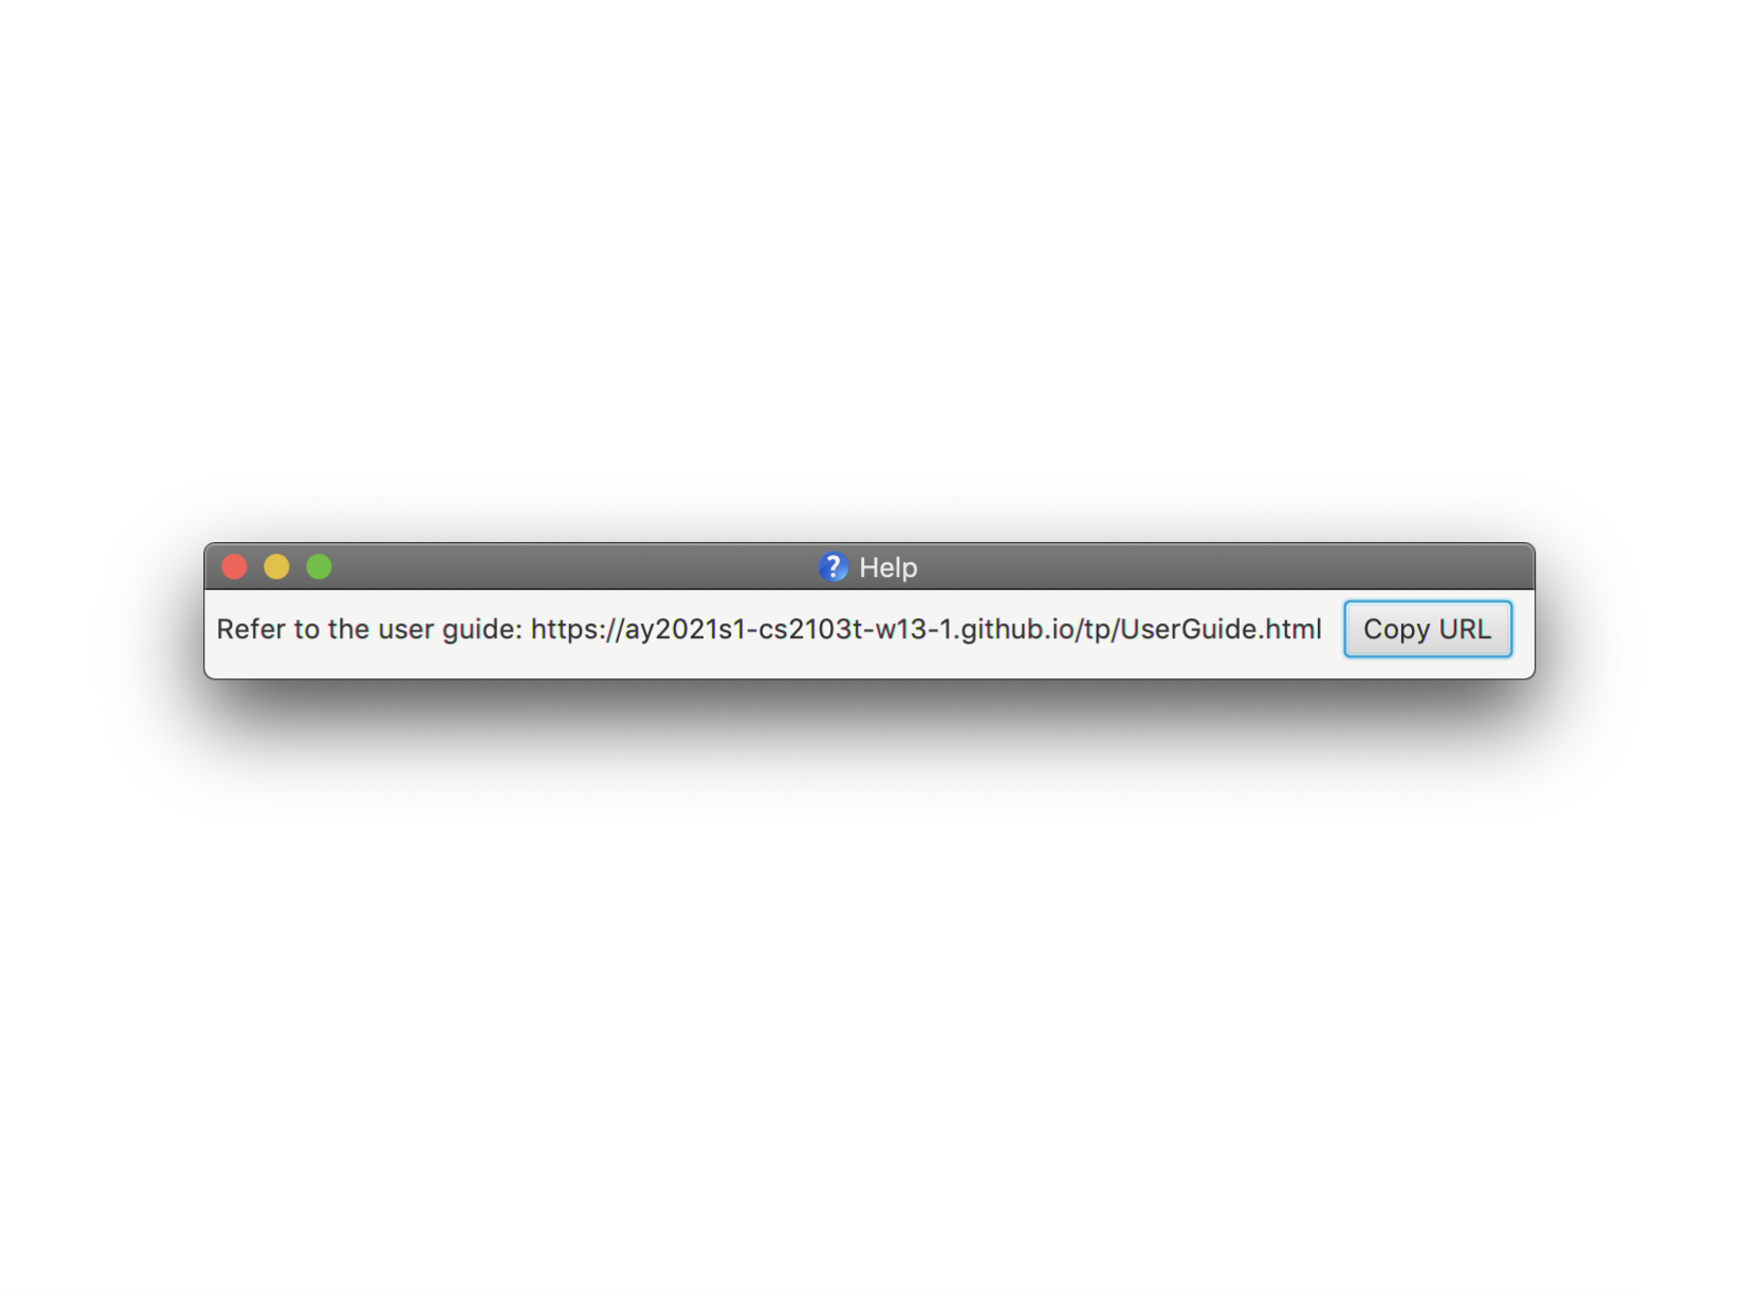
3.2.1. Open help window : help
If you’re not sure of how to use Eva at any point in time, use the help command!
The help command shows a message explaining how to access the help page.
Format: help
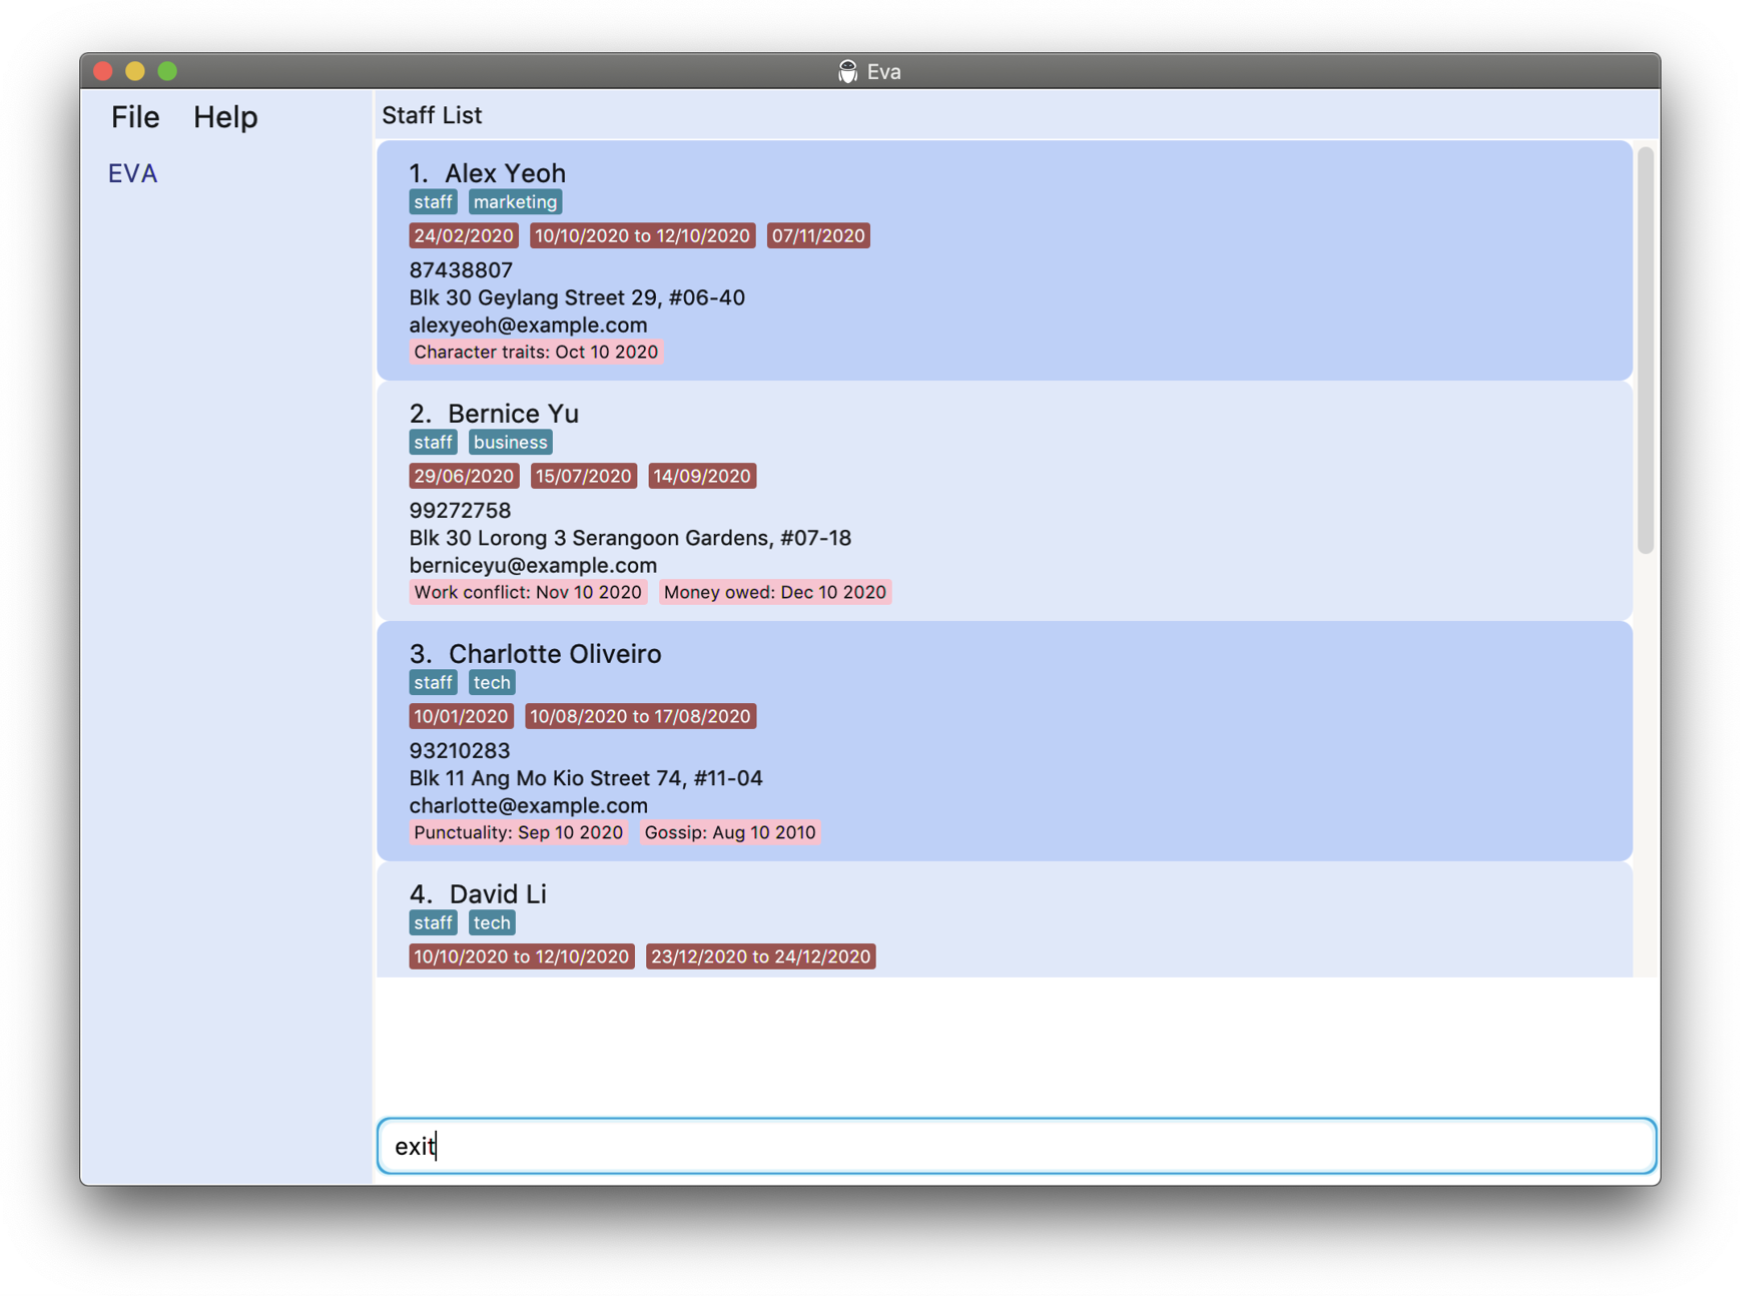
3.2.2. Exit the program : exit
Done using Eva? The exit command exits the program!
Format: exit
![]() Note: The exit command immediately closes the app upon execution.
Note: The exit command immediately closes the app upon execution.
As mentioned earlier in Features, there is no need to manually save data! So don’t worry if you accidentally close your app!
3.3. Staff commands
Eva makes use of these staff commands to give you the ability to keep track of your staffs which help you make business and manpower decisions.
![]() Note:
Note:
-
All commands under staff can only be done on either
Staff ListorStaff Profileexceptadds, which can be done on any panel. -
On a
Staff Profile, only the details of the profile that is being viewed can be changed.
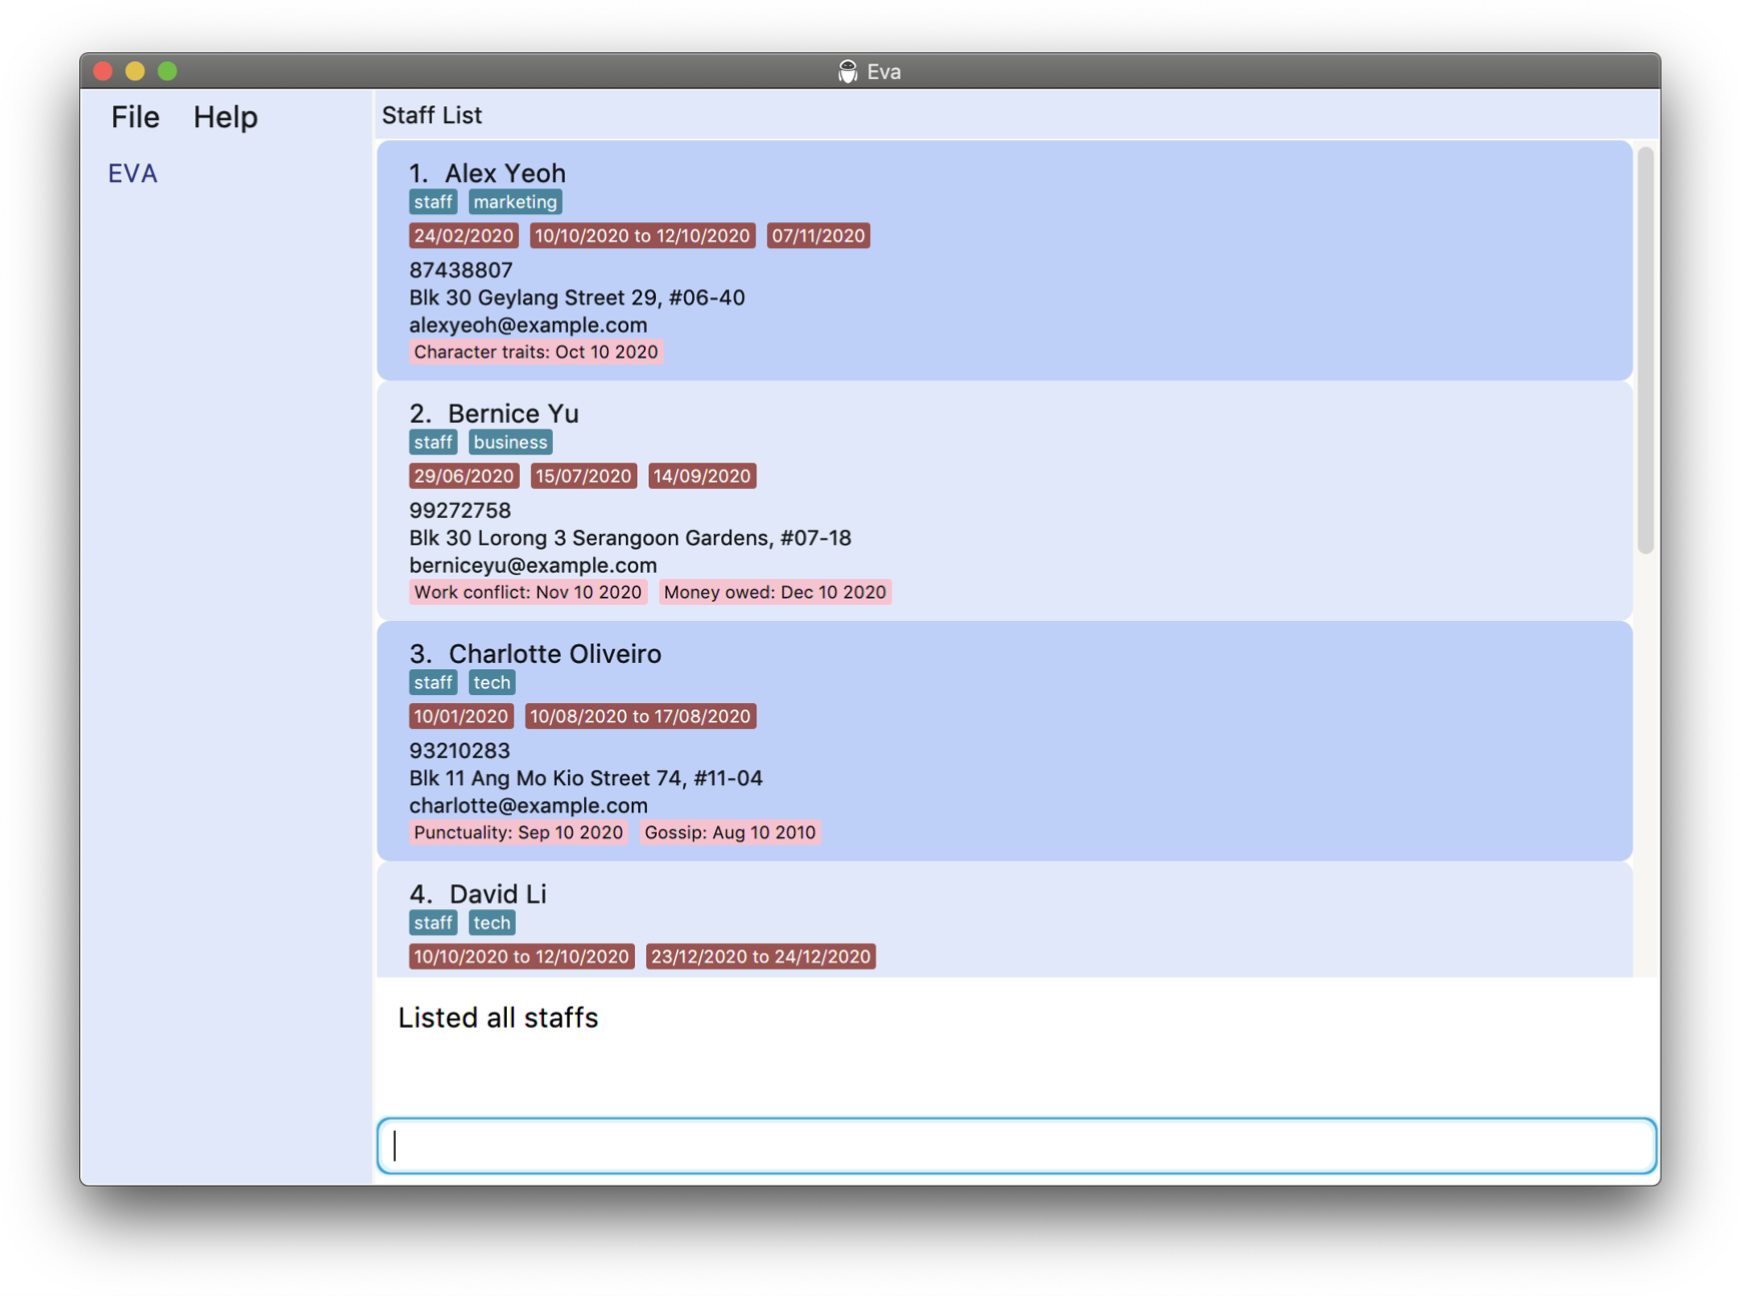
3.3.1. List all staff : list s-
The Staff List Panel panel serves as your primary tool to give you an overview of all the staffs in your company.
This command changes the panel to the Staff List and shows a list of all staffs in the Eva Database.
Format: list s-
The image below shows what you would see after executing this example.
3.3.2. Add a staff : adds
As storing staff records is a primary activity in Eva, you can use this command to add a staff record into Eva.
![]() Note:
Note:
A staff record can contain the details listed below:
- Name*
- Phone Number*
- Email*
- Address*
- Tags
- Comments
- Leaves
The fields marked with a asterisk (*) are compulsory and have to be provided in the parameters below.
Without any one of these fields, Eva will not accept your input.
Tags and comments can be added with this adds command as shown in the examples.
To manage leave records for each staff, please refer to the commands
addl and dell.
Below are some notes about the parameters you can add:
- A staff can have any number of tags (including 0)
- A staff can have any number of comments (including 0)
- Each staff is uniquely identified by their name. In the event you wish to add 2 staff records with the same name, please ensure that both their phone number and email addresses are different
![]() Tip:
Tip:
-
The details of each field can be provided in any order.
-
In the case of multiple similar prefixes, the argument of the last prefix will be used (excluding tags and comments).
Format: adds n/NAME p/PHONE_NUMBER e/EMAIL a/ADDRESS [t/TAG]…[c/COMMENTS]…
Examples:
- To add only the necessary fields
adds n/John Doe p/98765432 e/johnd@example.com a/John street, block 123, #01-01 - To add a comment along with the necessary fields
adds n/Kristina Ryan e/betsycrowe@example.com a/Betsy street, block 123, #01-01 p/12345678 c/ ti/Behaviour d/20/12/2020 desc/Very enthusiastic in meetings - To add a tag along with the necessary fields
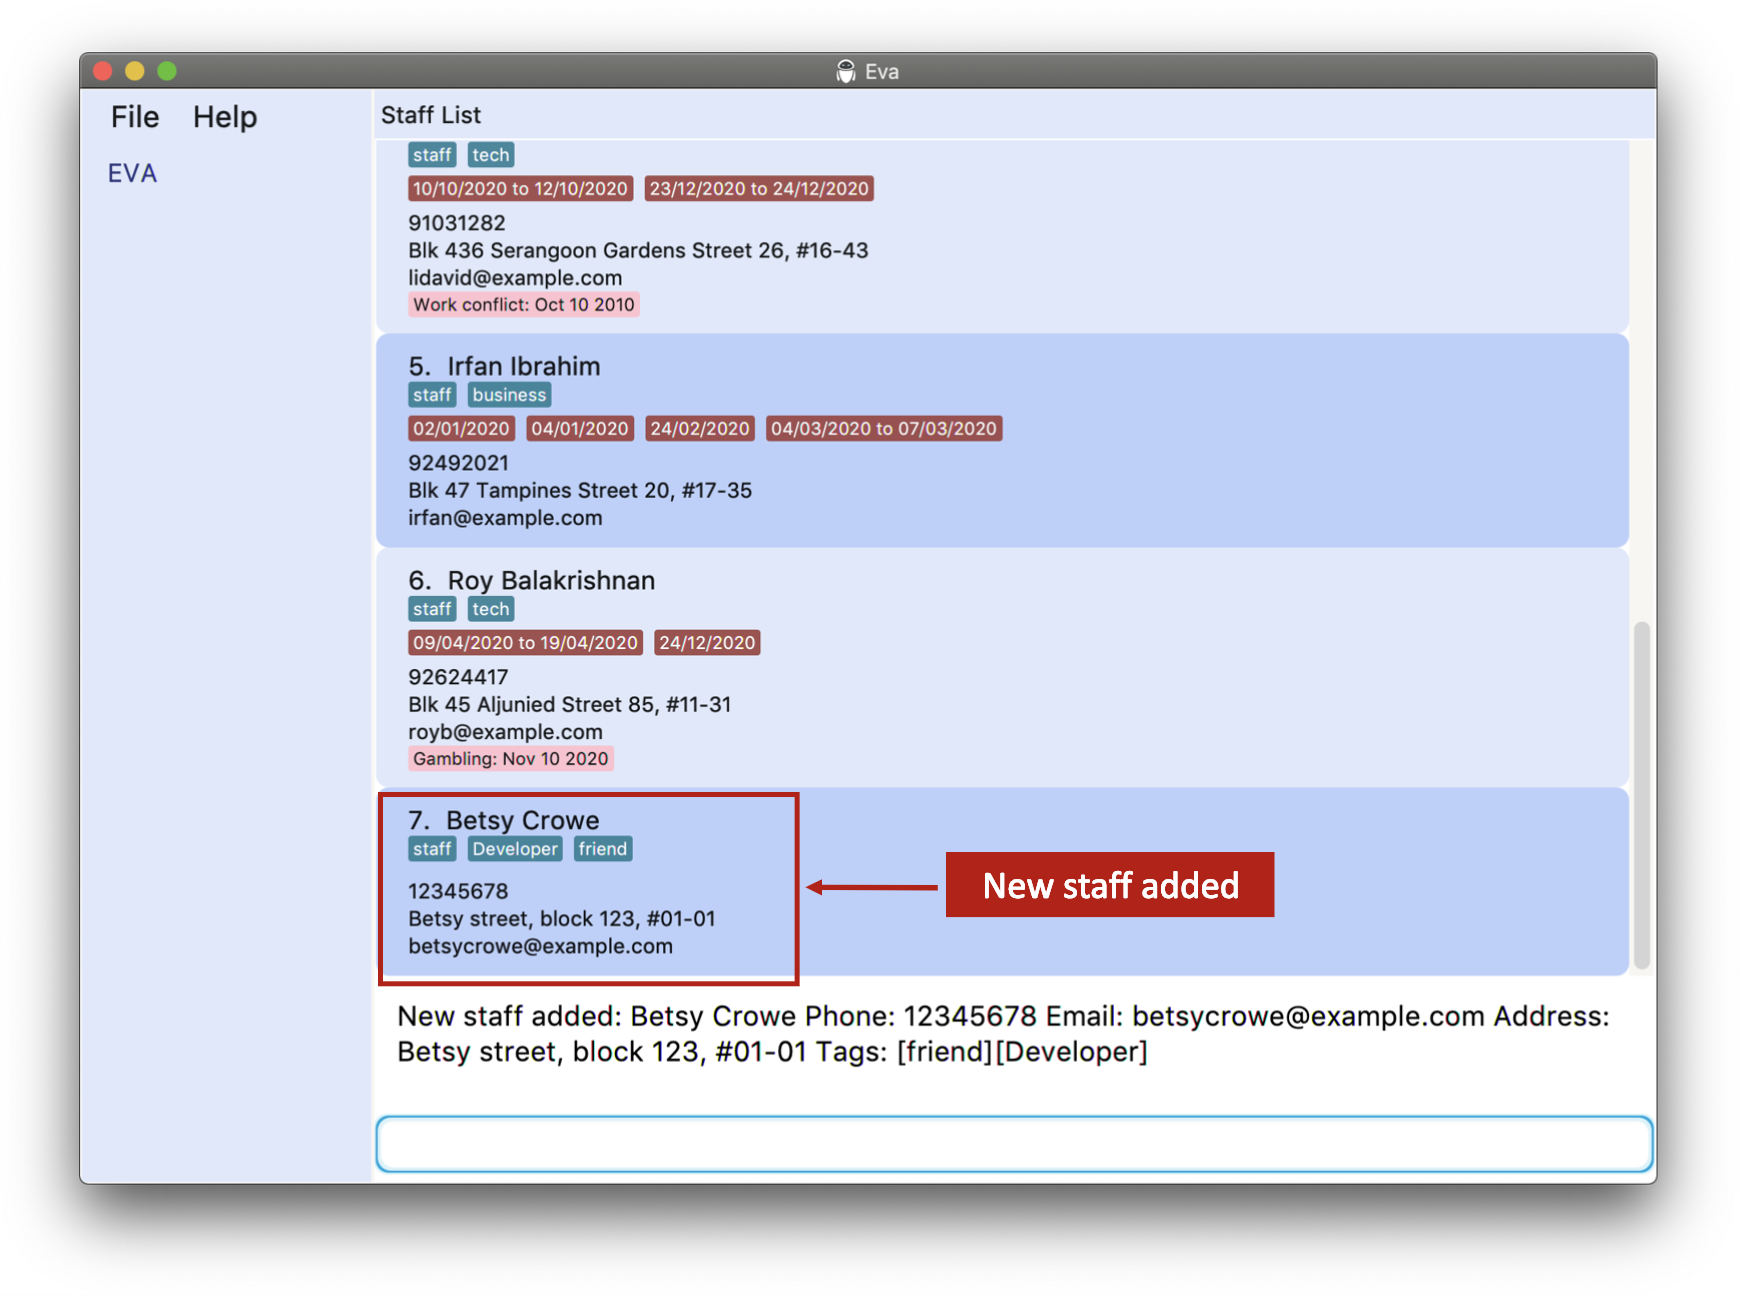
adds n/Betsy Crowe t/friend e/betsycrowe@example.com a/Betsy street, block 123, #01-01 p/12345678 t/Developer
The image below shows what you would see after executing the last example given. Notice that Betsy Crowe is now recorded as a staff in our database.
3.3.3. Find a staff : find s-
The command serves as a tool to help you quickly find all the staffs with the given name in your company.
This command will show a list of staffs whose name contains one of the given names. It changes the panel to the Staff List to display the result.
Format find FIND_TYPE- KEYWORD
Examples:
-
find s- Doe -
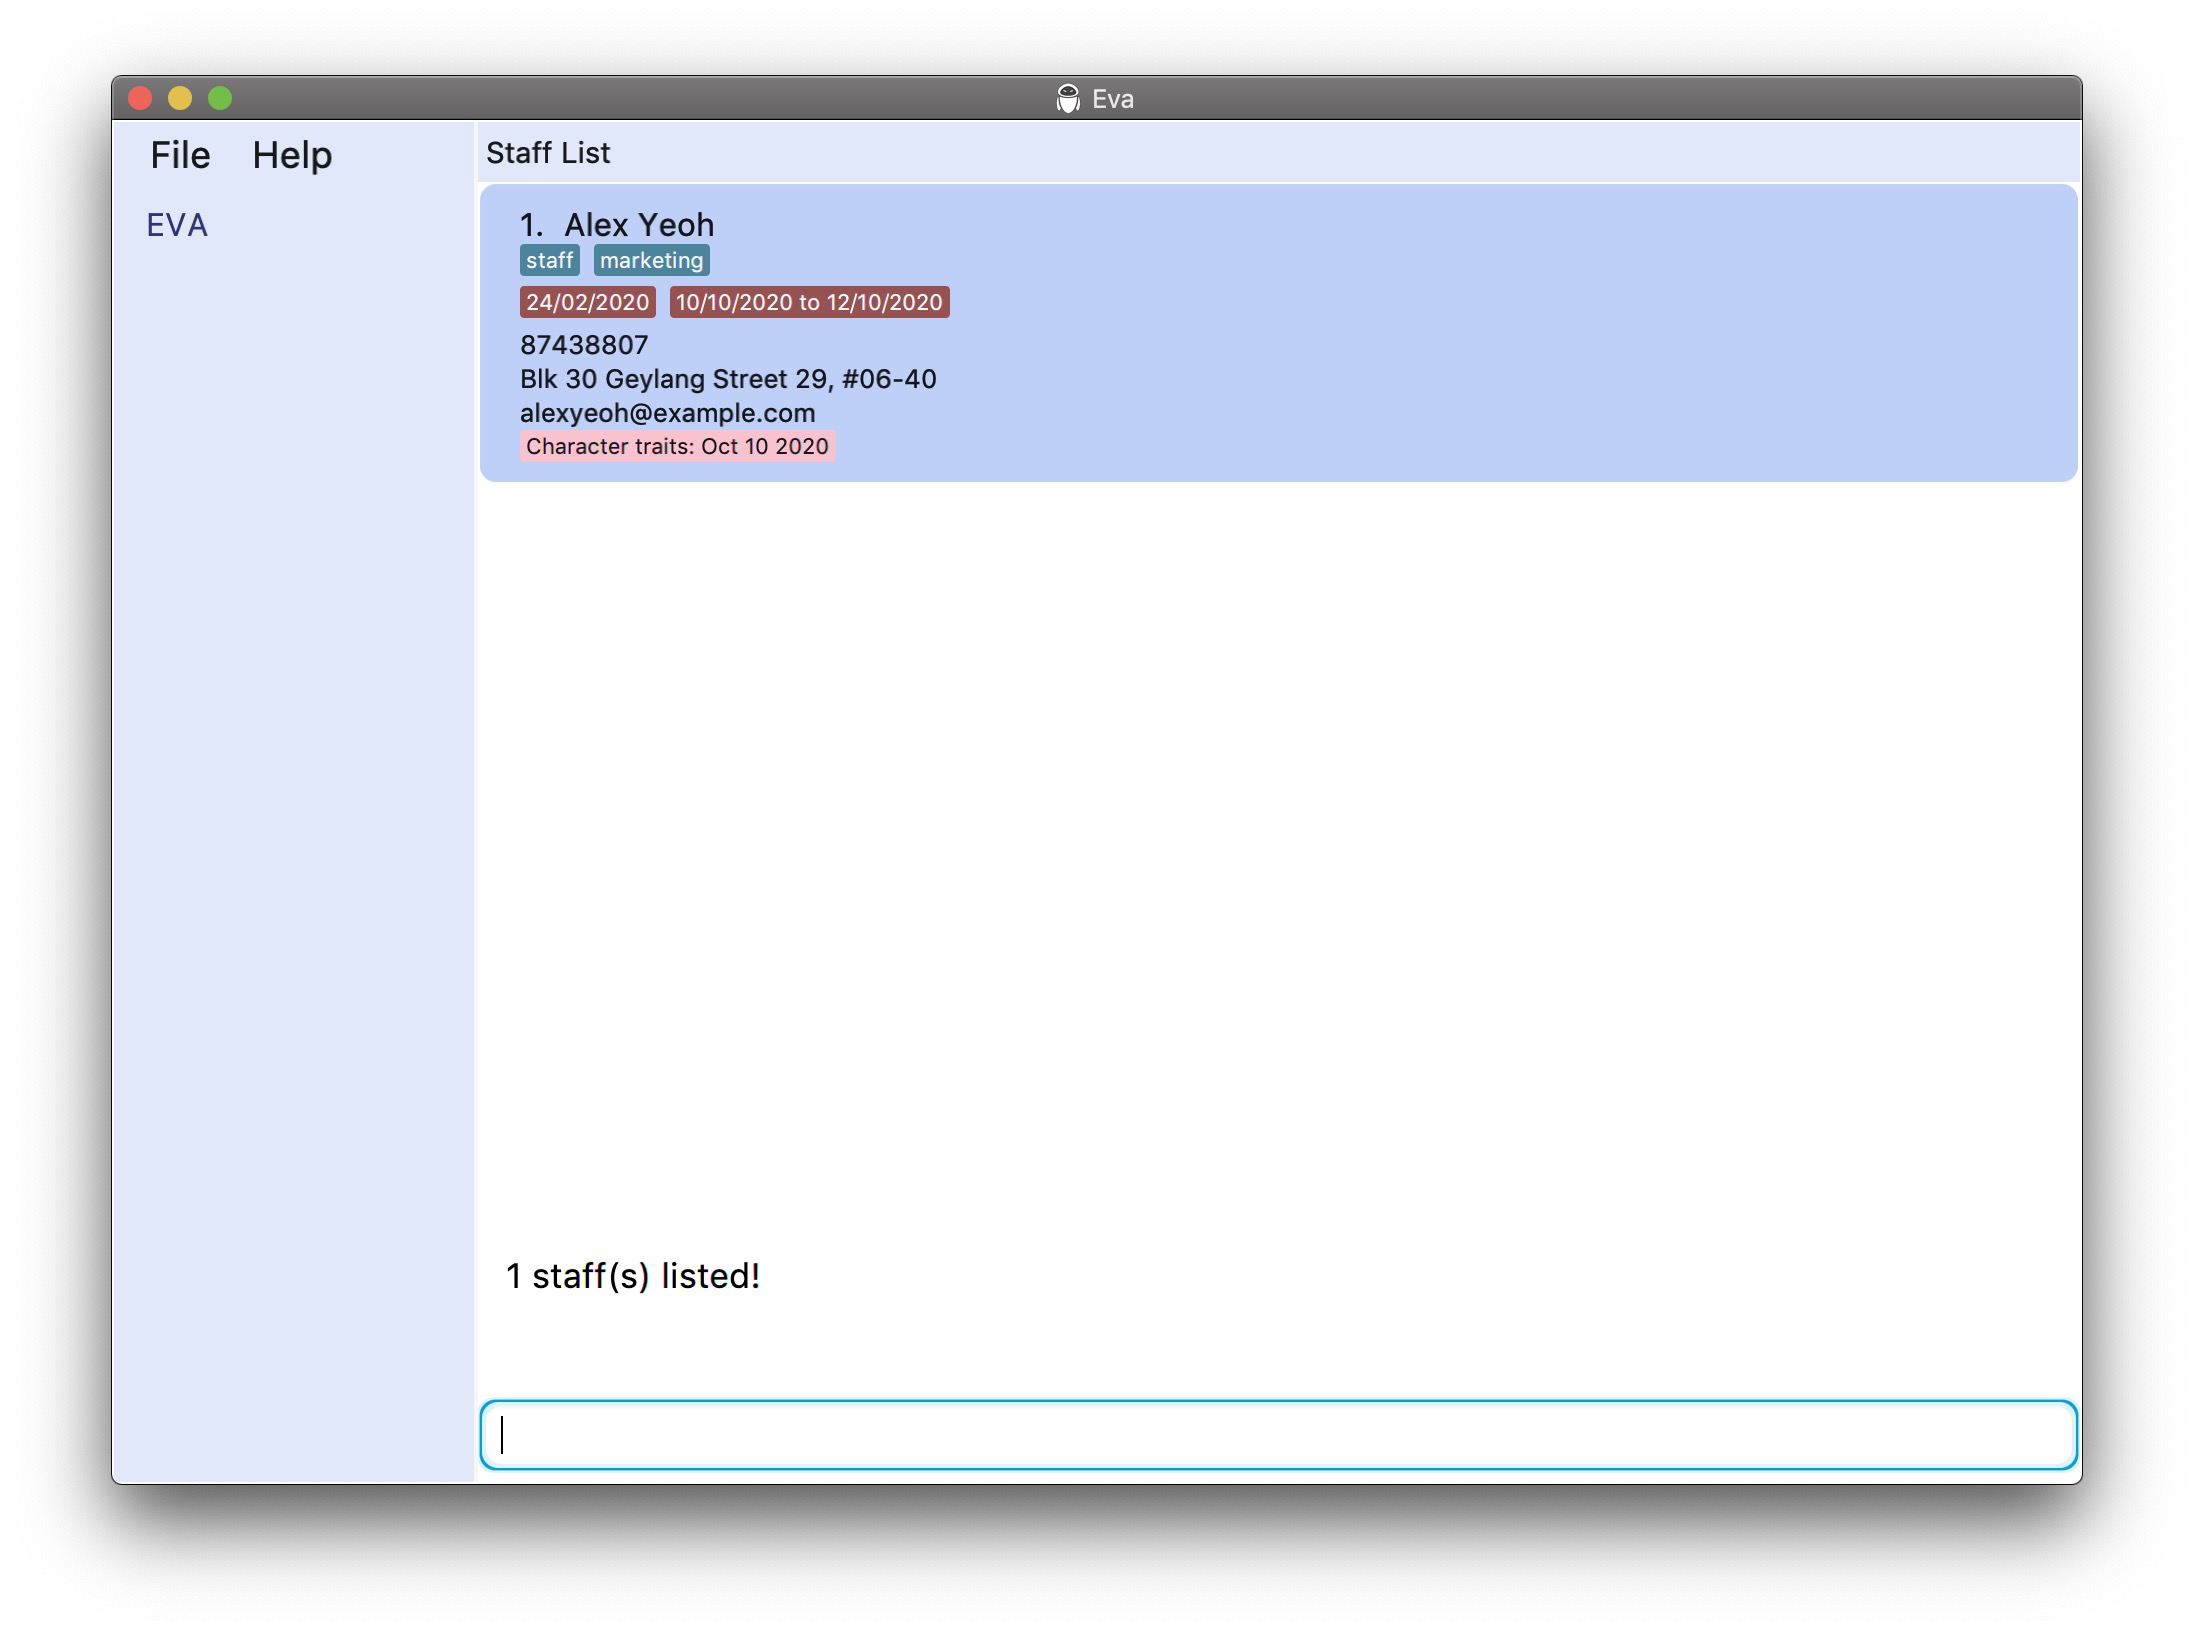
find s- Alex
The image below shows what you would see after executing the last example given. Notice that no other staffs are listed as there is only one Alex.
3.3.4. View : view
To get to the Staff Profile Panel mentioned earlier,
use this command from the Staff List Panel. Over here, you can take a closer look at the leaves and comments of a staff.
This command brings you to the profile panel of the staff at the specified index.
Format: view INDEX
Example:
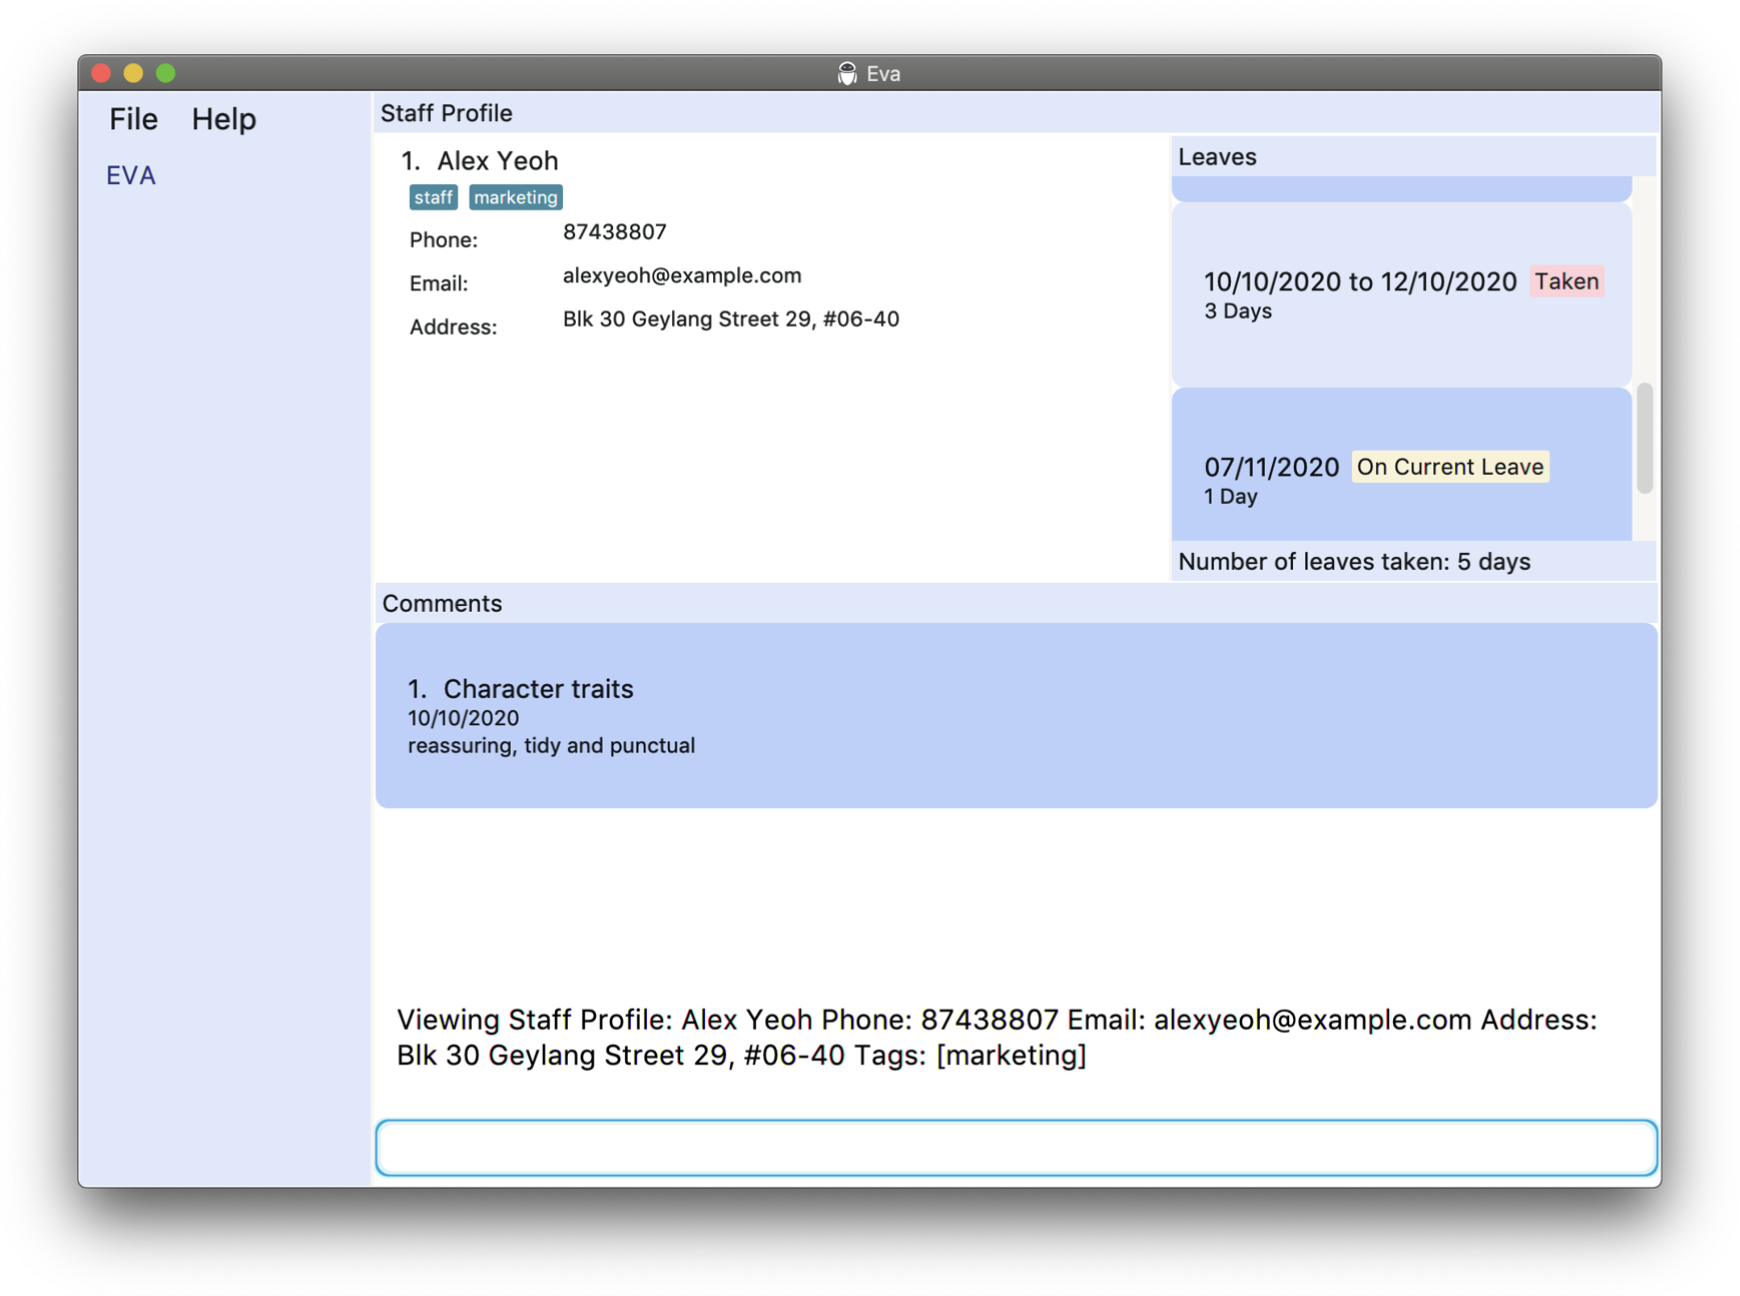
view 1
The image below shows what you would see after executing the example given.
3.3.5. Delete a staff: dels
This command deletes a staff from Eva’s database. By providing the index of the staff, you can remove that staff’s record.
![]() Important!
Important!
Please take note that this action is irreversible.
Format: dels INDEX
Example:
-
dels 1 -
dels 7
The image below shows what you would see after executing the last example given. Notice that the last staff in the list now has index 6.

3.3.6. Edit a staff: edits
Edits general details of a staff from eva (excluding leave taken)
Format: edits INDEX [n/NAME] [p/PHONE_NUMBER] [a/ADDRESS] [e/EMAIL] [t/TAG] [c/ ti/COMMENT_TITLE d/COMMENT_DATE desc/NEW_DESCRIPTION]
![]() Tip:
Tip:
-
Only description of comments can be edited. Title and Date cannot be edited.
-
In the case of multiple similar prefixes, the description of the last prefix will be used (excluding tags and comments).
Example:
-
edits 1 n/John Doe p/99999999 a/John Street e/NEW@example.com -
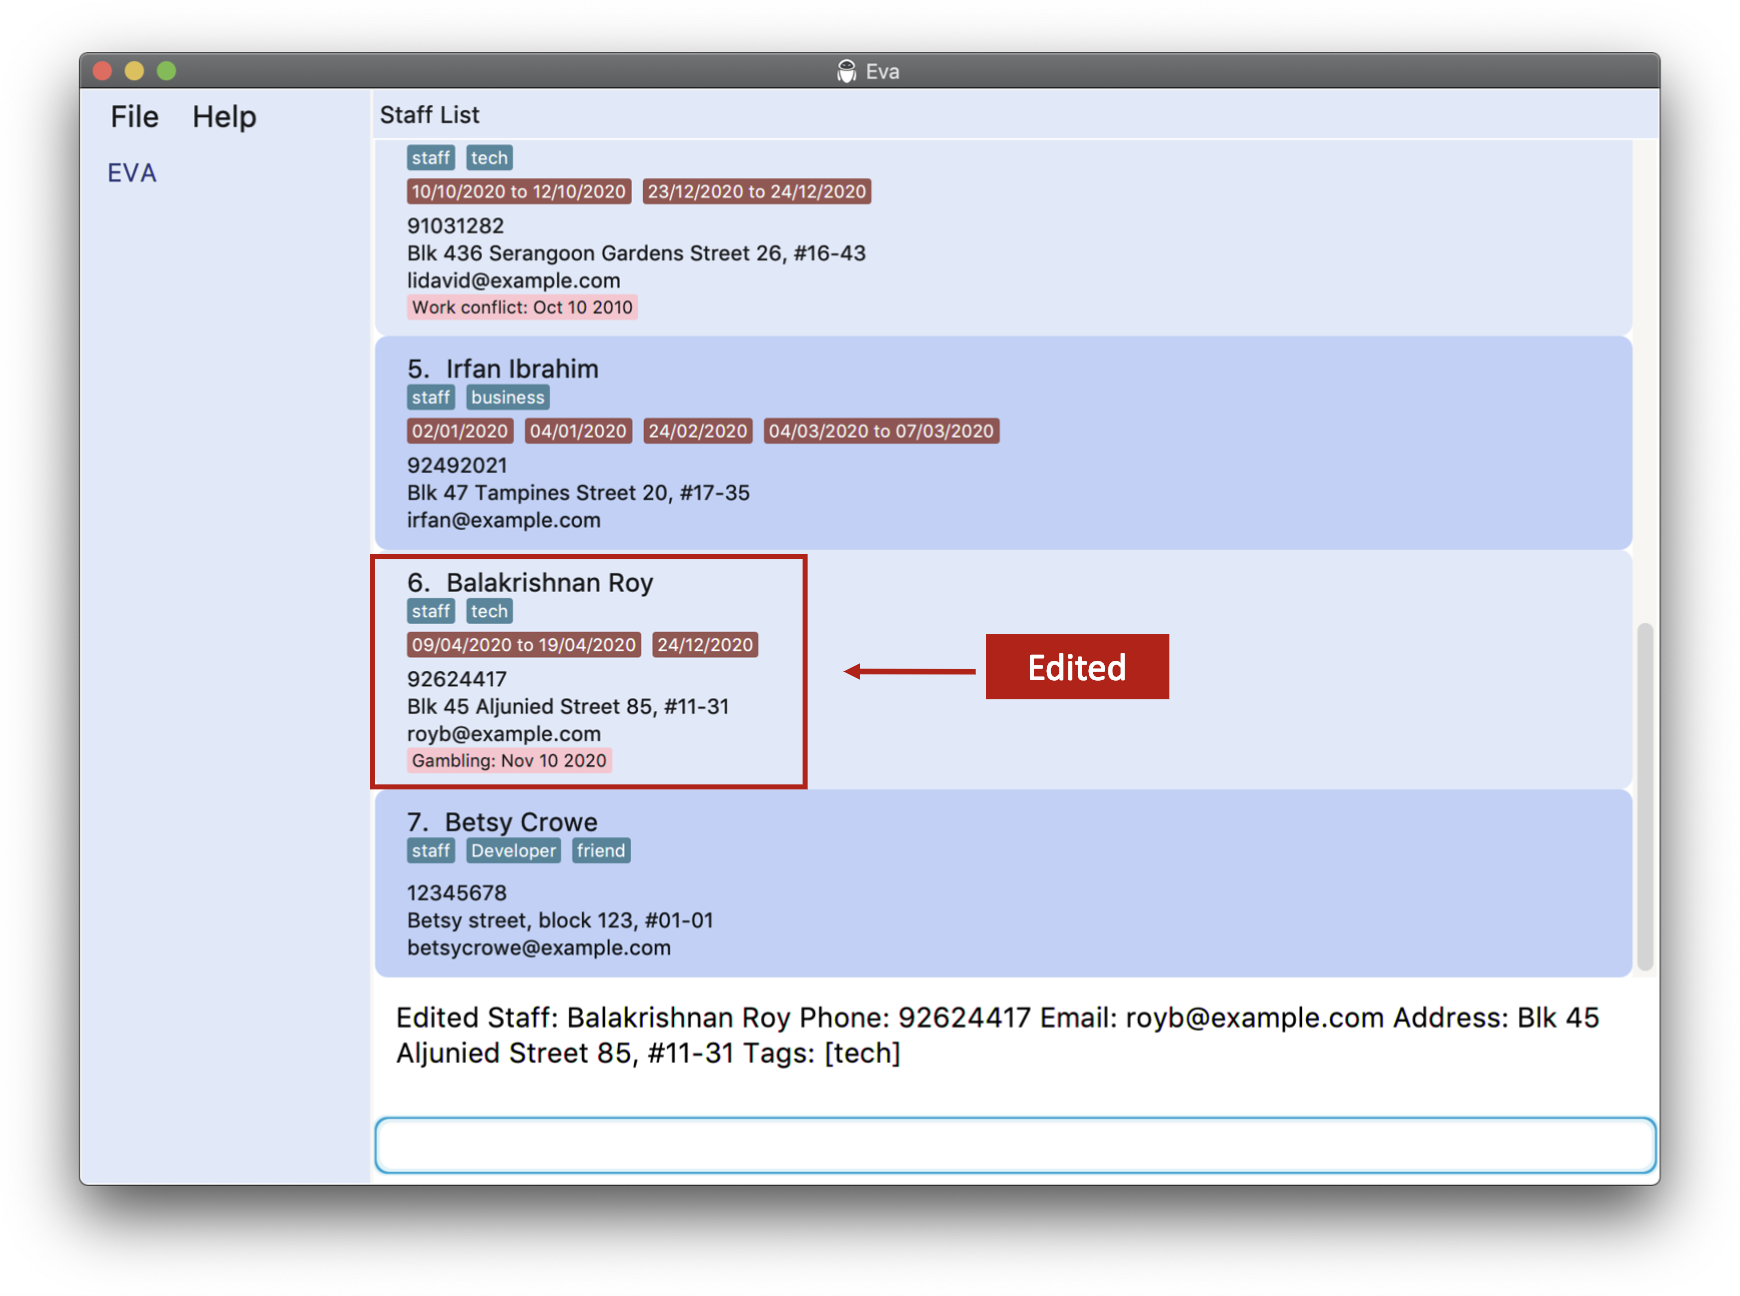
edits 1 n/Balakrishnan Roy
The image below shows what you would see after executing the last example given. Notice how Roy Balakrishnan has changed to Balakrishnan Roy.
3.3.7. Record leave taken by staff: addl
In a company, it is important to keep track of your manpower and know who will be working on which day. As such, Eva allows you to record down the leaves taken by a staff and show you the total number of leaves taken as well.
Format: addl INDEX l/d/DATE [d/DATE] [l/d/DATE [d/DATE]]…
![]() Tip:
Tip:
-
Addition of multiple leaves using the same command is supported. A leave can have either one (single day) or two dates (start and end inclusive).
-
Dates can be input in any order. Eva will sort the leaves and dates according to which date comes first.
-
Eva automatically tells you if a staff has either already taken the leave, is in the process of taking it or has not taken the leave. This can be seen on the Staff Profile.
-
Eva also automatically tallies up the total number of leave days taken by a staff and displays the total below the leaves! This can be seen on the Staff Profile.
Examples:
-
list s-followed byaddl 2 l/d/20/10/2020adds the leave record with the given date(s) to the 2nd person in the shown list. -
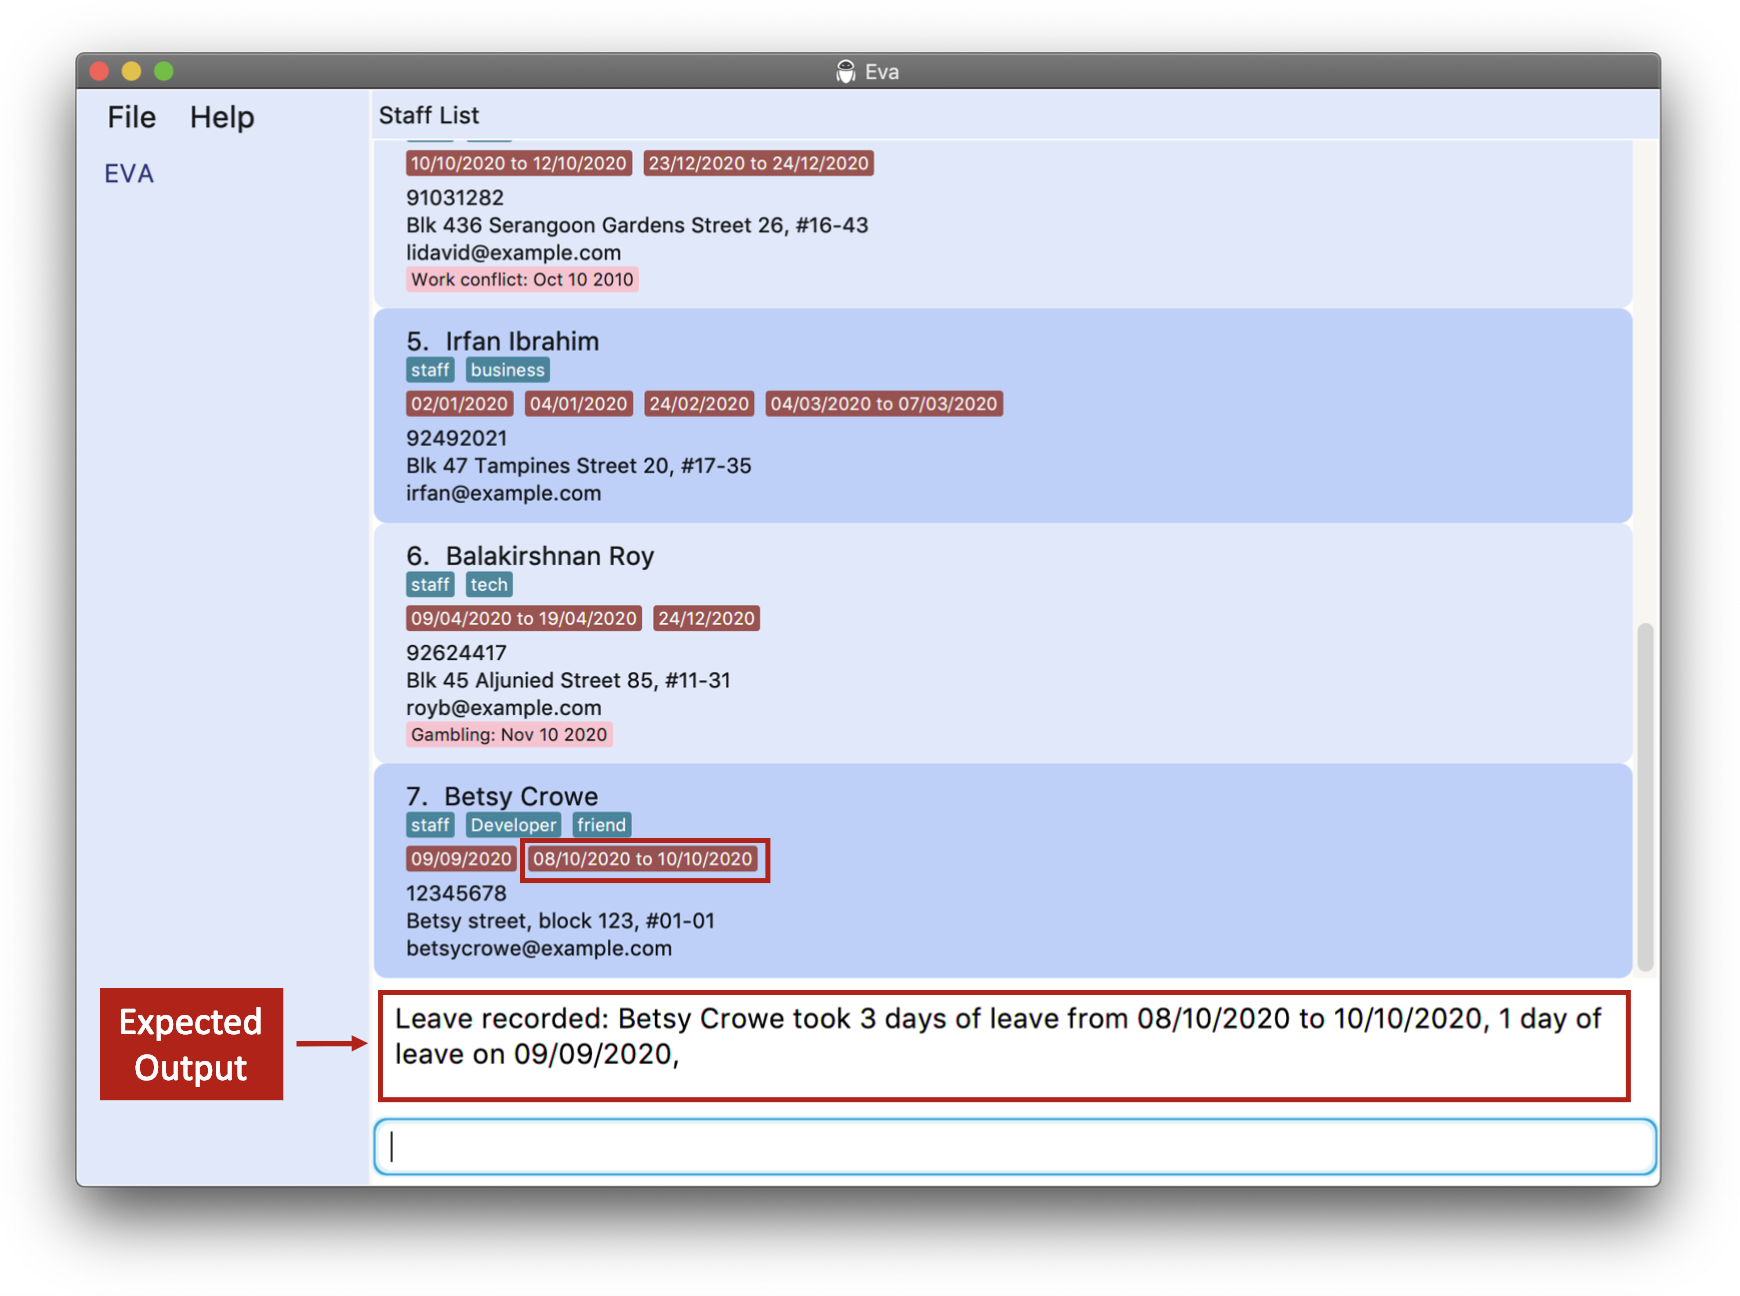
find s- Betsyfollowed byaddl 1 l/d/20/10/2020adds the leave to the 1st person in the results of thefind s-command. addl 1 l/d/08/10/2020 d/10/10/2020 l/d/20/10/2020addl 7 l/d/09/09/2020addl 7 l/d/10/10/2020 d/08/10/2020
The image below shows what you would see after executing the last example given above. Notice how the leave appears on Betsy’s record.
3.3.8. Delete leave taken by staff: dell
Sometimes a staff becomes unable to take their leave and cancels or postpones, Eva allows you to delete their recorded leaves. The total leave taken count is also automatically updated.
This command removes the record of leave taken by a staff, specified by the date given.
![]() Important!
Important!
Please take note that this action is irreversible.
![]() Note:
If a leave record has a date range that lasts from 08/11/2020 to 12/11/2020, any date keyed in that date range will cause the whole record to be deleted.
Note:
If a leave record has a date range that lasts from 08/11/2020 to 12/11/2020, any date keyed in that date range will cause the whole record to be deleted.
Format: dell INDEX d/DATE
Examples:
-
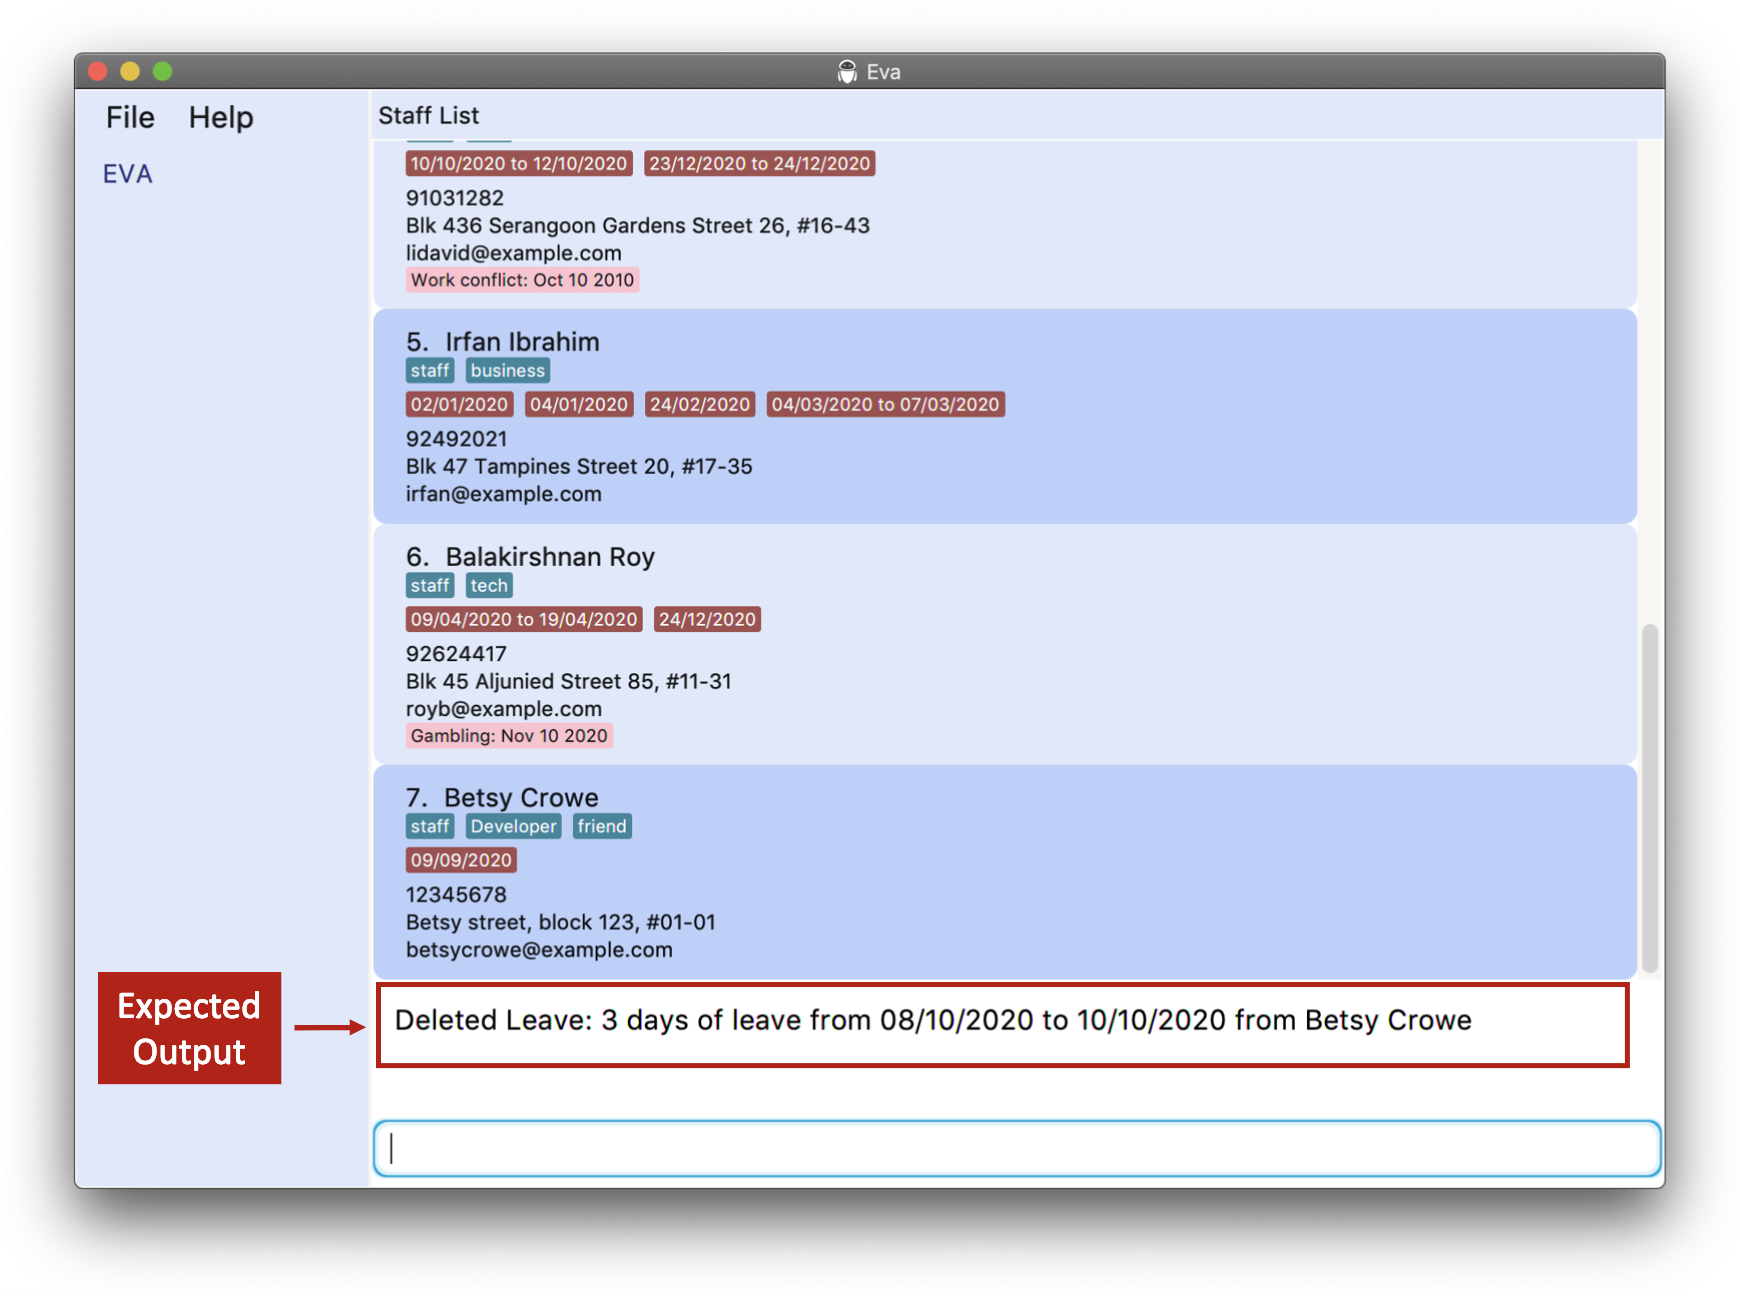
list s-followed bydell 2 d/09/10/2020deletes the leave record of which the given date coincides with from the 2nd person in shown list. -
find s- Betsyfollowed bydell 1 d/09/10/2020deletes the leave from the 1st person in the results of thefind s-command.
The image below shows what you would see after executing the last example given above. Notice how the leave is deleted from Betsy’s record.
3.3.9. Clear staff database : clear s-
In any case that you might want to remove all staff records, you can always use this command.
This command clears all staff entries from the Eva database.
![]() Important!
Important!
Please take note that this action is irreversible.
Format: clear s-
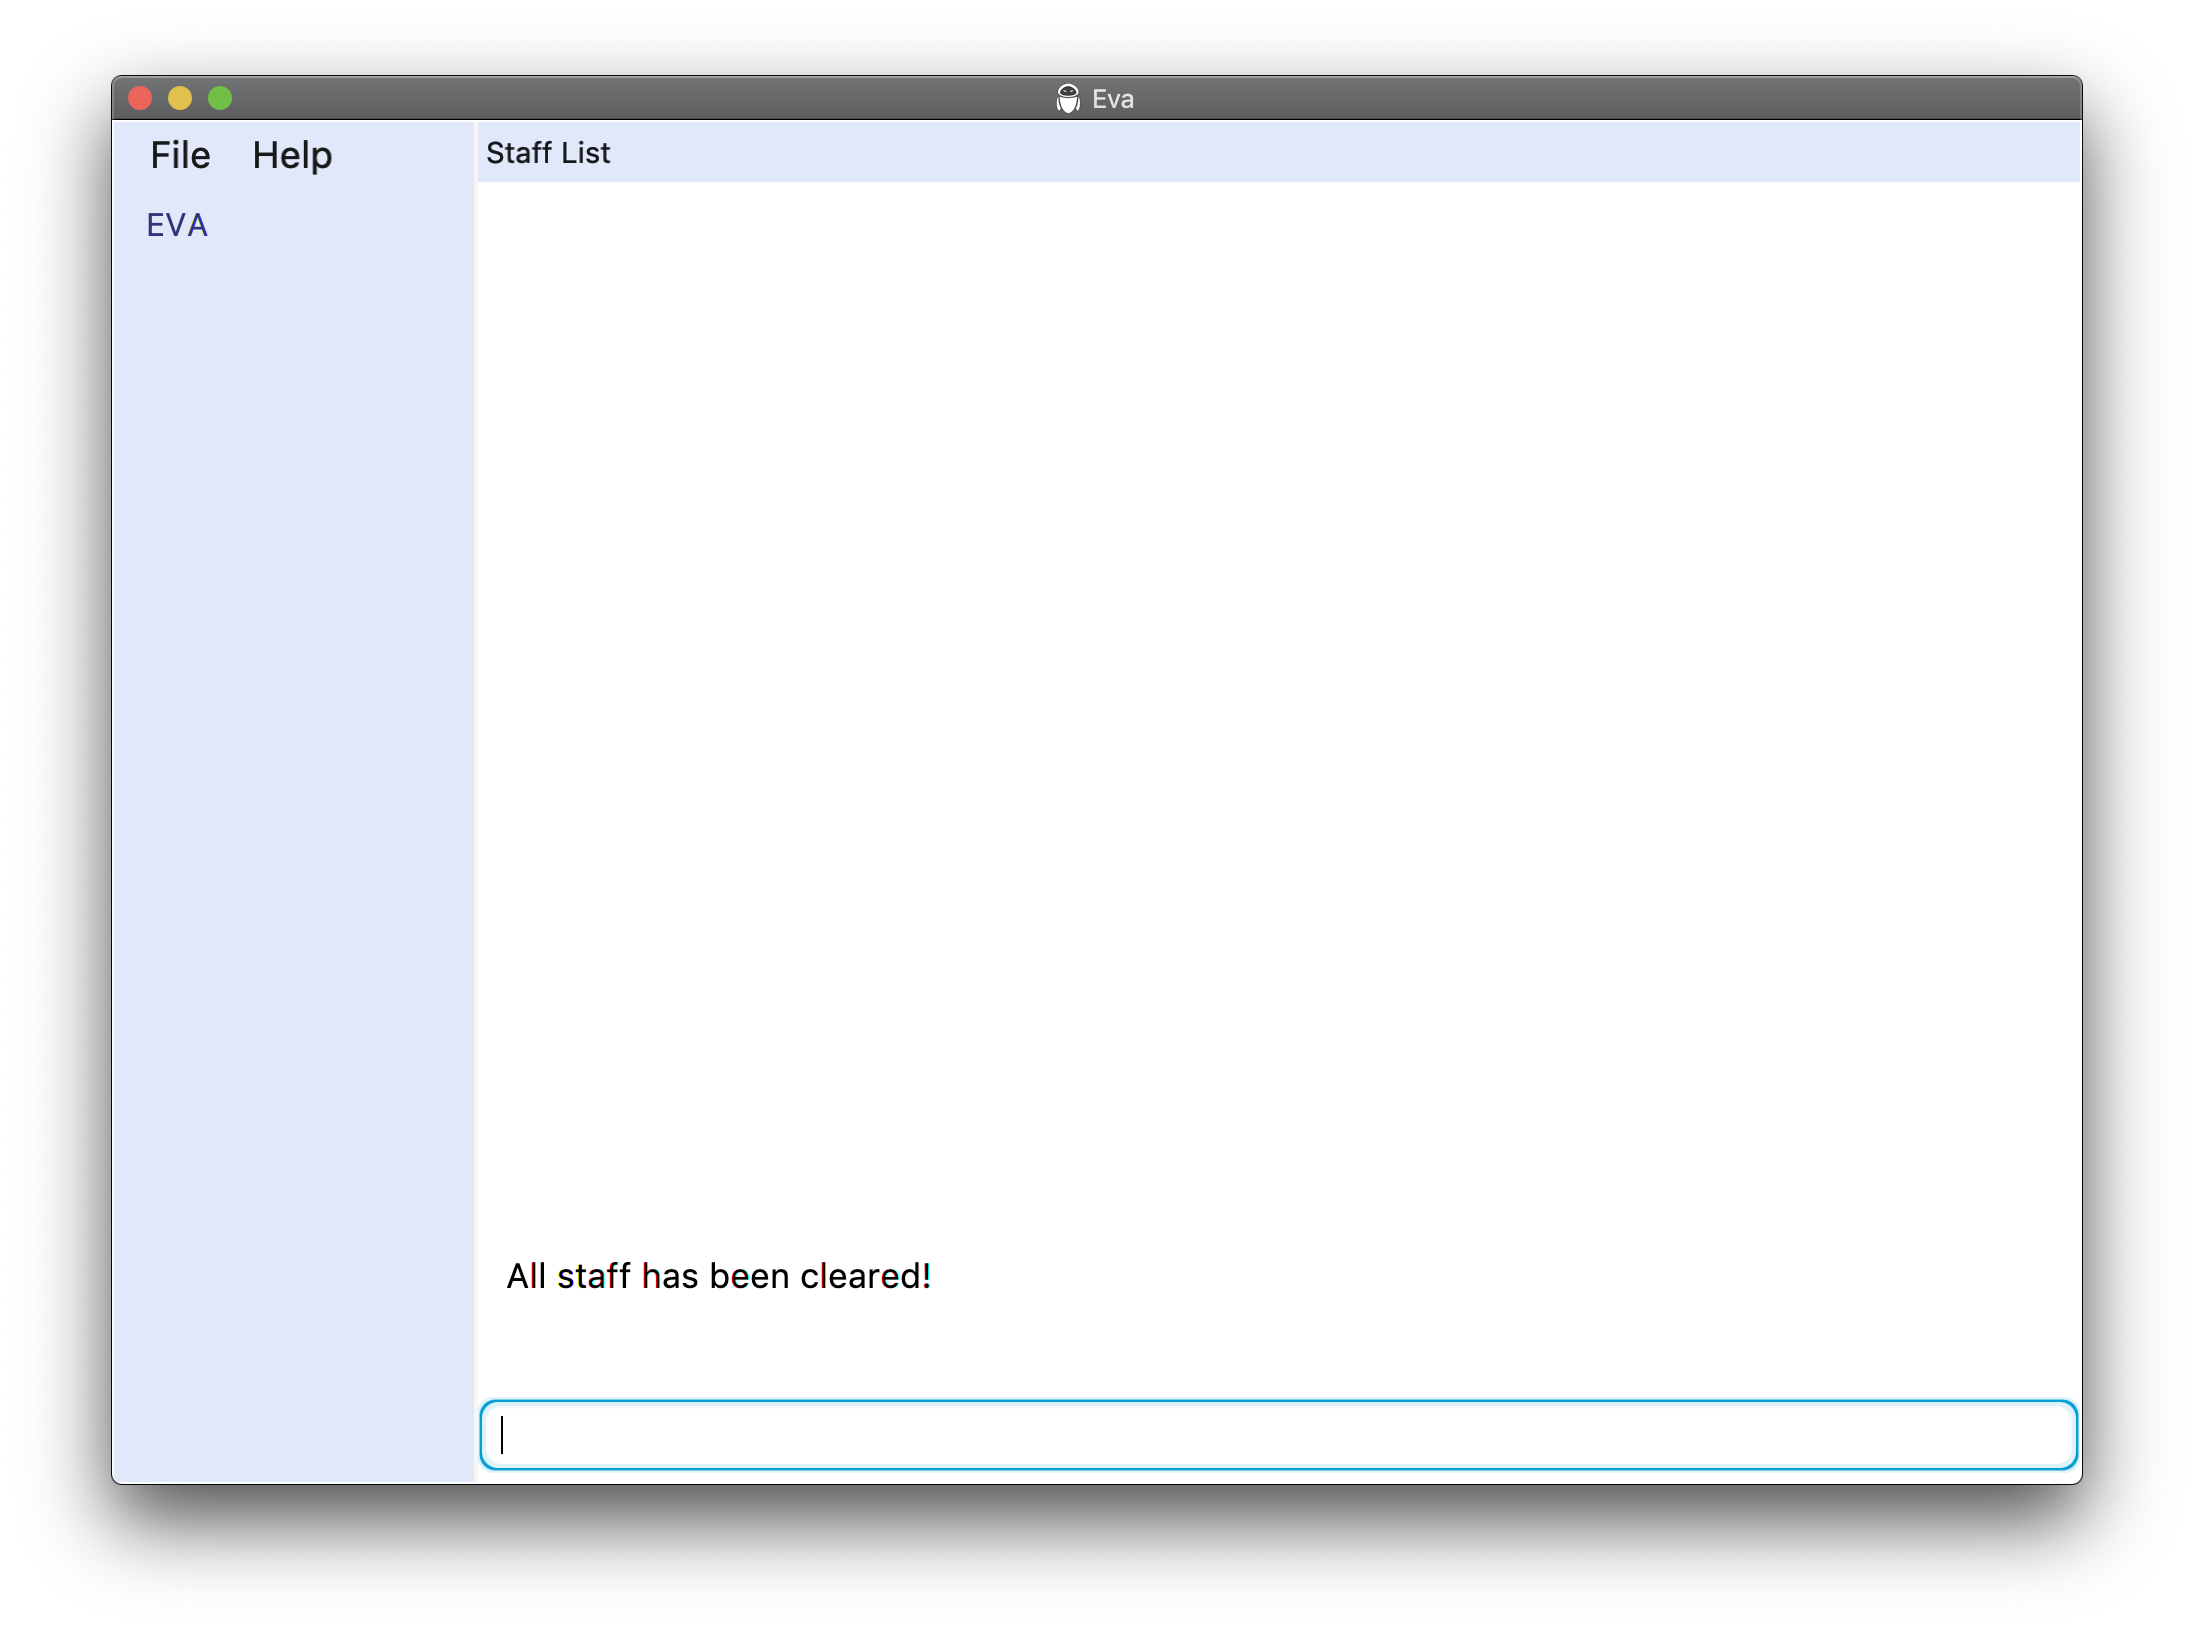
The image below shows what you would see after using this command. Notice that there are no more records of staff in the
Staff List.
3.4. Applicant commands
Applicant commands give you the ability to keep track of your applicants which help you make good recruitment decisions.
![]() Note:
Note:
-
All commands under applicant can only be done on either
Applicant ListorApplicant Profileexceptadda, which can be done on any panel. -
While in profiles, only details of the profile that is being viewed can be changed.
3.4.1. List all applicants : list a-
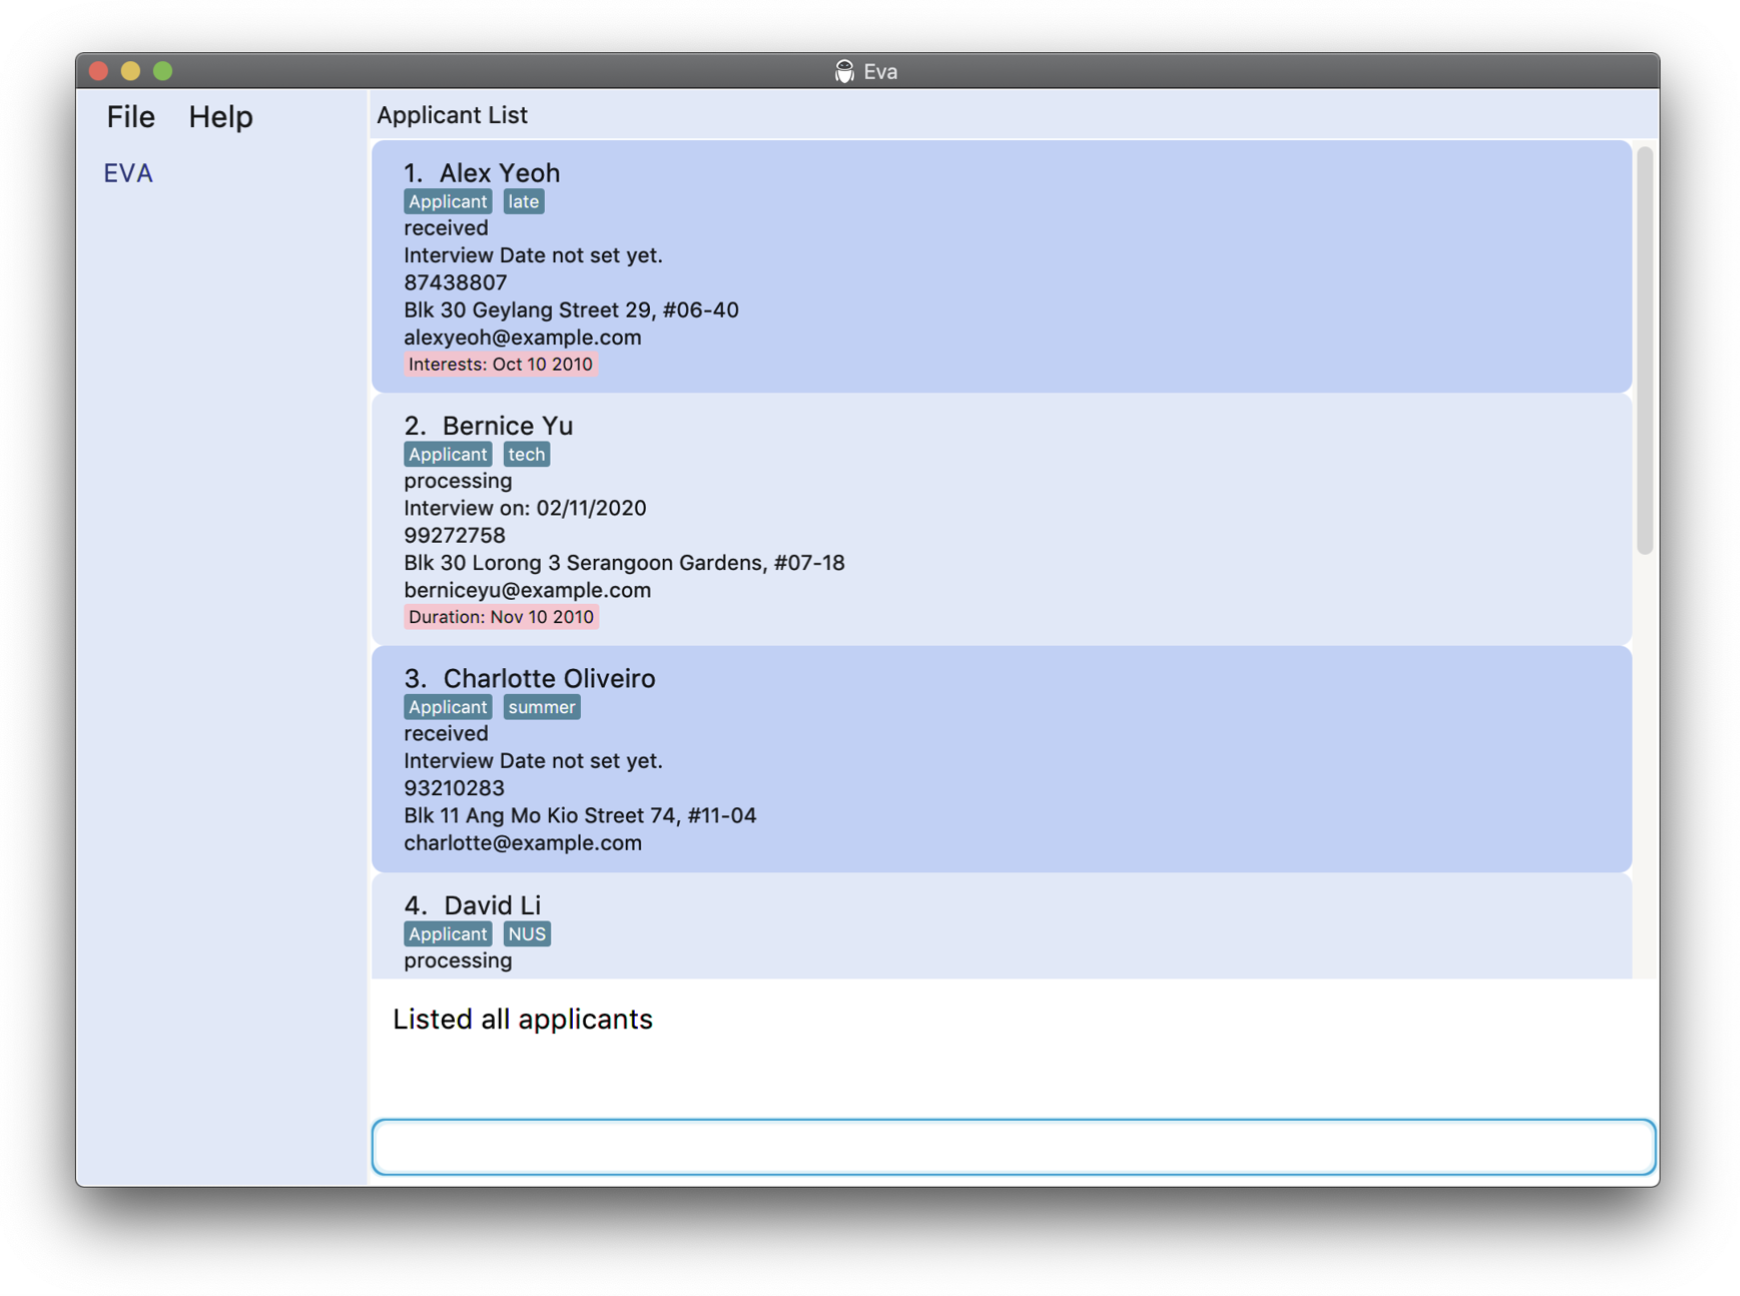
The Applicant List Panel serves as your primary tool to give you an overview of all the applicants in your company.
This command changes the panel to the Applicant List and shows a list of all applicants in the Eva Database.
Format: list a-
The image below shows what you would see when you execute this command.
3.4.2 Add an applicant: adda
Managing data of applicants is another main activity you might be involved in. Hence, this command is handy for you to add an applicant record into Eva.
![]() Note:
Note:
An applicant record can contain the details listed below:
- Name*
- Phone Number*
- Email*
- Address*
- Tags
- Comments
- Interview Date
- Application
- Application Status
The fields marked with a asterisk (*) are compulsory and have to be provided in the parameters below.
Without any of these fields, Eva will not accept your input.
Tags, comments, interview date can be added with this adda command as shown in the examples.
To manage application records for each applicant, please refer to the commands
addapp and delapp.
To manage the application status, please refer to the command setas.
Below are some notes about the parameters you can add:
- An applicant can have any number of tags (including 0).
- An applicant can have any number of comments (including 0).
- Each applicant is uniquely identified by their name. In the event you wish to add 2 applicant records with the same name, please ensure that both their phone numbers and email addresses are different.
- The interview date has to be in DD/MM/YYYY format.
- Once you add an applicant the status will be automatically set as received, if you wish to change it, refer to the feature setting of application status below.
![]() Tip:
Tip:
- In the case of multiple similar prefixes, the description of the last prefix will be used (excluding tags and comments).
- The details of each field can be provided in any order.
- The interview date is optional. If an interview date is not fixed yet, you can leave it and set it later.
Format: adda n/NAME p/PHONE_NUMBER e/EMAIL a/ADDRESS [id/INTERVIEW_DATE] [t/TAG]…[c/COMMENTS]…
Examples:
- To add an applicant without an interview date
adda n/Vicky Santana p/98765432 e/vsc@xample.com a/John street, block 123, #01-01 - To add an applicant with tags and comments
adda n/Betsy Crowe t/friend e/betsycrowe@example.com a/Betsy street, block 123, #01-01 p/92345678 t/Developer c/ ti/Working Ethics d/10/10/2010 desc/Good - To add an applicant with an interview date
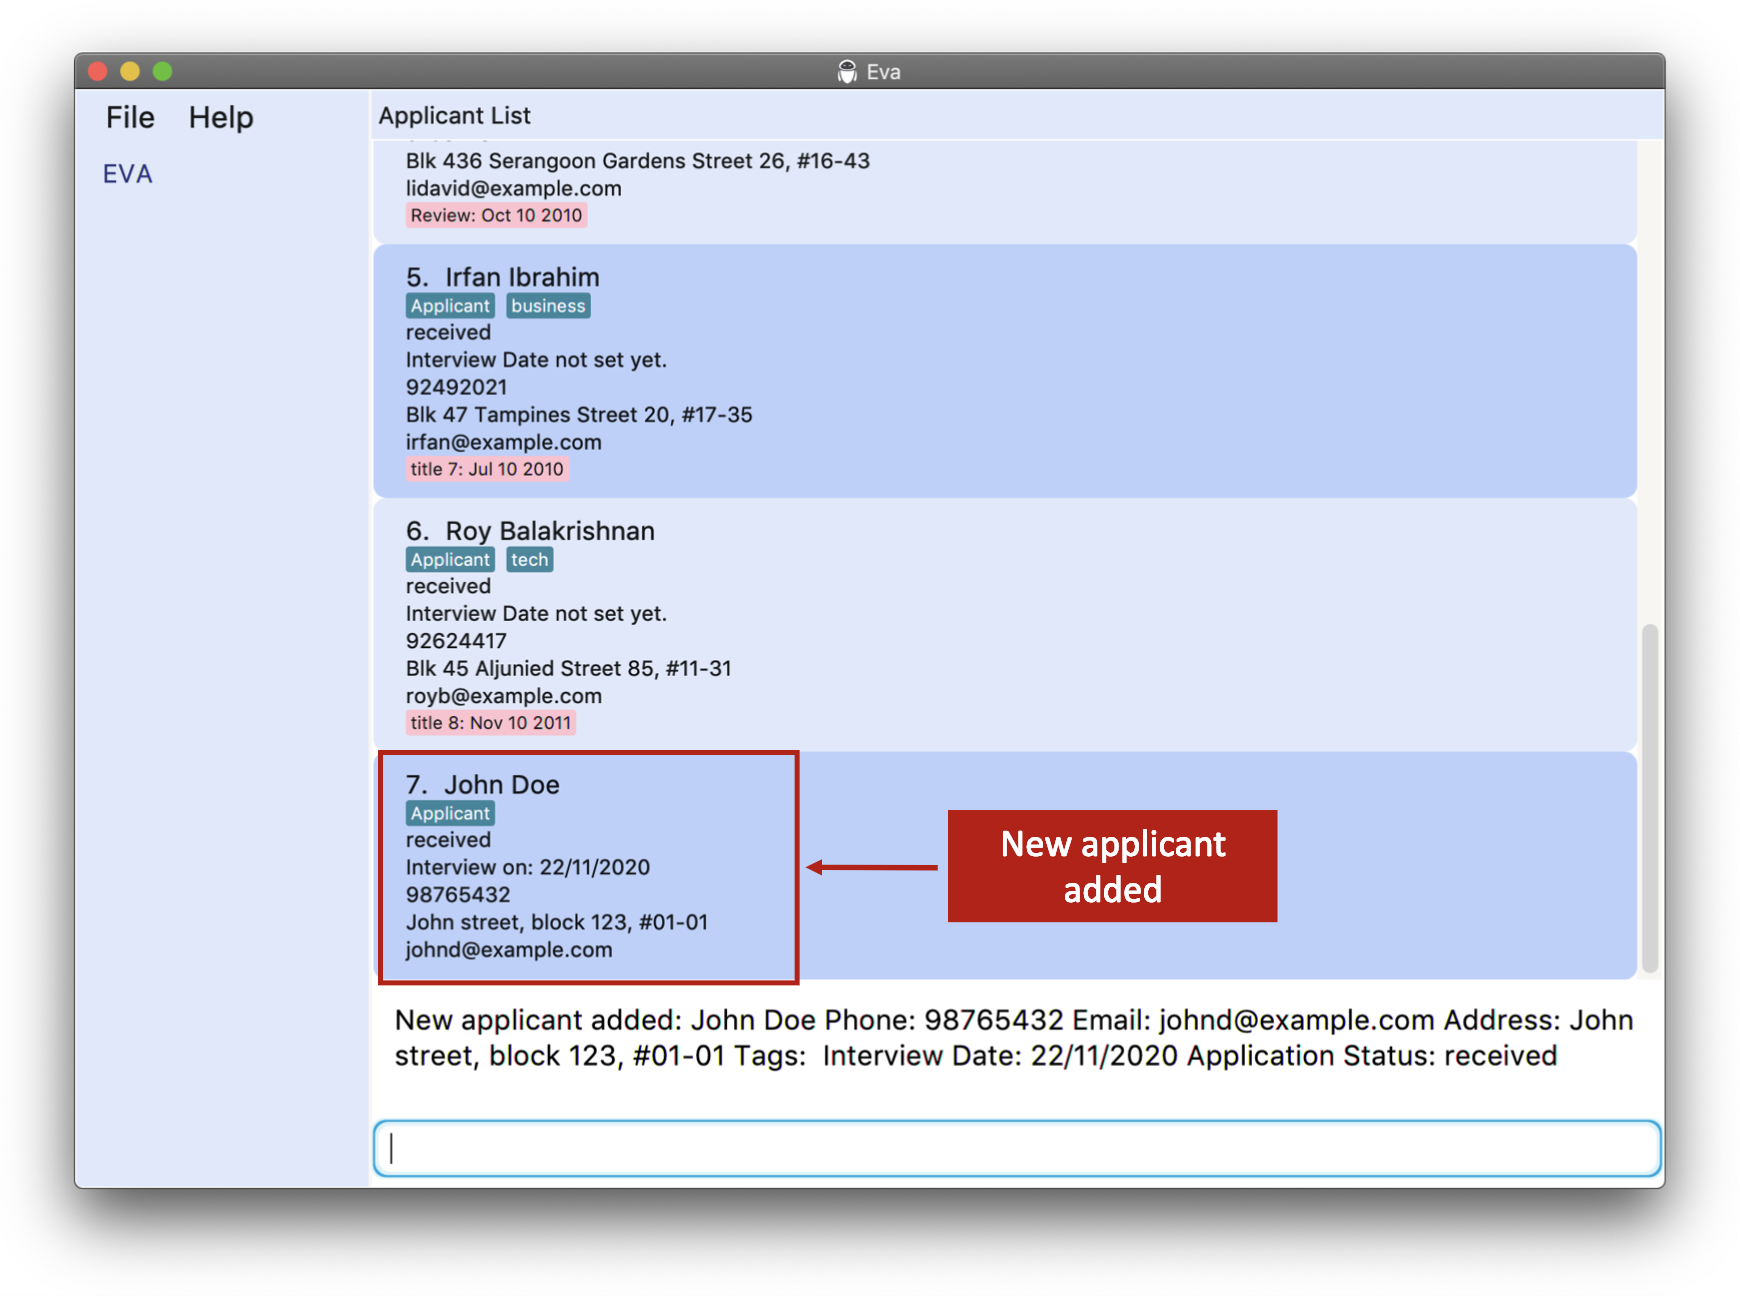
adda n/John Doe p/98765432 e/johnd@example.com a/John street, block 123, #01-01 id/22/11/2020
The image below shows what you would see after executing the last example given above. Notice that John Doe is now recorded as an applicant in our database.
3.4.3. Find an applicant : find a-
The command can help you quickly find all the applicant records with the given name in your company.
This command will show a list of applicants whose name contains one of the given names. It changes the panel to the Applicant List to display the result.
Format find FIND_TYPE- KEYWORD
Examples:
-
find a- Doe -
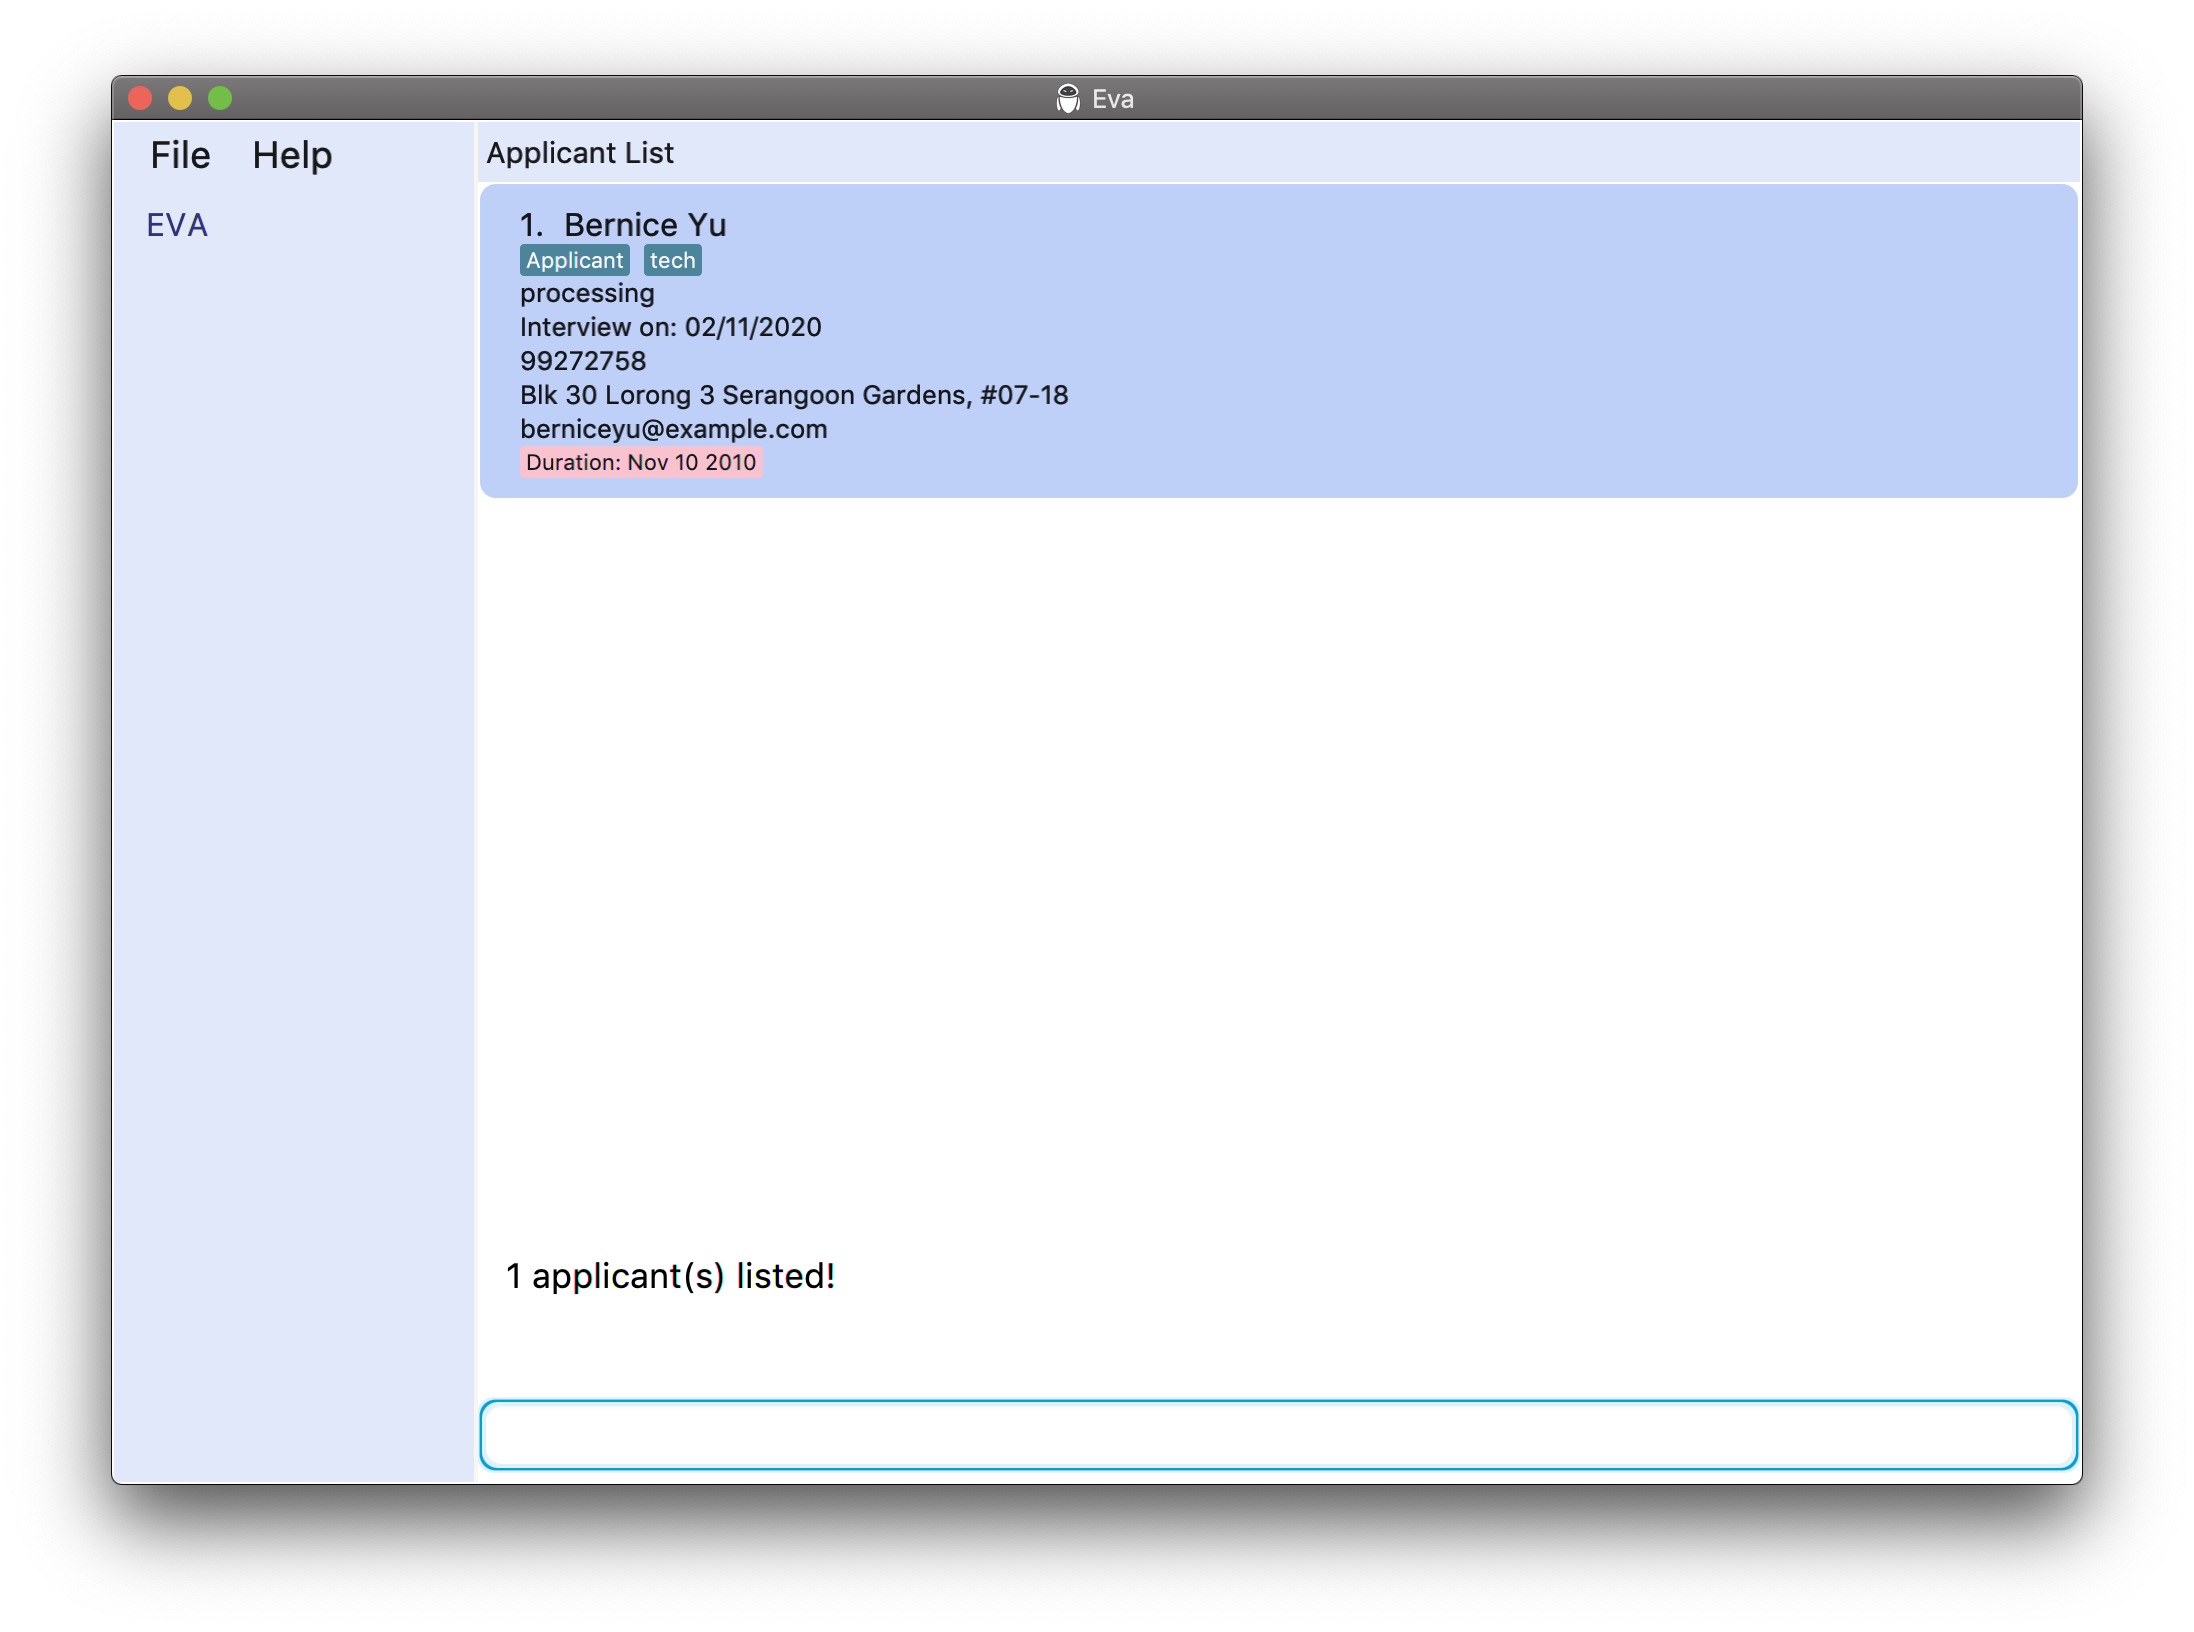
find a- Yu
The image below shows what you would see after executing the last example given above.
3.4.4. View : view
To get to the Applicant Profile Panel mentioned earlier,
use this command from the Applicant List Panel. Over here, you can take a closer look at the application and comments of an applicant.
This command brings you to the profile panel of the applicant at the specified index.
Format: view INDEX
Example:
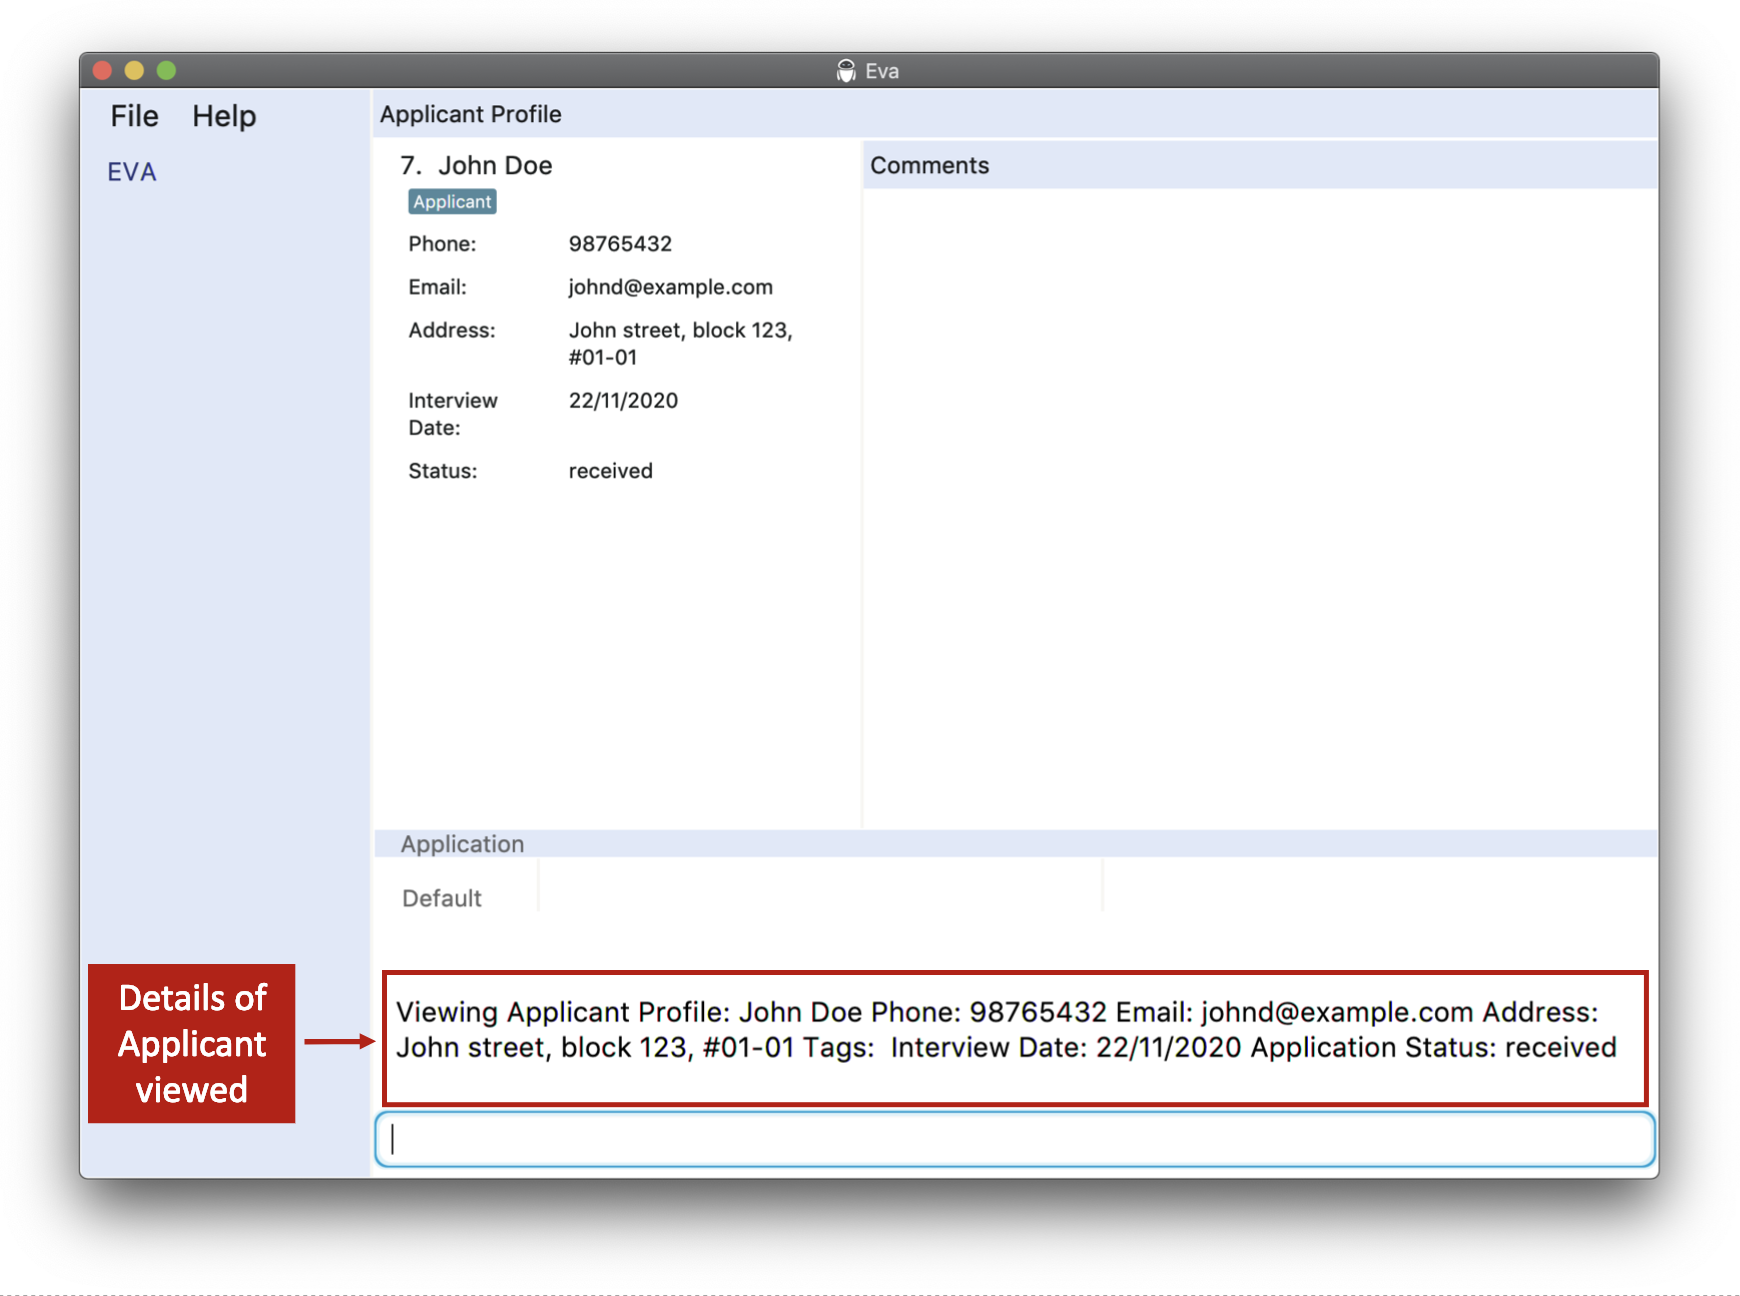
view 1
The image below shows what you would see after executing this example.
3.4.5. Delete an applicant: dela
If you need to remove specific records of applicants, you may use this command. By providing the index of the
applicant you see on Applicant List , you can remove that applicant’s record.
![]() Important!
Important!
Please take note that this action is irreversible.
Format: dela INDEX
Example:
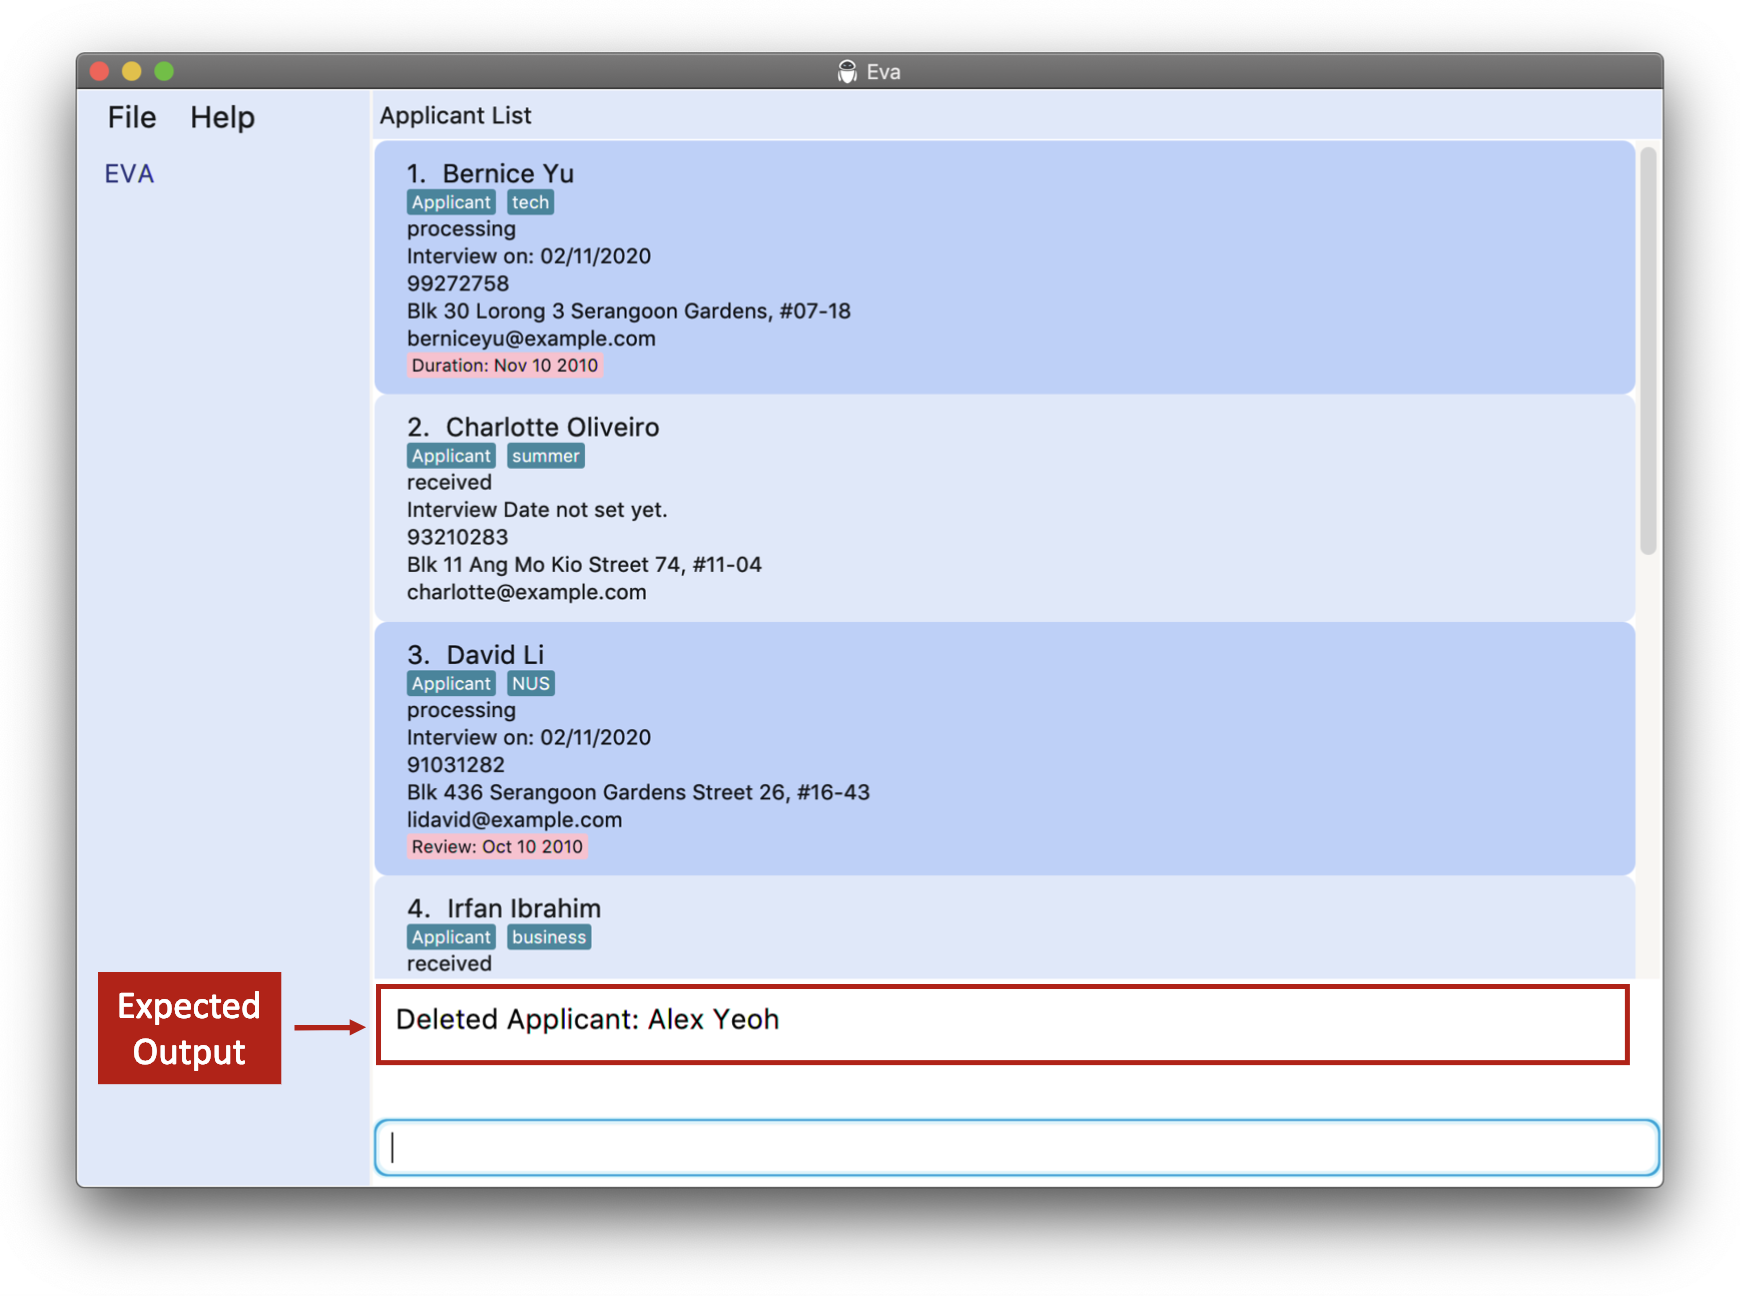
dela 1
The image below shows what you would see after executing this example. Notice how Bernice Yu, previously at index 2, is now at index 1.
3.4.6. Edit an applicant: edita
Edits general details of an applicant from eva (excluding application status)
Format: edita INDEX [n/NAME] [p/PHONE_NUMBER] [a/ADDRESS] [e/EMAIL] [id/INTERVIEW_DATE] [c/ ti/COMMENT_TITLE d/COMMENT_DATE desc/NEW_DESCRIPTION]
![]() Tip:
Tip:
-
Only description of comments can be edited. Title and Date cannot be edited.
-
In the case of multiple similar prefixes, the description of the last prefix will be used (excluding tags and comments).
Example:
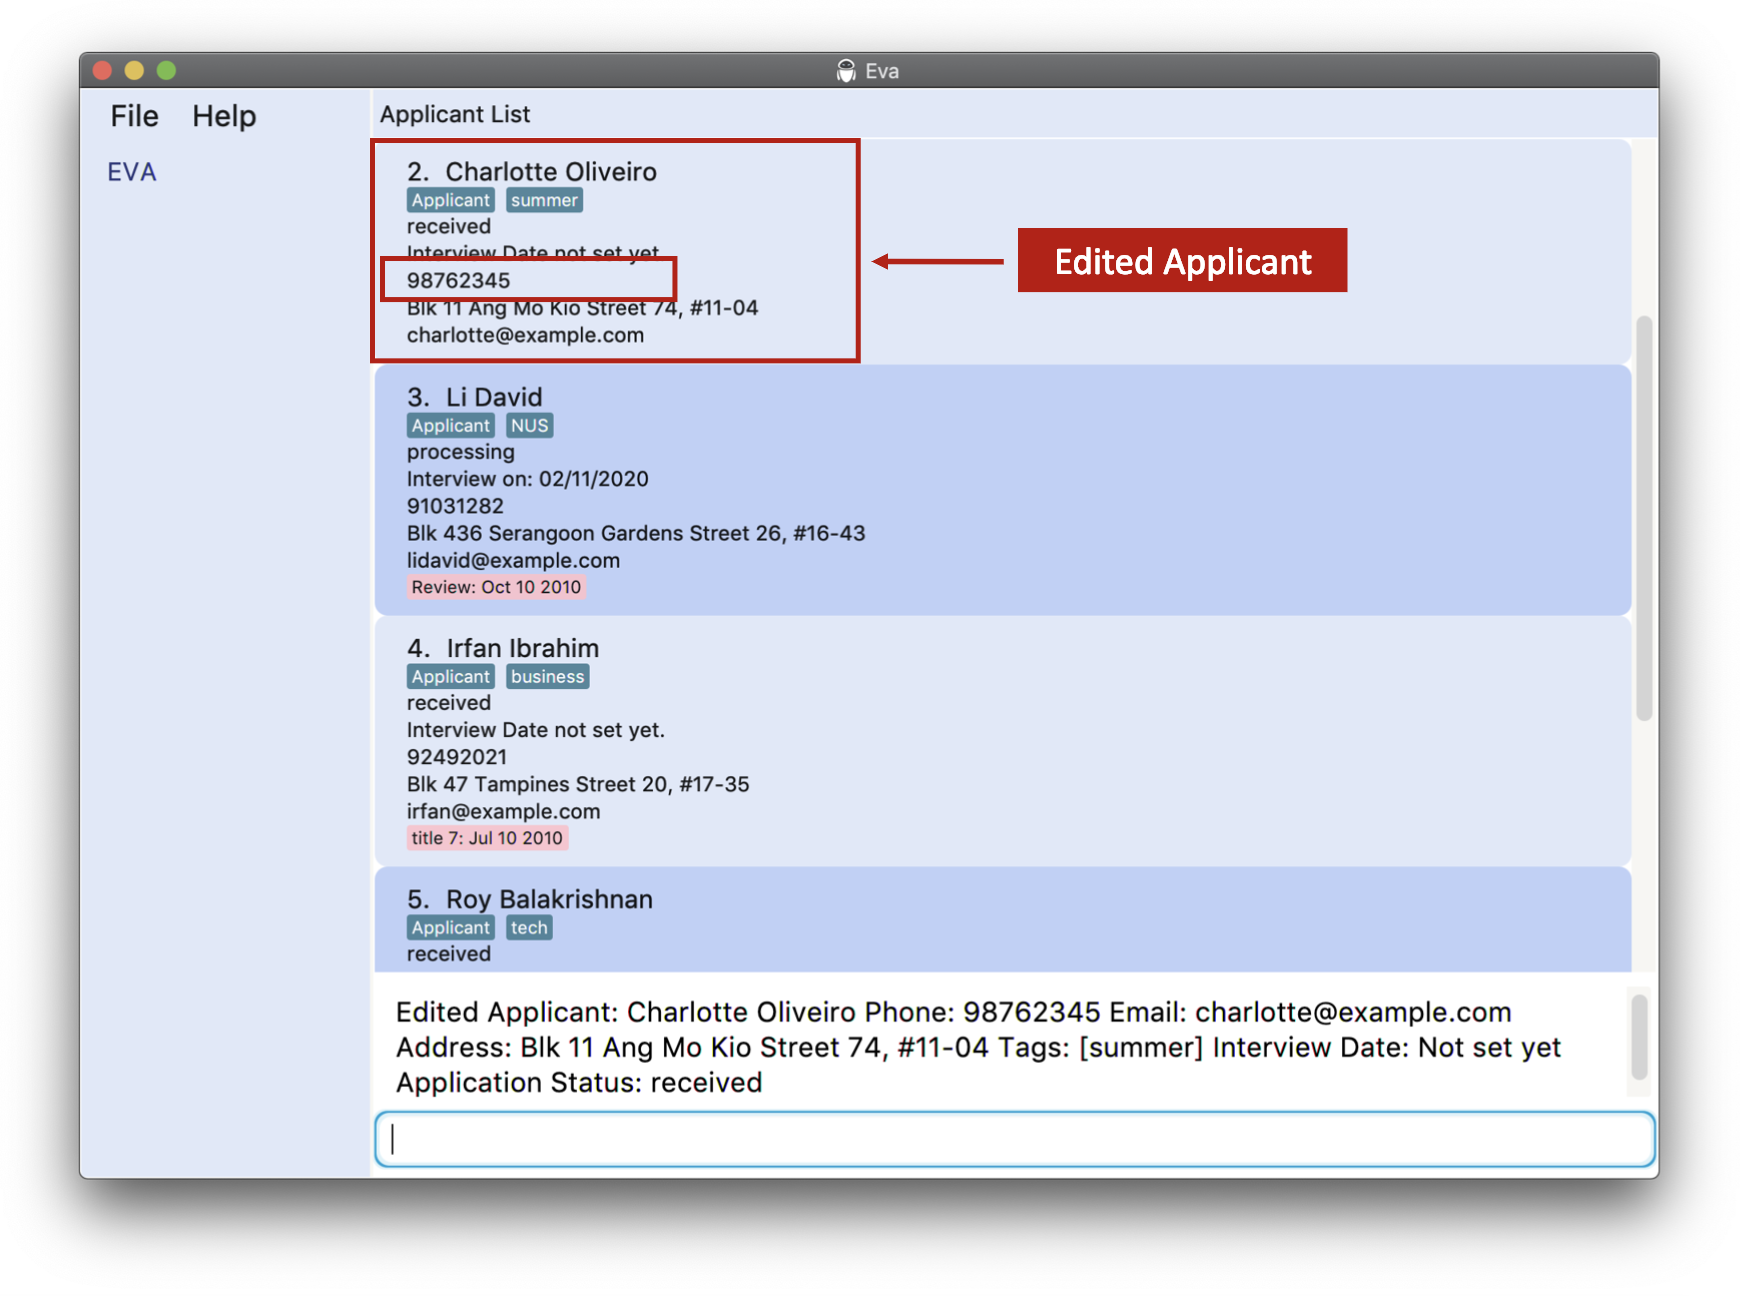
edita 1 n/NEWNAME p/99999999 a/NEWADDRESS e/NEW@example.comedita 1 id/ 10/10/2010edita 2 p/98762345
The image below shows what you would see after executing the last example given above.
3.4.7. Add an application: addapp
This command scans an applicant’s resume text file and adds an application (resume details) to an applicant with the specified index under Eva.
Format: addapp INDEX FILEPATH
- An applicant should be created prior to the addition of its application.
![]() Tip:
Tip:
-
You may find a resume text file generated in the data folder
data/resume.txt, which is in the same directory as your jar file. This is the strict template to follow for resume files. -
You may use the sample resume by keying in
sampleas filepath. -
More info here.
Example:
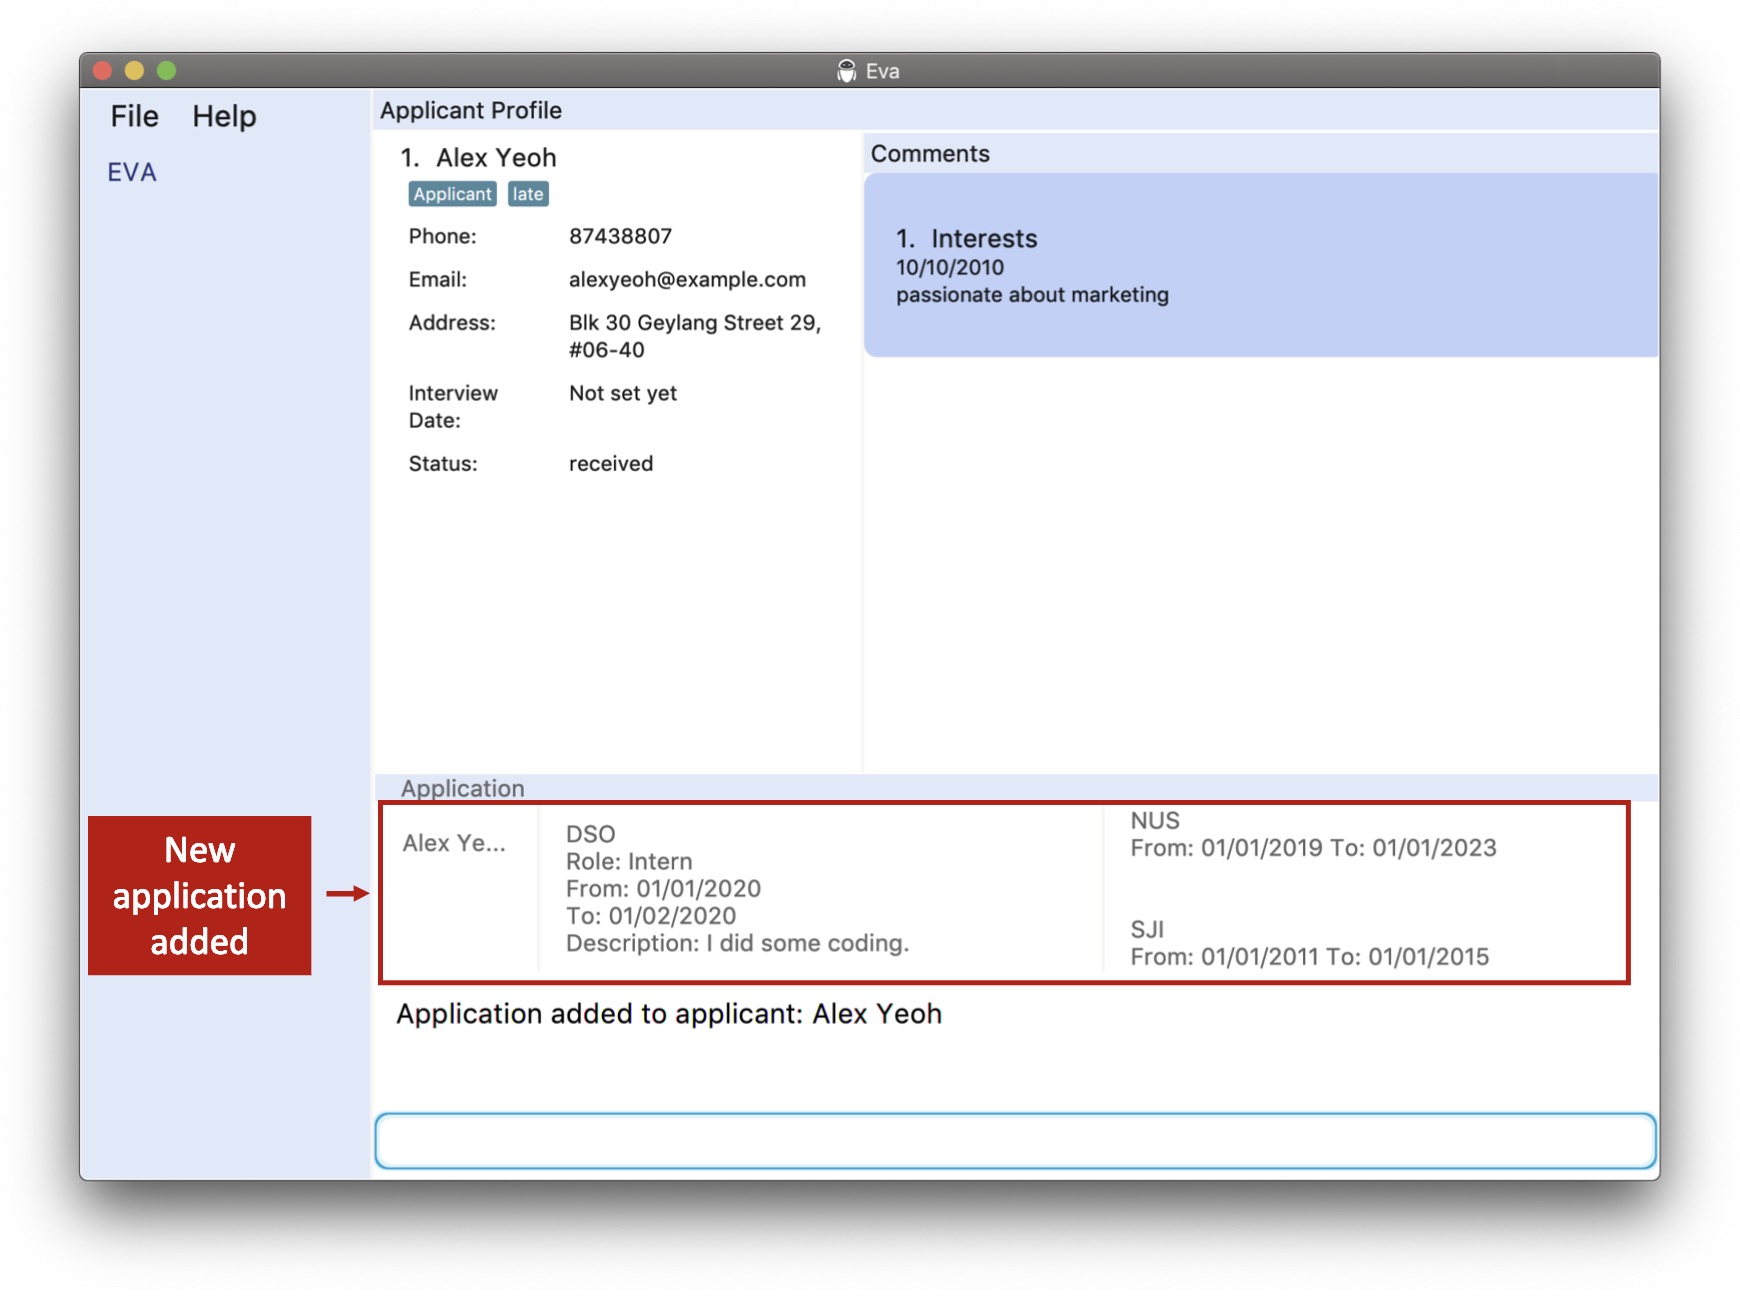
addapp 1 data/resume.txtaddapp 1 sample
The image below shows what you would see after executing the last example given above.
3.4.8. Delete an application: delapp
Deletes an application from an applicant with the specified index under Eva.
![]() Important!
Important!
Please take note that this action is irreversible.
delapp replaces the current application of the target applicant with a blank application. Format: delapp INDEX
Example:
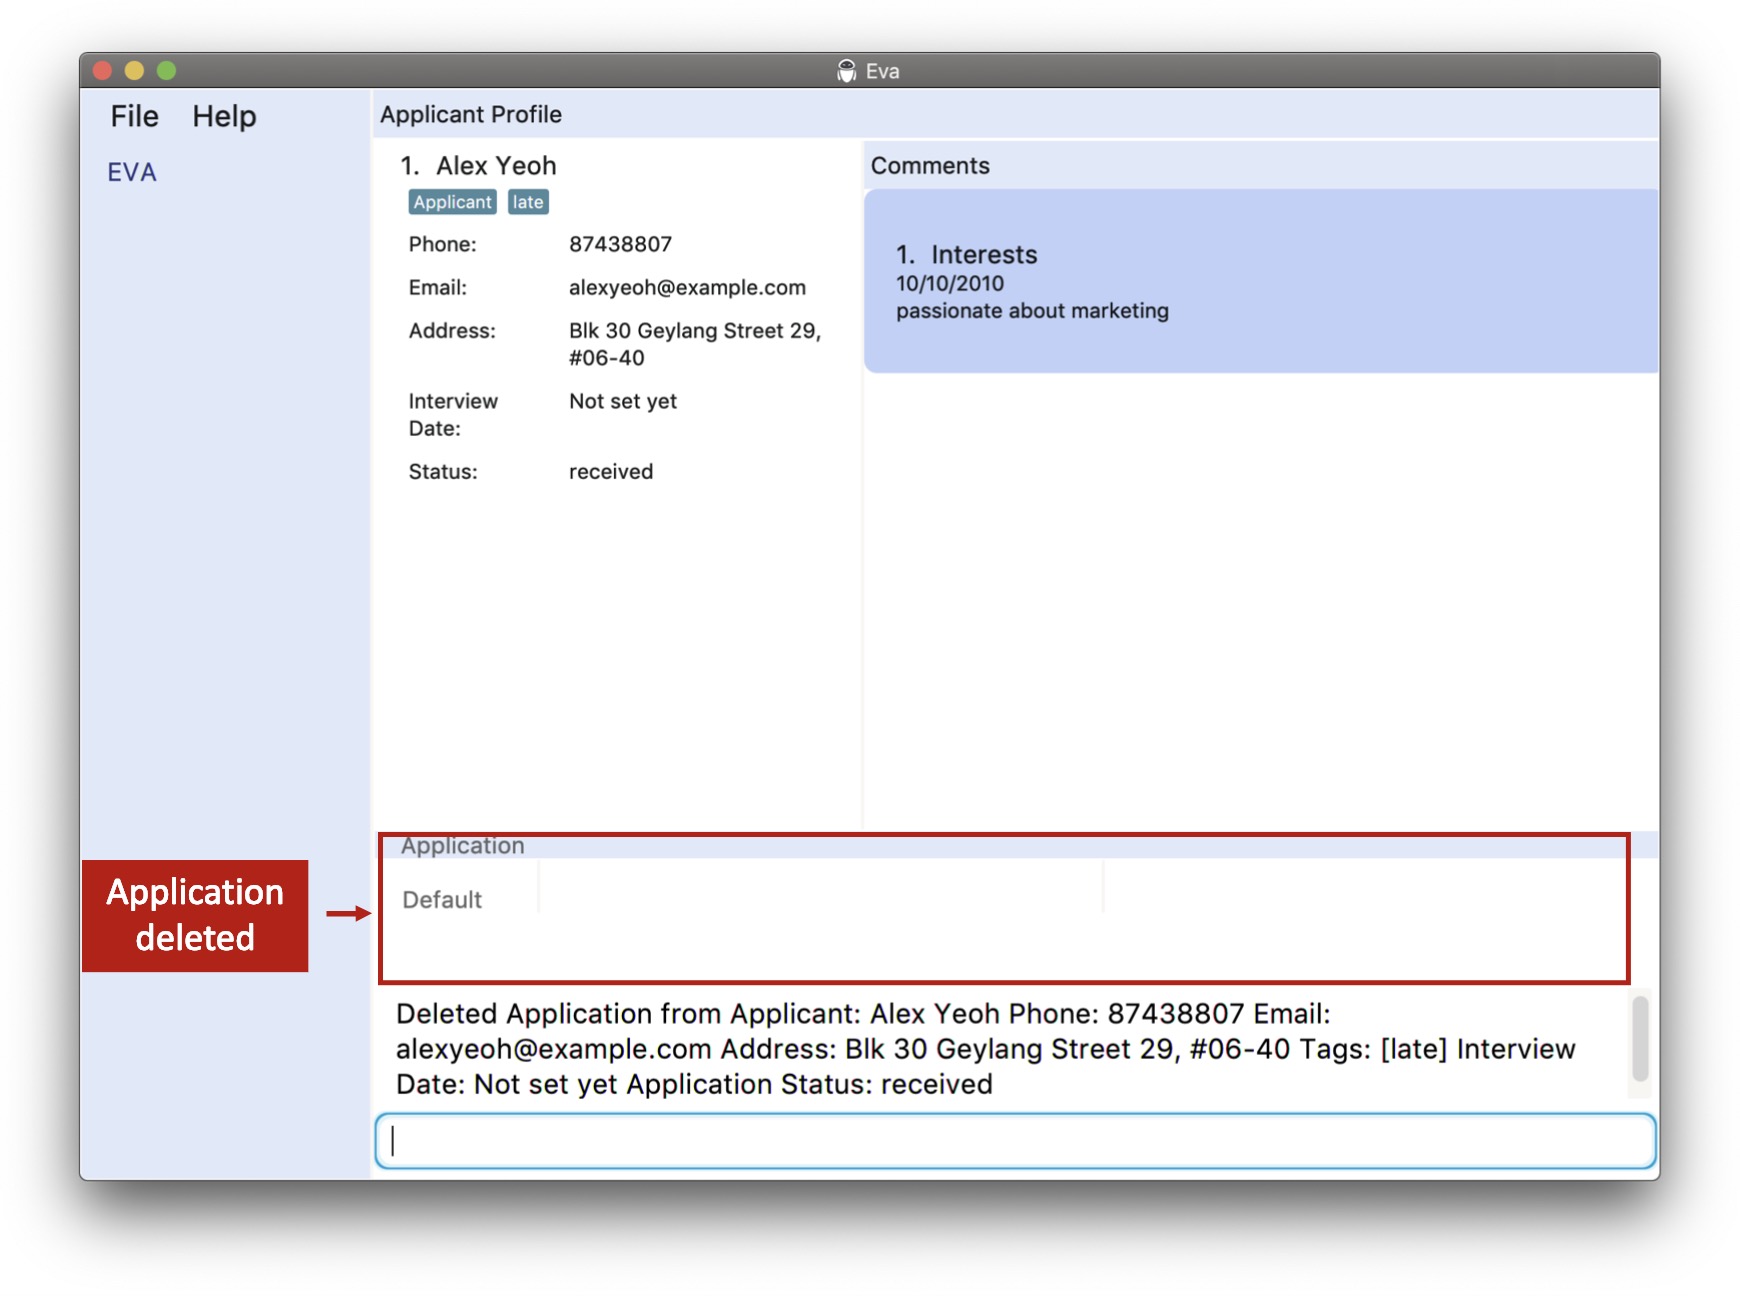
delapp 1
The image below shows what you would see after executing this example.
3.4.9. Set application status: setas
We understand that the process of hiring new talent requires multiple stages and this can be tracked using the application status. You can use this command to change the status of any applicant at any time.
![]() Note:
Note:
Application status can only be any one from the following:
- received
- processing
- accepted
- rejected
Format: setas INDEX as/NEW_APPLICATION_STATUS
Example:
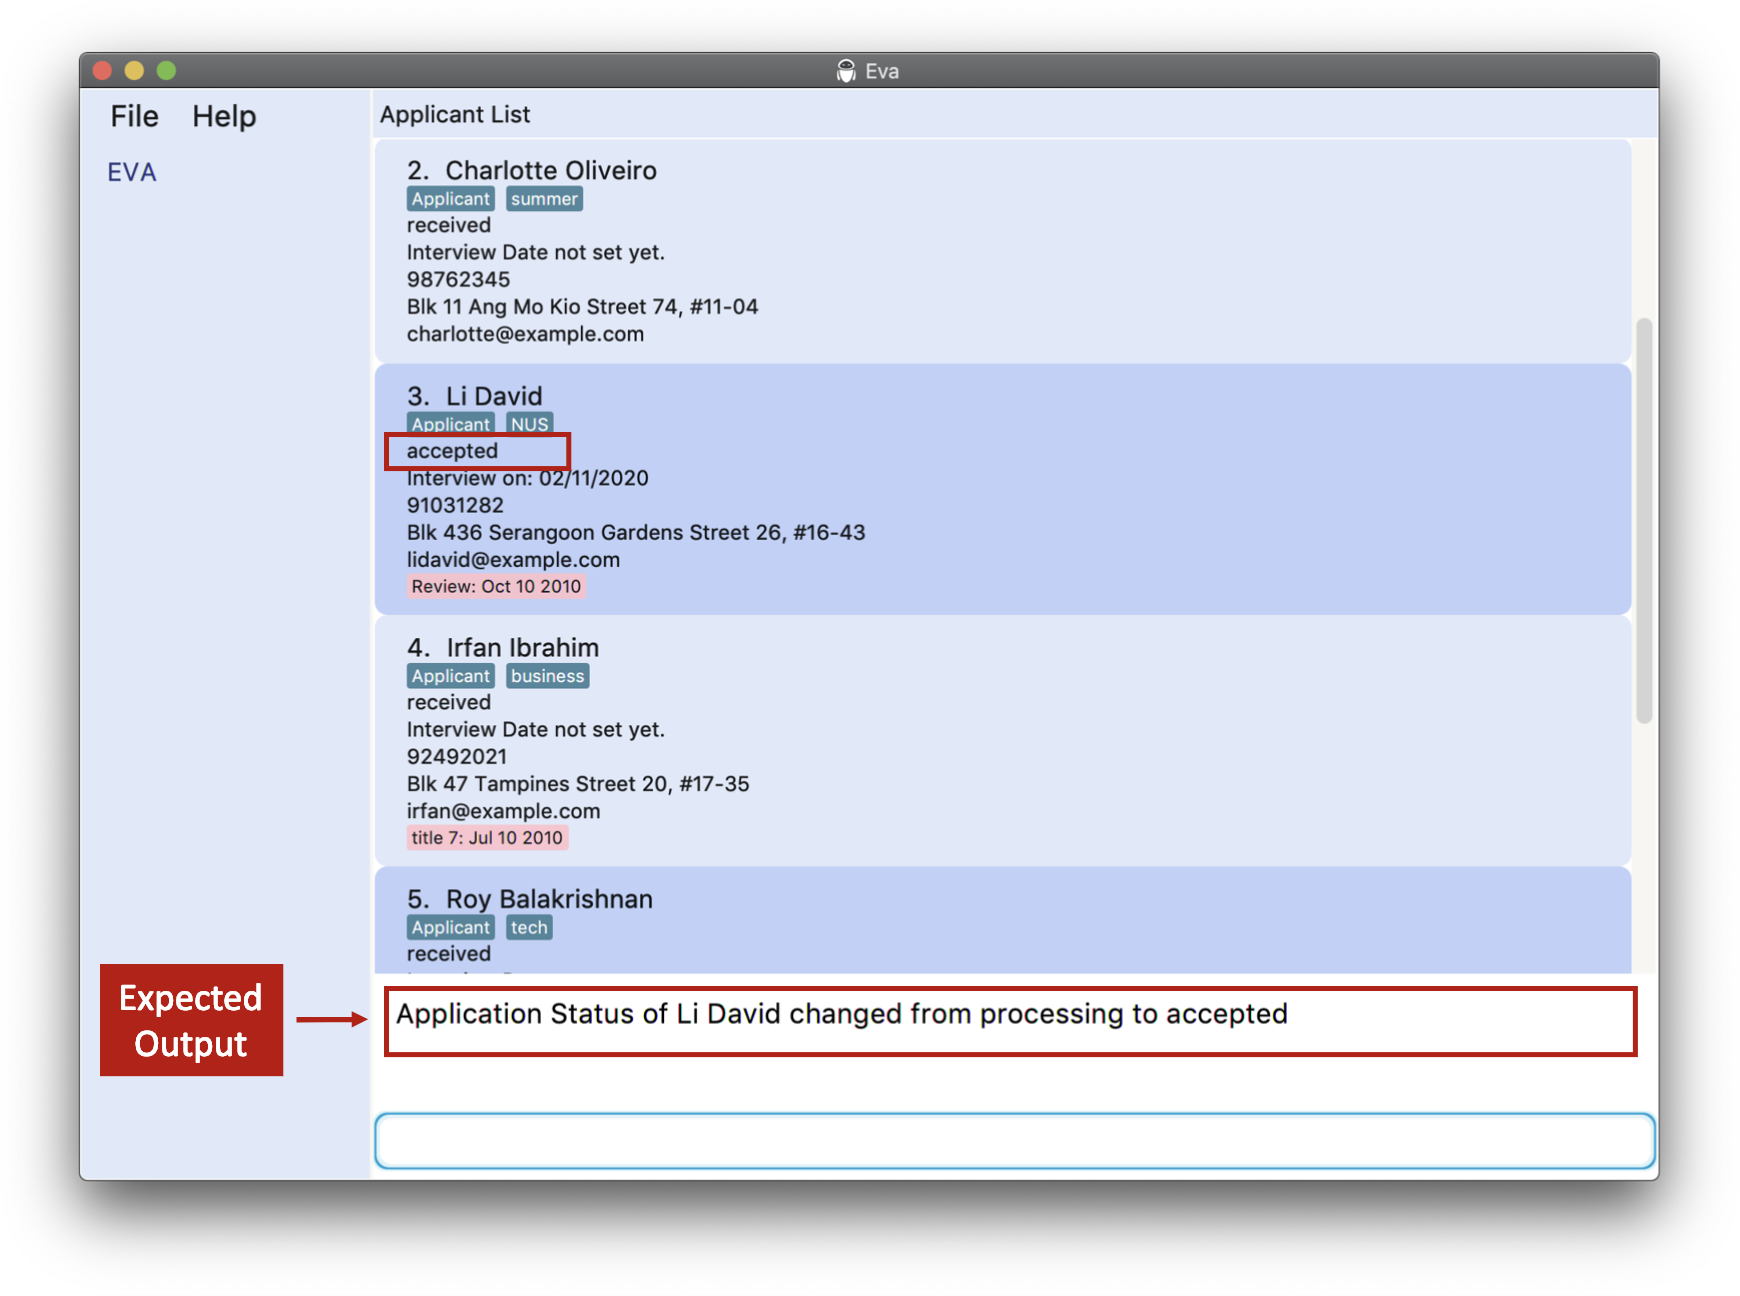
setas 1 as/receivedsetas 3 as/accepted
The image below shows what you would see after executing the last example given above. Notice that the application status of Li David has changed to accepted.
3.4.10 Clear applicant database: clear a-
In any case that you might want to remove all applicant records, you can always use this command. This command clears all applicant entries from the Eva database.
![]() Important!
Important!
Please take note that this action is irreversible.
Format: clear a-
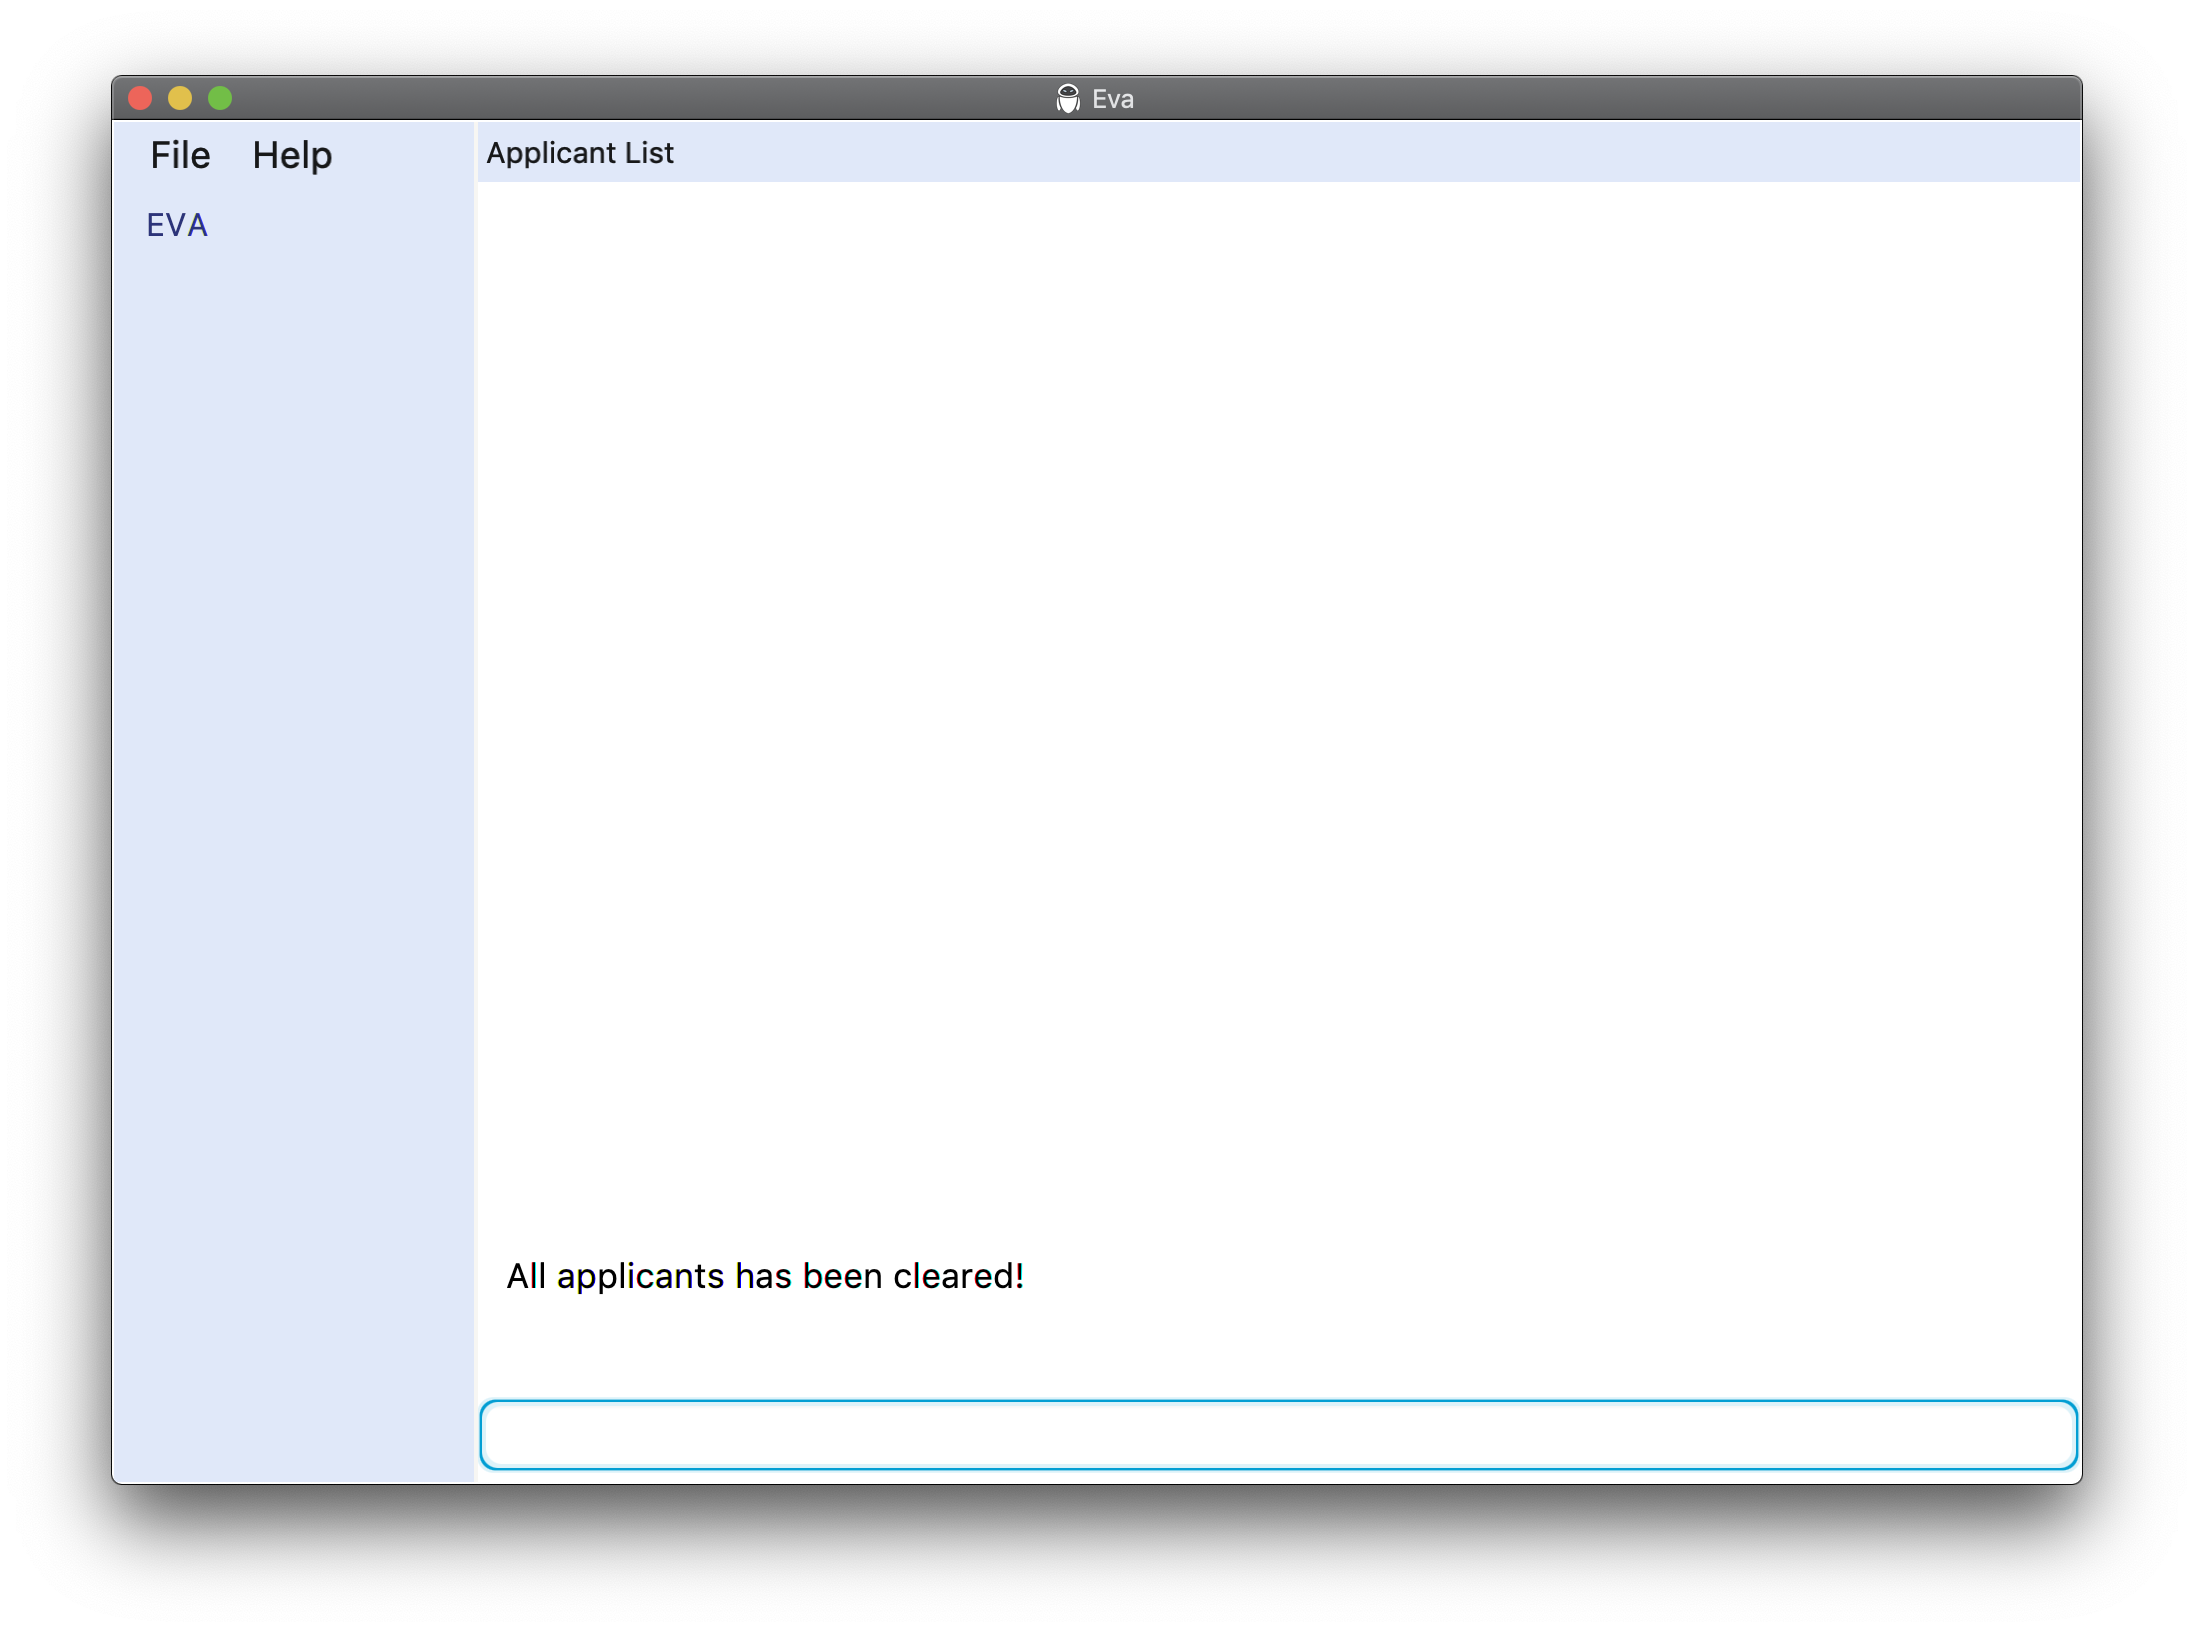
The image below shows what you would see after using this command.
Notice that there are no more records of applicants in the
Applicant List.
3.5. Comment Commands
Commands to add, delete and edit comments on staff or applicants
![]() Note:
Note:
-
Comment Commands take index reference from which type of person user is viewing.
-
If user is viewing
Staff ListorStaff Profile, comment commands takes index reference fromStaff List. -
If user is viewing
Applicant ListorApplicant Profile, comment commands takes index reference fromApplicant List. -
Comments are arranged according to date, then alphabetically if same date.
-
Comments do not support the input
|. -
Comment description can only be seen in profiles.
3.5.1 Add comment to a staff/applicant: addc
Adds a comment to a staff/applicant under eva depending on which panel you are in
Format: addc INDEX c/ ti/TITLE_OF_COMMENT d/DATE_OF_COMMENT desc/DESCRIPTION
Example:
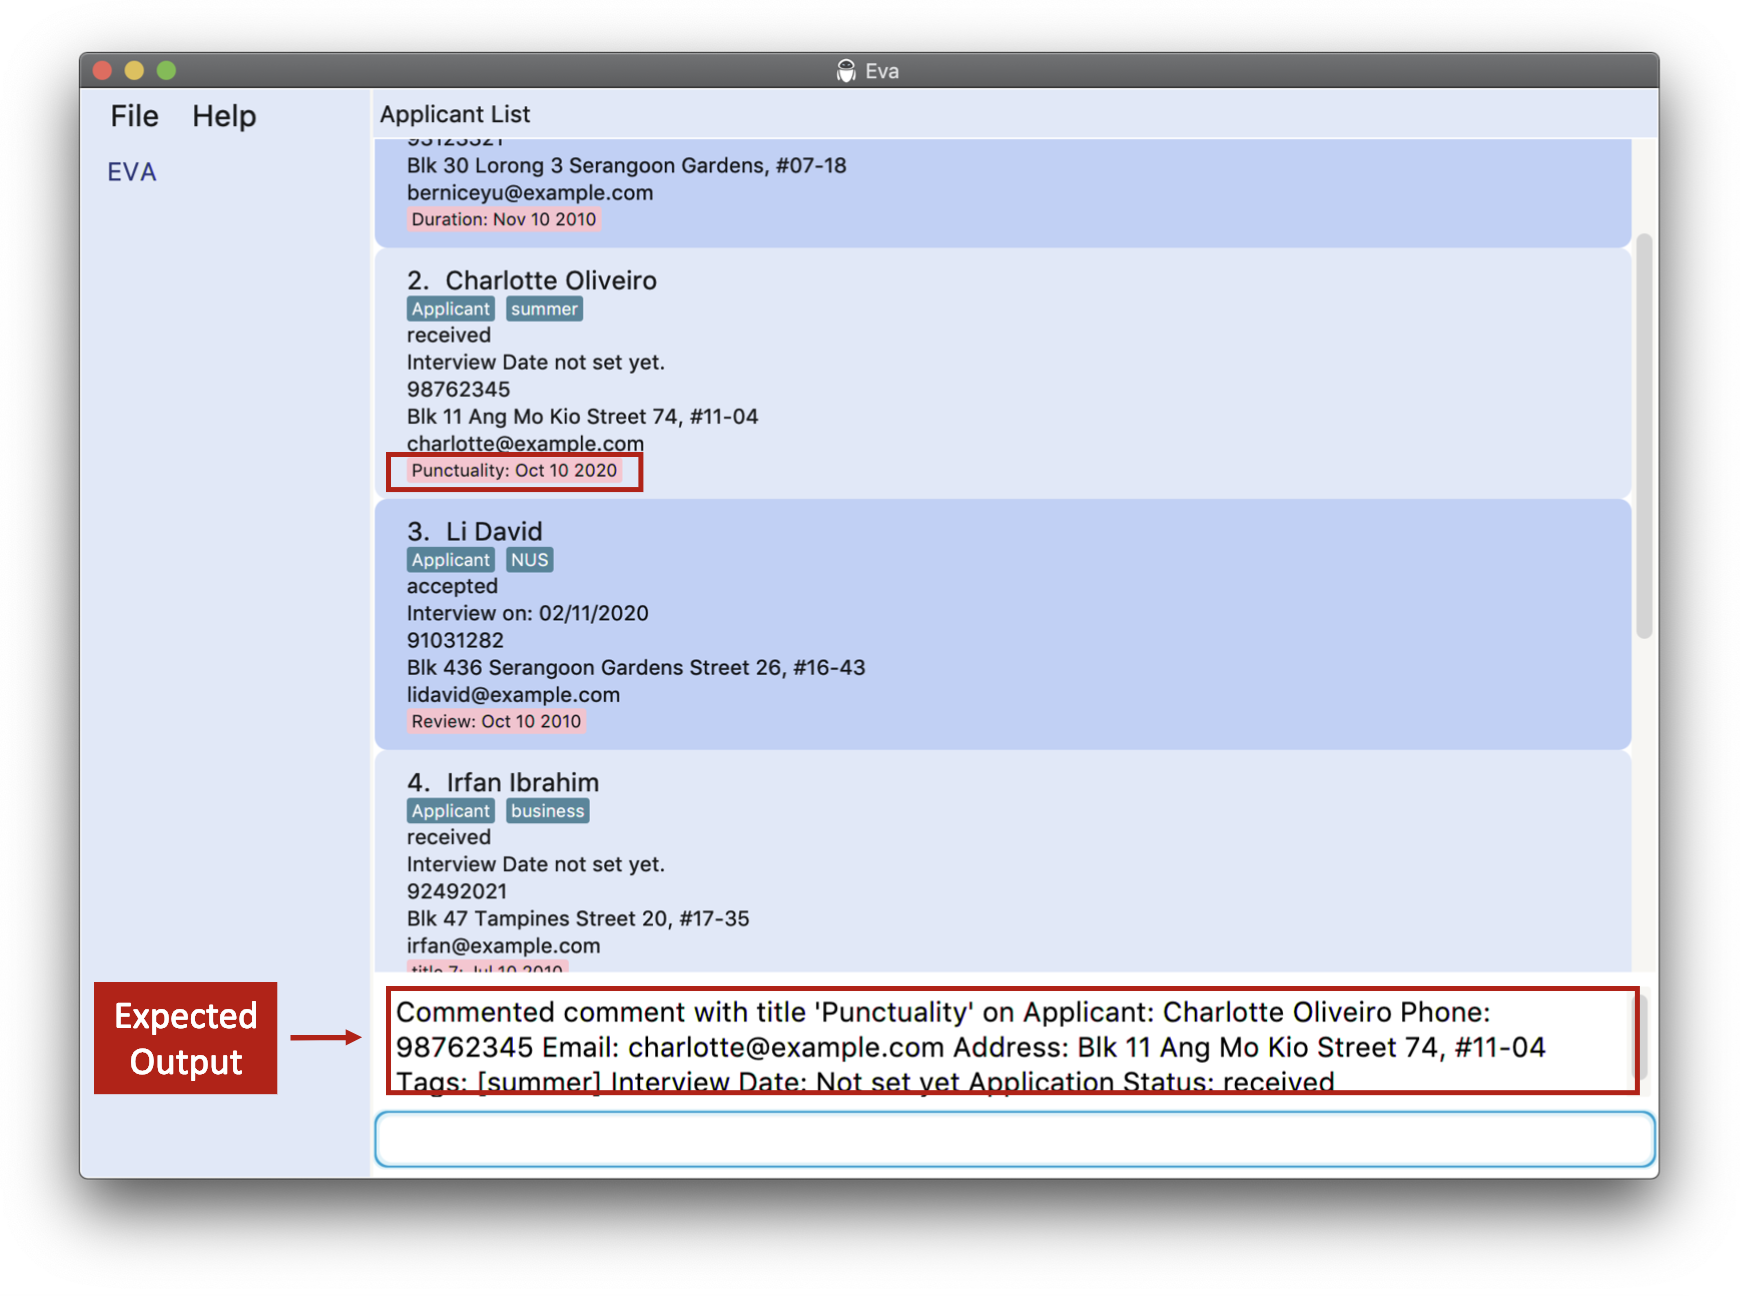
addc 1 c/ ti/Working Ethics d/10/10/2010 desc/Goodaddc 2 c/ ti/Punctuality d/10/10/2020 desc/This applicant as a problem with punctuality
The image below shows what you would see after executing the last example given above.
3.5.2 Delete comment from a staff/applicant: delc
Deletes a comment from a staff/applicant under eva depending on which panel you are in
![]() Important!
Important!
Please take note that this action is irreversible.
Format: delc INDEX c/ ti/TITLE_OF_COMMENT_TO_DELETE
Example:
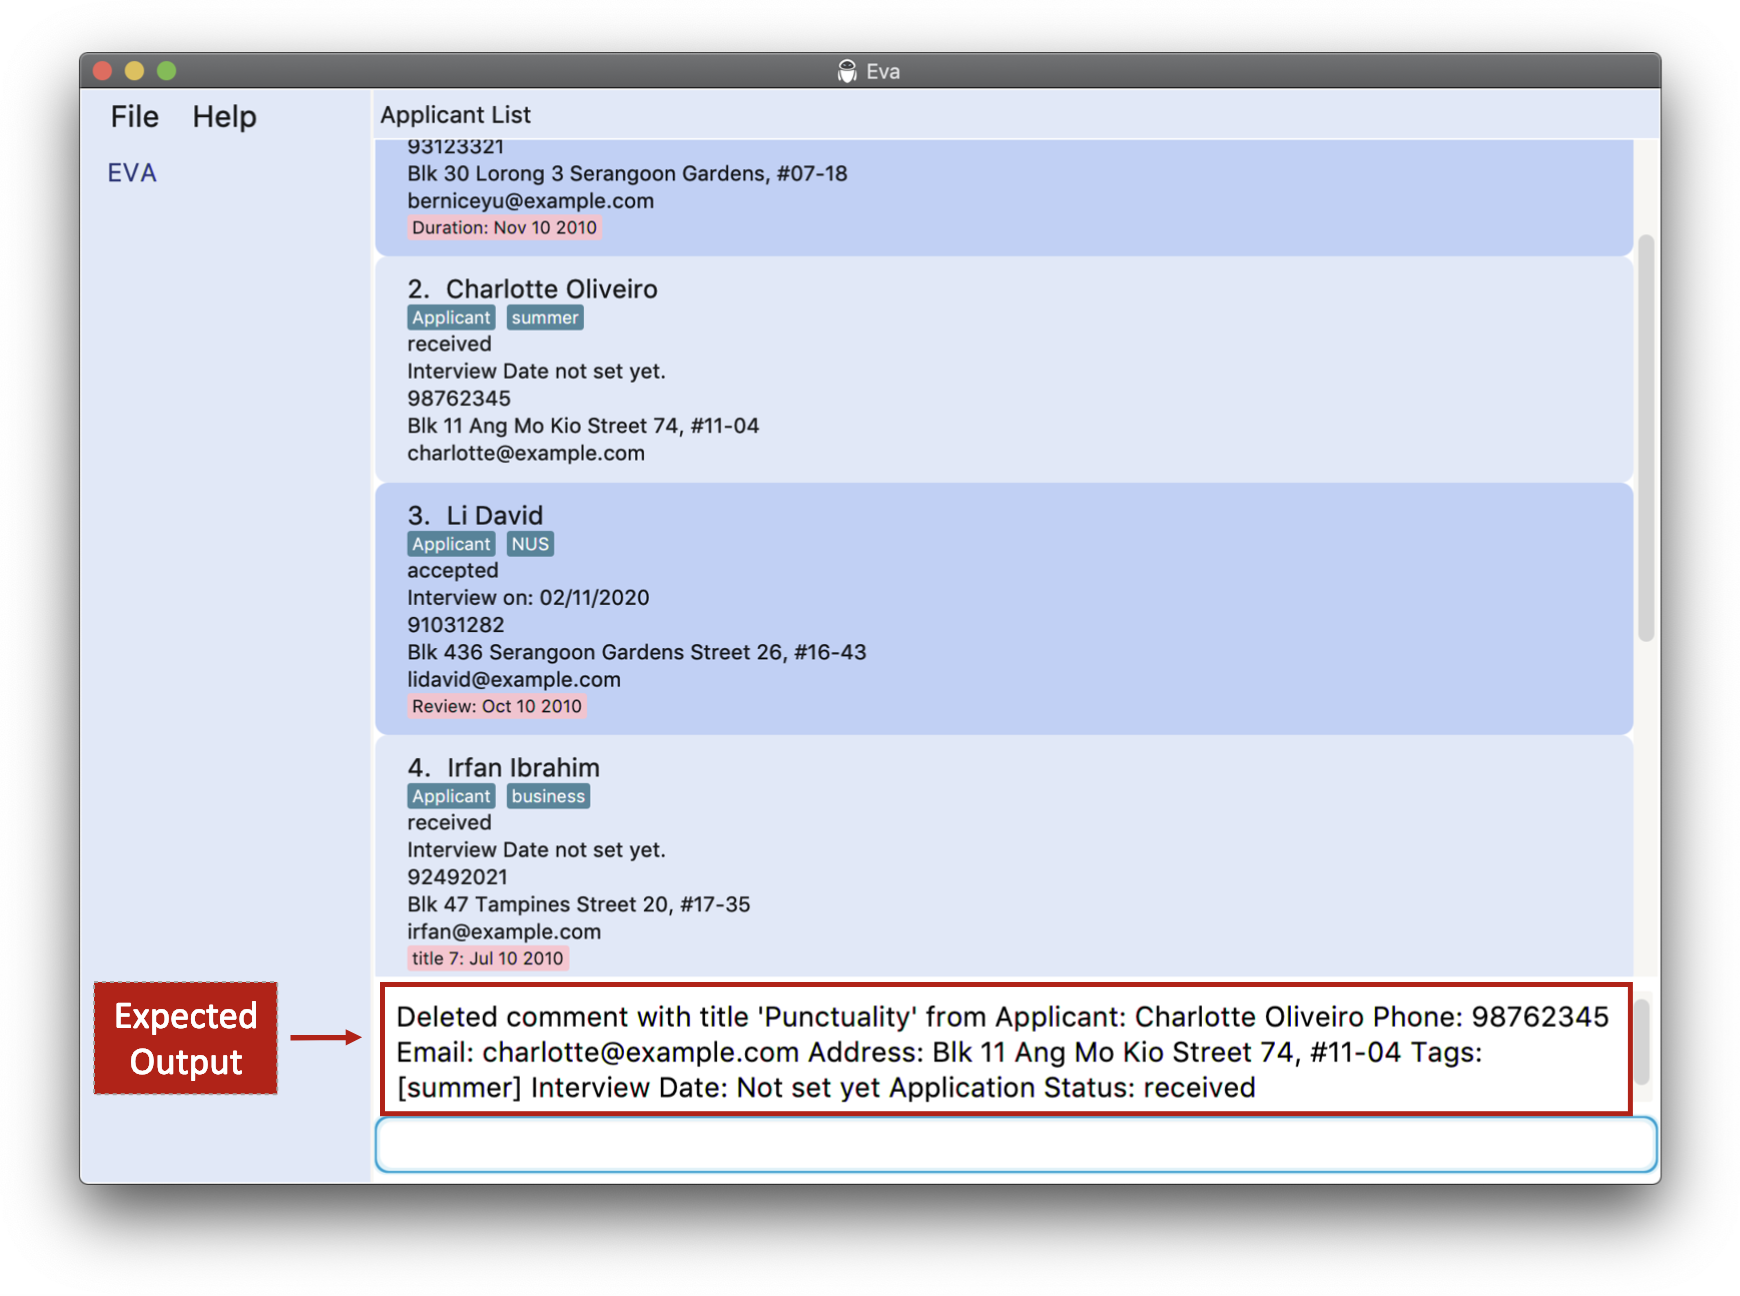
delc 1 c/ ti/Working Ethicsdelc 2 c/ ti/Punctuality
The image below shows what you would see after executing the last example given above.
3.5.3. Edit comment on a staff/applicant: editc
Edits the description of a comment on a staff/applicant.
![]() Note:
Note:
Users can only view comment descriptions on Staff Profile or Applicant Profile panels.
Format: editc INDEX c/ ti/TITLE_OF_COMMENT_TO_CHANGE d/DATE_OF_COMMENT_TO_CHANGE desc/NEW_DESCRIPTION
Example:
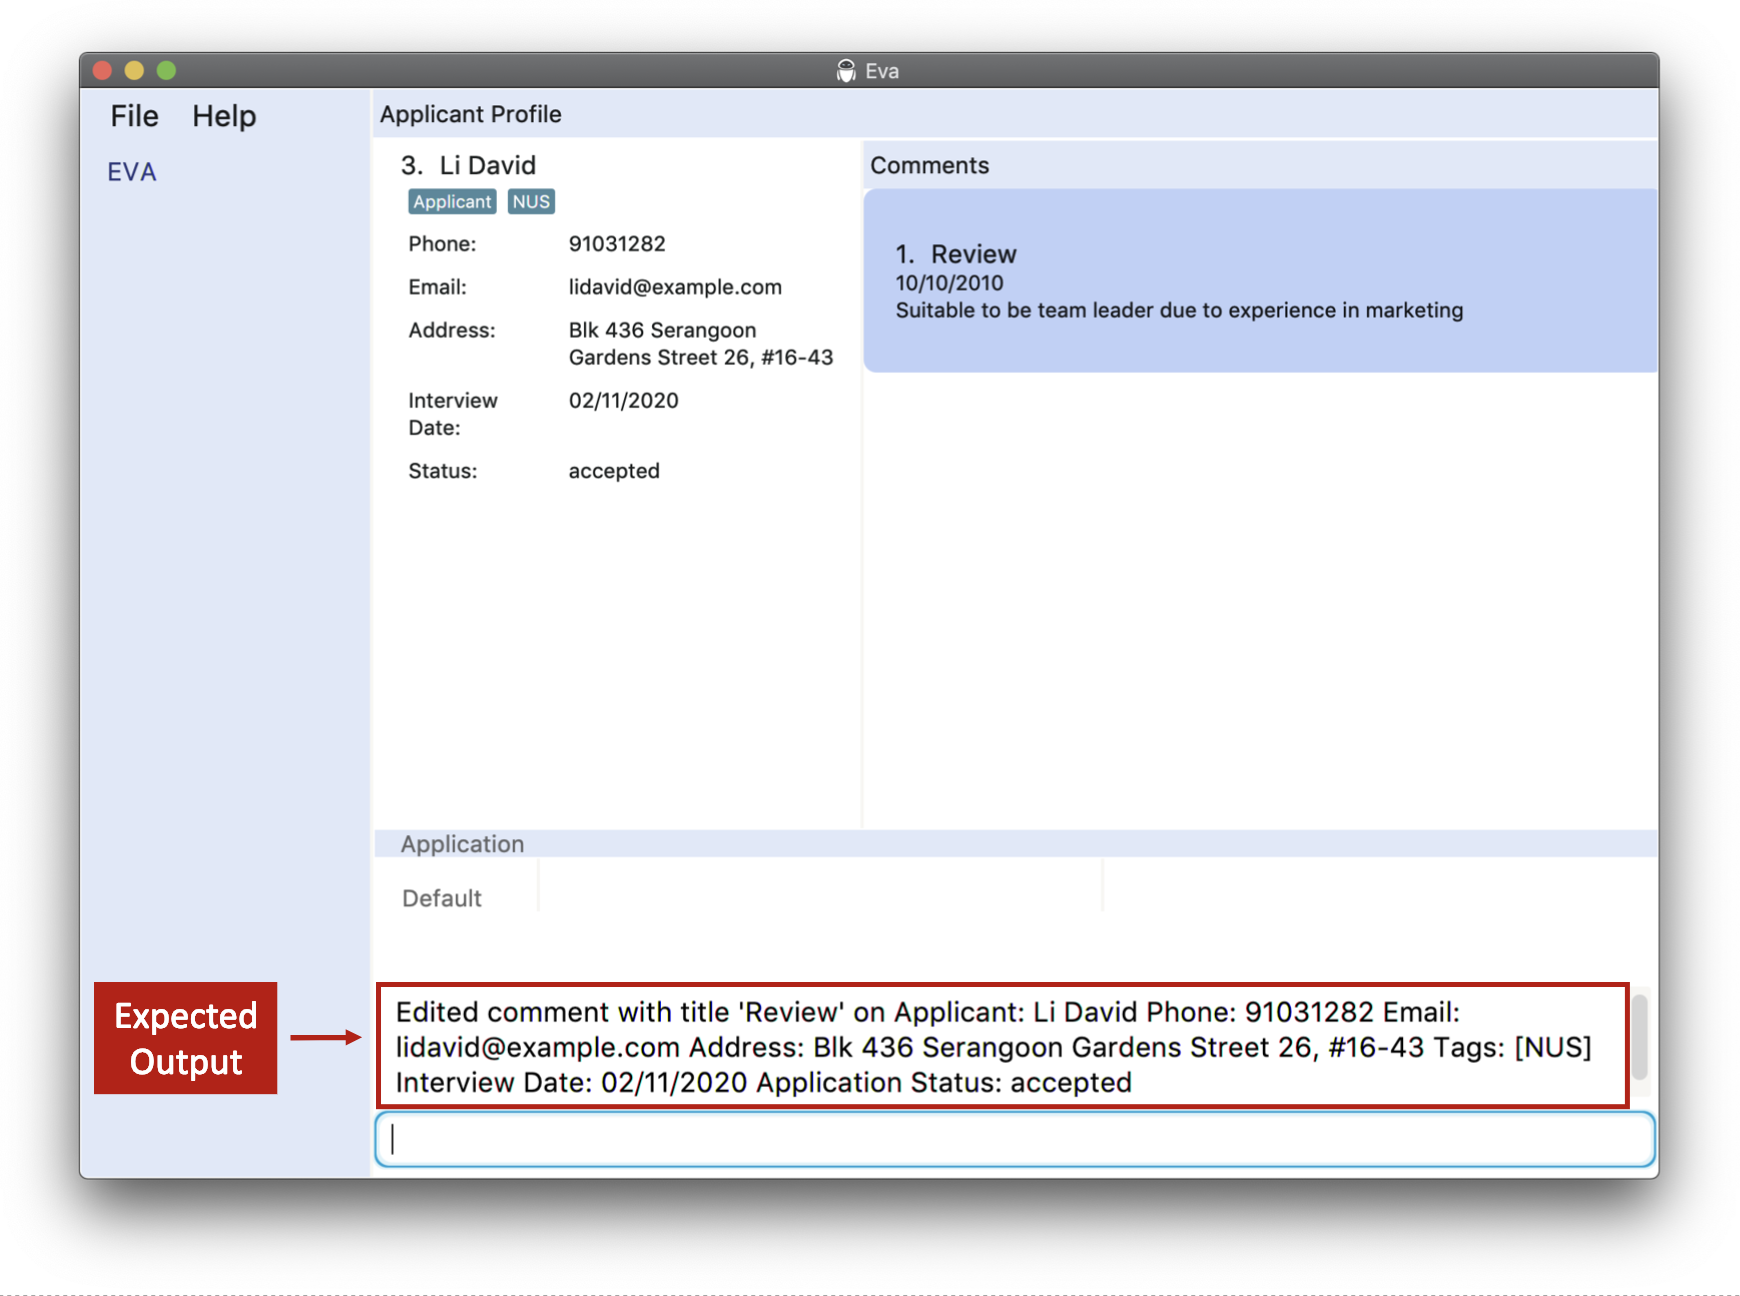
editc 1 c/ ti/Working Ethics d/10/10/2010 desc/Quite Badeditc 3 c/ti/Review d/10/10/2010 desc/Suitable to be team leader due to experience in marketing
The image below shows what you would see after executing the last example given above.
3.6. Script Engine (Experimental)
Eva provides a built-in script to execute JavaScript that can be used to extend the features of Eva.
To write a script to extend the features of Eva, please refer to Nashorn official website for supported JavaScript features, and learn how to import Java classes to extend Eva features.
![]() Important!
Important!
-
Please take note that this feature is not ready and is purely experimental.
-
While loading scripts can extend the features of Eva and simplify the workflow, a script can also break the application. Use with caution!
-
Scripts downloaded over Internet could contain malicious content and pose security threats to your computer. Use at your own risks!
3.6.1. Load a JavaScript script: load
Format: load SCRIPT_FILE_PATH
Example Scenario:
- Load a script located at
C:\Documents\script.js - Command:
load C:\Documents\script.js
4. FAQ
Q: How do I transfer my data to another Computer?
A: Install the app in the other computer and overwrite the empty data file it creates with the file that contains the data of your previous Eva home folder.
Q: How do I find the data file?
A: The data folder is automatically generated in the same directory as your Eva.jar file. The data folder should contain the data you have saved inside some .json files.
Q: I can’t run the app by double clicking! What do I do?
A: Open terminal and traverse to the directory the Eva.jar file is in. Then type the command java -jar Eva.jar.
5. Command summary
This section gives a summary of all the commands in the user guide.
5.1. System
| Action | Format, Examples |
|---|---|
| Help | help |
| Exit | exit |
| Load (experimental) | load |
5.2. Staff
| Action | Format, Examples |
|---|---|
| List Staff | list s- |
| Add Staff |
adds n/NAME p/PHONE_NUMBER e/EMAIL a/ADDRESS [t/TAG]… e.g. adds n/John Doe p/98765432 e/johnd@example.com a/John street, block 123, #01-01
|
| Find Staff |
find s- KEYWORD [MORE_KEYWORDS]e.g. find s- James Jake
|
| View |
view INDEXe.g. view 2
|
| Delete Staff |
dels INDEXe.g. dels 1
|
| Edit Staff |
edits INDEX [n/NAME] [p/PHONE_NUMBER] [e/EMAIL] [a/ADDRESS] [t/TAG]…e.g. edits 2 n/James Lee e/jameslee@example.com
|
| Add Leave |
addl INDEX l/d/DATE [d/DATE] e.g. addl 2 l/d/08/10/2020 d/10/10/2020 l/d/20/10/2020
|
| Delete Leave |
dell INDEX d/DATEe.g. dell 1 d/10/10/2020
|
| Clear Staff Database | clear s- |
5.3. Applicant
| Action | Format, Examples |
|---|---|
| List | list a- |
| Add Applicant |
adda e.g. adda n/John Doe p/98765432 e/jd@example.com a/John street, block 123, #01-01
|
| Find |
find a- KEYWORD [MORE_KEYWORDS]e.g. find a- James Jake
|
| View |
view INDEXe.g. view 2
|
| Delete Applicant |
dela e.g. dela 1
|
| Add Application |
addapp INDEX [filepath] e.g. addapp 1 C:\Users\Public\Downloads\resume.txt
|
| Delete Application |
delapp INDEX e.g. delapp 1
|
| Set AppStatus |
setas INDEX as/NEW_APPLICATION_STATUS e.g. setas 1 as/processing
|
| Clear Applicant Database | clear a- |
Appendix: Distribution of Contribution
- 1. Introduction (Royce and Nikhila)
- 2. Getting Started (Ben)
-
3. Features (Ben and Nikhila)
- 3.1. Eva GUI (Ben)
- 3.2. System Commands
-
3.3. Staff commands (Ben)
- 3.3.1. List all staff : list s- (Hou Rui)
- 3.3.2. Add a staff : adds (Nikhila)
- 3.3.3. Find a staff : find s- (Hou Rui)
- 3.3.4. View : view (Ben)
- 3.3.5. Delete a staff: dels (Royce)
- 3.3.6. Edit a staff: edits (Isaac)
- 3.3.7. Record leave taken by staff: addl (Ben)
- 3.3.8. Delete leave taken by staff: dell (Ben)
- 3.3.9. Clear staff database : clear s- (Nikhila)
-
3.4. Applicant commands
- 3.4.1. List all applicants : list a- (Hou Rui)
- 3.4.2 Add an applicant: adda (Nikhila)
- 3.4.3. Find an applicant : find a- (Hou Rui)
- 3.4.4. View : view (Ben)
- 3.4.5. Delete an applicant: dela (Nikhila)
- 3.4.6. Edit an applicant: edita (Isaac)
- 3.4.7. Add an application: addapp (Royce)
- 3.4.8. Delete an application: delapp (Royce)
- 3.4.9. Set application status: setas (Nikhila)
- 3.4.10 Clear applicant database: clear a- (Nikhila)
- 3.5. Comment Commands
- 3.6. Script Engine (Experimental) (Hou Rui)
- 4. FAQ (Ben)
- 5. Command summary (Royce)